HelloRouteSP – Part 3: Working with HelloRouteSP Tutorial
HelloRoute and the MPLS enabled version HelloRouteSP is a portable TCP/IP visualization software based on SNMP protocol that was designed to help network engineers or consultants to quickly visualize and draw logical topology and/or present other useful information about the network.
HelloRouteSP can provide assistance with:
- First or preliminary mapping of network when troubleshooting
- Documentation maintenance (topology can be saved to a file, XML support in progress)
- Troubleshooting routing and connectivity issues
Current features of HelloRouteSP (alpha version):
- SNMPv2c and SNMPv3 support (including SNMPv3 security with encryption and authentication)
- Usage of standardized MIBs from IETF (ALFA version requires only MIB-2 support from network devices)
- Automatic TCP/IP topology model calculation and visualization
- Fully interactive
HelloRouteSP uses SNMP protocol to get all the needed information from networking devices and uses IETF standardized MIBs (Management Information Base) to be compatible with network equipment from various vendors. Currently the the application uses MIB-2, IP-FORWARD, IF-MIB, MPLS-LSR, MPLS-VPN, MPLS-TE databases to analyze the network.
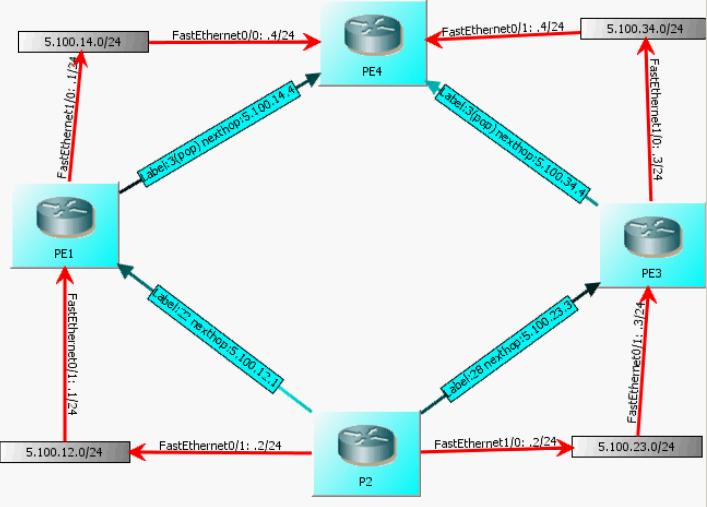
Using HelloRouteSP is quite simple. You only have to know the SNMP parameters configured for access to all the devices and have IP access to them for SNMP protocol. Once you get this basic information, visualization can get you all the information and draw the topology itself. On the next picture, you can see a basic MPLS enabled network with visualized routing to one of the routers Loopback interface.
How can you create such a nice view? For this Tutorial I, you need a few routers (also possible only with GNS3) and HelloRouteSP that you can
DOWNLOAD – HelloRouteSP
Step 1. Creating an empty router
Your first move is to place a new router to the empty topology view.
- Right click on the white space and from the menu select “Add router”
- Double left-click to add new router
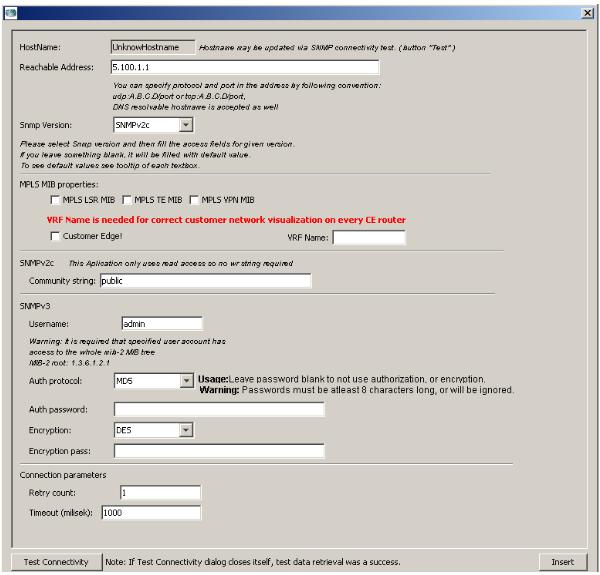
Both of these methods will get you to SNMP parameters configuration screen in which you can specify device address, SNMP version, authentication and encryption parameters and so on. On the next picture, you can see this dialog displayed.
On this dialog screen, you can specify all the SNMP parameters that can be set for a typical SNMP session. These parameters are:
- Reachable Address – You can set either IP or hostname address to be resolved. Additionally, by using tcp: or udp: before the address, you can tell HelloRoute to use tcp or udp communication. Default value is udp. Also, after the address, you can use “/” and put a port number if you want to change the default 161 port to something else.
In summary: [udp: | tcp:]address[/port] 😉 - SNMP version – HelloRouteSP is capable of using SNMPv2c or SCNMPv3.
- The next series of MIB configuration statements can be considered optional if you do not know/need to visualize MPLS technologies in you network. If you leave all the MPLS MIB options checked, HelloRouteSP will look for MPLS information in the provided routers, but if if cannot find any, it will continue without MPLS visualization.If you want MPLS visualization, and you know what you are doing, you can achieve better performance by not requesting MPLS related MIBs from routers that do not support MPLS MIBs or are customer edge routers that do not require MPLS at all.
- Customer Edge/VRF name – This will enable you to achieve multiple layers of visualization hierarchy in a MPLS VPN network where you want HelloRouteSP to visualize customer networks as well. Once you check this box, you HAVE TO specify the VRF name of the customers PE routers interface so that HelloRouteSP can connect this customer outer with the appropriate PE routers. Note that VRF name is case sensitive.
- SNMPv2 community string – Ok, we all know that SNMPv2 security is a joke with plain text passwords called “community string”, to set one for SNMPv2 session, fill this text field.
- SNMPv3 username – as the label sais, this is SNMPv3 credentials username.
- SNMPv3 Auth protocol – HelloRouteSP supports MD5 and SHA1 for authentication.
- SNMPv3 Auth password – Specifies the password to be used with the username with the Auth. protocol selected
- SNMPv3 Encryption – HelloRoute supports DES, 3DES and AES for encryption of traffic session.
- SNMPv3 Encryption password – This is where you specify encryption password for the Encryption algorithm.
- Connection Parameters/Retry Count/Timeout – HelloRoute by default uses UDP communication that is connectionless session. To achieve more stability over unstable connections, you can modify the default retry count for UDP requests and also timeout value of how long to wait for a response
Once you have all the parameters set, you can click on the “Insert” button. You have now your first router defined in the HelloRouteSP application.
Step 1. Retrieve details about the Router with HelloRouteSP
Now, let’s retrieve all the information about this router via SNMP! To do this, simply click on the “Retrieve Data and Update Topology” button. Alternativelly, you can right-click on the router and select “Update Router Model” as seen on the next picture.
Once you initiated the retrieval of information via SNMP, a dialog box similar to this one will appear.
If you are lucky and no problem occurs, the dialog changes to this state and closes automatically:
If an error occur, the dialog will not close itself, but will stay open and you can use the provided debug outputs to search for a problem.
For a successfully retrieved information from a router, the visuals of HelloRouteSP will update and in the information panel on the right side, you will see some more details regarding your added router. Examples from this information presented on the right side information tree follows:
This concludes the Tutorial I. In the next part, I will show you how to visualize basic network routing with different summarized routes.

