


HPE’s DCN / Nuage SDN – Part 3 – REST API introduction
REST-full API, the new trendy bandwagon of cloud automation and SDN due to its simplicity and universal compatibility. TI is essentially a http transfer protocol with JSON payload. And if I confused you here, please stay calm, we are still doing networking here, we will just try to use a different control mechanism than good old console or visual GUI for the sake of automation later. Also here on this site we already had one exposure to REST API use with the HP’s SDN controller both using raw curl and automation of this controller using perl web application as tutorials.
Index of article series:
- HPE’s DCN / Nuage SDN – Part 1 – Introduction and LAB Installation Tutorial
- HPE’s DCN / Nuage SDN – Part 2 – First Steps Creating Virtual/Overlay Customer Network
- HPE’s DCN / Nuage SDN – Part 3 – REST API introduction
Introduction to part #3 about REST API
I was thinking for a long time how to structure this article, and at the end I decided. That instead of showing too much boring REST API calls, I am going to show only a few elemental REST API calls of Nuage, but from different points of view. We will start with some Intro notes on reverse-engineering VSD GUI’s REST API calls and REST API documentation of Nuage/DCN, then follow-up using cURL to play with the REST API calls and after we have enough of console we switch to POSTMAN application (which is a higher level editor of REST API calls) and at the very end, I am going to show you one quick-n-dirty web application that is using REST API towards Nuage created in perl.
All these sections are really very elemental as they are all going to show you a simple quadruplet of authentication, reading, creating and deleting a simple REST API object that represents a Nuage enterprise in the VSD. Then it will be up to your specific need which path you will pursue deeper.
1. “Reverse engineering” Nuage’s VSD GUI’s REST API calls
Ok, firstly, when you have VSD installed, it’s REST API documentation is available in https://<YOUR VSD IP ADDRESS>:8443/web/docs/api/V4_0/API.html
Secondly, the important part here is that the VSD GUI that we used in previous part of this series is actually completely based on REST API. This means that every single action that you do in this GUI is actually starting a REST API call in the background. And this is what we are going to help us here with a little bit of reverse engineering these calls. You actually capture this traffic using wireshark, but the easiest way how to do this is to install a firefox “firebug“plugin.
This plugin enables you to monitor HTTP session communication that the GUI generated between your browser and the VSD REST API interface and this way you can easily learn what REST API calls are part of each of the different actions you do. For example, install firebug, open the default login page of VSD and in the firebug bottom control area select Net -> All like this:
(NOTE: You will see on the pictures below that my lab VSD is using TCP port 3389, this is a PORT-FORWARDING port as VSD is normally using port TCP 8443, so do not get confused as this is specific for my lab, your VSD should always have both VSD GUI, REST API and REST API documentation using 8443 as port!)
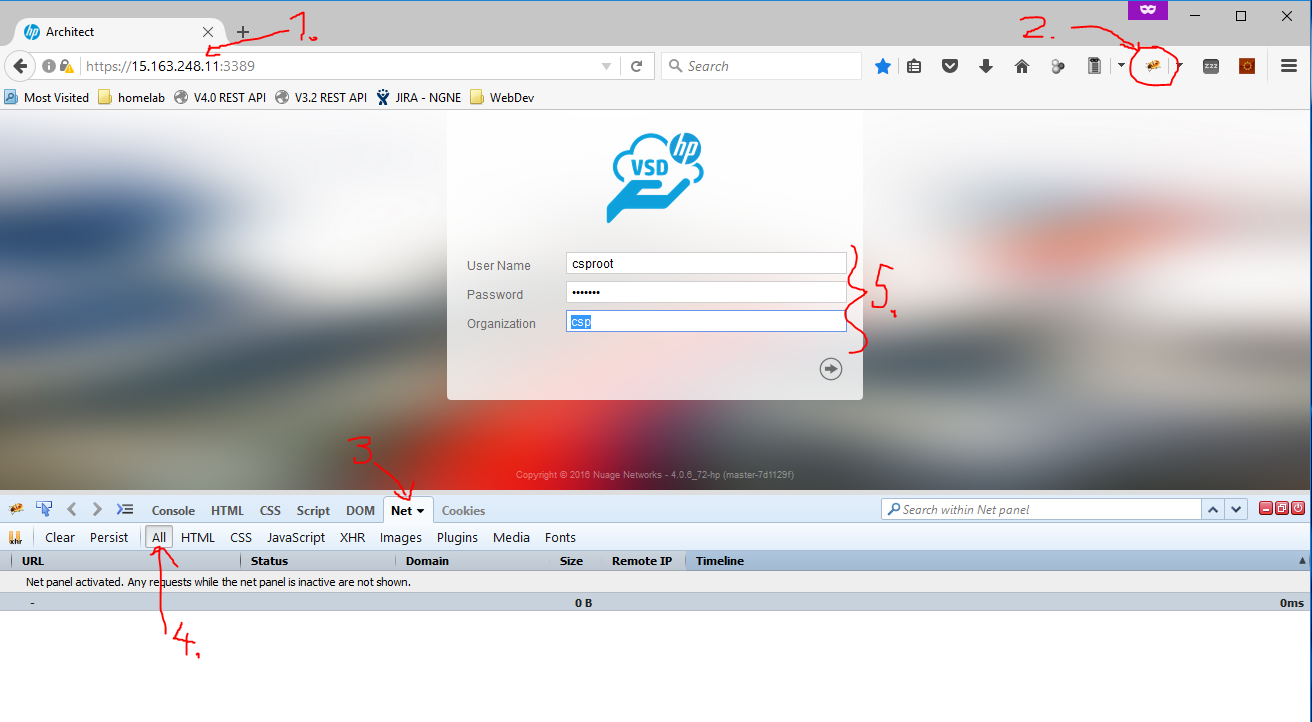
Once you enter your authentication login / password, you will notice that firebug will show you all the REST API calls that the GUI have done in the background to authenticate you and also show you the entry page.

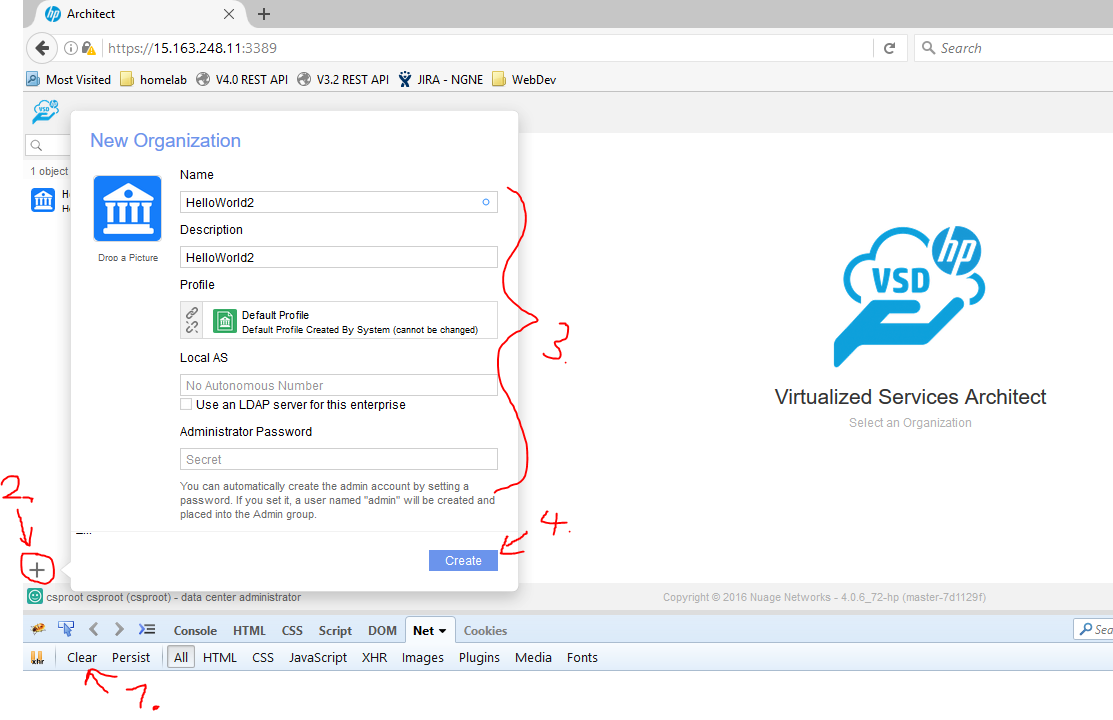
So above you can see that to login, it used /nuage/api/v4_0/me call and then loaded all licenses and enterprises overview using the /nuage/api/v4_0/licenses and /nuage/api/v4_0/enterprises REST API calls. Next, lets see how it looks when you create something, lets declare a new enterprise called “HelloWorld2”.
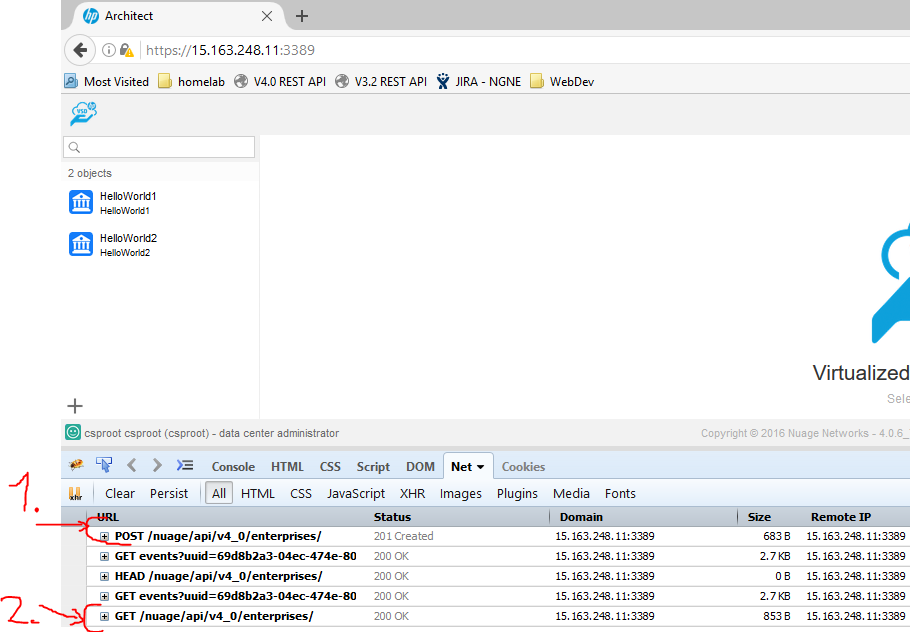
As you can see, it is the same target URL, but using POST method to send new data towards VSD and subsequent GET request to re-read if the new Enterprise was created. The last part before we jump into JSON payload is removing the HelloWorld2 enterprise.
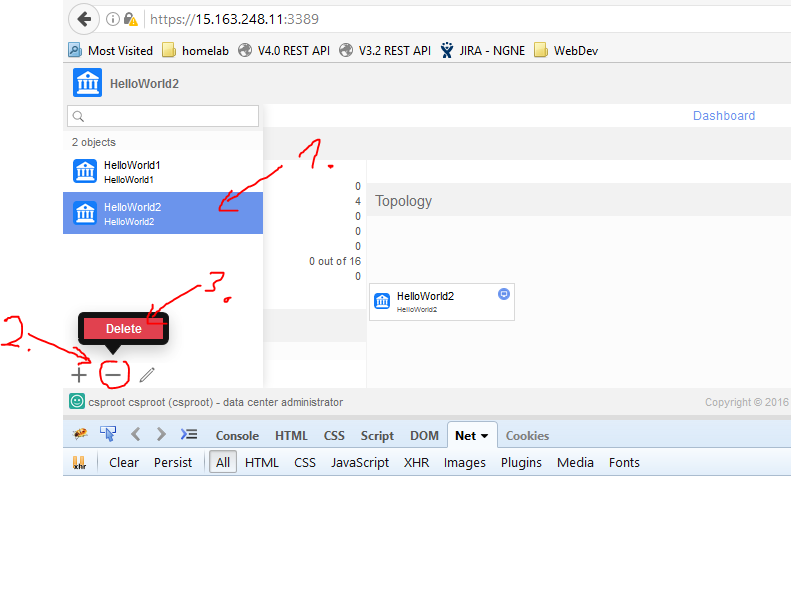
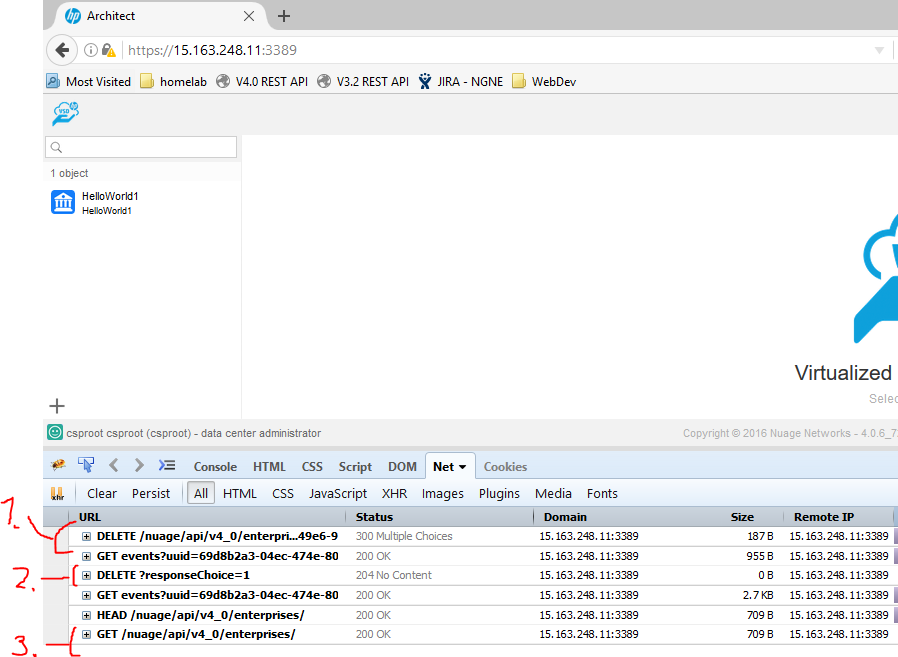
Ok, now here is the interesting part about DELETE method in HTTP, in order to know if the HTTP transaction was correct and/or the deletion itself was correct, the REST API will actually return positive 300 status call giving you visual warning in the GUI (ergo a confirmation message will pop-up on VSD), only when you select “OK” to confirm the deletion it will send a second DELETE method with the response choice and you get no response content back. Subsequently the GUI will read the enterprises list again to know if the deletion was correct.
2. Raw REST API examples using cURL
2.1 Reading enterprises list using curl
Now that you have seen how the VSD GUI is using REST API, we can do exactly the same actions using linux curl syntax. So let’s start with authentication, the whole purpose for this is to get authentication token called “APIKey”, in my case I can achieve this simply with this command :
$ curl -u csproot:csproot -k \
-X GET https://15.163.248.11:3389/nuage/api/v4_0/me \
-H "Content-Type:application/json"; \
-H "X-Nuage-Organization:csp" | python -mjson.tool
RESPONSE:
[
    {
        "APIKey": "4724ef0b-1f37-4817-941d-76a3001dc2f7",
        "APIKeyExpiry": 1482751936254,
        "ID": "8a6f0e20-a4db-4878-ad84-9cc61756cd5e",
        "avatarData": null,
        "avatarType": null,
        "elasticSearchUIAddress": null,
        "email": "csproot@CSP.com",
        "enterpriseID": "76046673-d0ea-4a67-b6af-2829952f0812",
        "enterpriseName": "CSP",
        "entityScope": null,
        "externalID": null,
        "externalId": null,
        "firstName": "csproot",
        "flowCollectionEnabled": false,
        "lastName": "csproot",
        "licenseCapabilities": [
            "ENCRYPTION_ENABLED"
        ],
        "mobileNumber": null,
        "password": null,
        "role": "CSPROOT",
        "statisticsEnabled": false,
        "userName": "csproot"
    }
]
To explain the curl command a little:
- -u csproot:csproot –> basic authentication of http protocol to give our normal username and password to Nuage
- -k –> this is disables a check of the SSL certificate, this is needed becuase in my lab I am using a self-signed certificate that VSD generated by default, if you have a real certificate from public CA in your VSD, you can remove this.
- -X GET https://15.163.248.11:3389/nuage/api/v4_0/me –> this is the HTTP standard method or command to use on the remote side, this is for use practically the URL of the REST API target
- -H “Content-Type:application/json” and -H “X-Nuage-Organization:csp” –> the “-H” parameters adds extra header key/value pairs to the HTTP request, in our case we need to specifici that the payload is a JSON and Nuage also needs to know what organization context the user authentication is coming from (similarly like your VSD GUI login you need to enter organization).
- | python -mjson.tool –> This is optional part to achieve a nice human readable structure of the JSON reply once it arrives, I am hijacking a python library as this one is available quite often, optionally you can remove this part from the command.
Or of course if you want to simly filter out the APIKey then one more “grep pipe”:
sh-4.1$ curl -u csproot:csproot -k \
-X GET https://15.163.248.11:3389/nuage/api/v4_0/me \
 -H "Content-Type:application/json"; -H "X-Nuage-Organization:csp" \
| python -mjson.tool | grep APIKey
"APIKey": "4724ef0b-1f37-4817-941d-76a3001dc2f7",
2.2 Creating new Enterprise with curl
So now we have the APIKey in its cryptic form, we can continue with displaying all the Nuage enterprises with another curl command, but this time we use the APIKey as authentication password like this, however to avoid this article to become a collection of super-large JSON texts I am going to filter using grep only the enterprise name and its ID:
sh-4.1$ curl -k -u csproot:4724ef0b-1f37-4817-941d-76a3001dc2f7 \
https://15.163.248.11:3389/nuage/api/v4_0/enterprises \
-H "Content-Type:application/json" \
-H "X-Nuage-Organization:csp" \ | python -mjson.tool \
| grep -E '"ID"'\|'"name"'
RESPONSE:
        "ID": "85789b45-a35a-4b4a-8ddd-d39e00021fa9",
        "name": "HelloWorld1",
Next, lets try to actual create a new enterprise definition by pushing back to the VSD a new enterprise called “HelloWorld2”, we simply push this as a curl command utilizing a http POST method with JSON paylod that specifies the HelloWorld2 name:
sh-4.1$ curl -k -u csproot:4724ef0b-1f37-4817-941d-76a3001dc2f7 \
-X POST https://15.163.248.11:3389/nuage/api/v4_0/enterprises \
-d '{"name":"HelloWorld2"}'  \
-H "Content-Type:application/json" \
-H "X-Nuage-Organization:csp" \
| python -mjson.tool
The important parts to remember here are:
- -x POST https://15.163.248.11:3389/nuage/api/v4_0/enterprises –> This changes the HTTP method to a POST that sends data payload to the VSD instead of reading something.
- -d ‘{“name”:”HelloWorld2″}’ –> This is a very simply JSON payload for the POST that declares a single key/value pair for the enterprise name.
OPTIONAL: Create new enterprise linked with enterprise-profile
After the above example with HelloWorld2, you might be asking what enterprise profile was linked to it, it is true that the answer is actually “none”, because we didn’t specified any profile, if you want a new enterprise linked with a profile, we need an ID of such profile first, luckily in our reverse-engineering of the VSD above, when you are in the enterprise declaration GUI, there is a REST API going for nuage/api/v4_0/enterpriseprofiles to achieve exactly that, so lets get again name and ID of all enterprise profiles like this:
sh-4.1$ curl -k -u csproot:4724ef0b-1f37-4817-941d-76a3001dc2f7 \
https://15.163.248.11:3389/nuage/api/v4_0/enterpriseprofiles \
-H "Content-Type:application/json" -H "X-Nuage-Organization:csp" | \
python -mjson.tool  | grep -E '"ID"'\|'"name"'
RESPONSE:
        "ID": "f1e5eb19-c67a-4651-90c1-3f84e23e1d36",
        "name": "Default Profile",
As you can see above, I only have the “Default Profile” in my lab, so we will create another enterprise based on this one called HelloWorld3 and the creation curl REST API will then look like this:
sh-4.1$ curl -k -u csproot:4724ef0b-1f37-4817-941d-76a3001dc2f7 \
-X POST https://15.163.248.11:3389/nuage/api/v4_0/enterprises \
-d '{"name":"HelloWorld3","enterpriseProfileID":"f1e5eb19-c67a-4651-90c1-3f84e23e1d36"}'  \
-H "Content-Type:application/json" \
-H "X-Nuage-Organization:csp"
RESPONSE:
[
    {
        "BGPEnabled": false,
        "DHCPLeaseInterval": 24,
        "ID": "ff9221e0-47f9-46c2-aa44-ae2fb42fa54f",
        "LDAPAuthorizationEnabled": false,
        "LDAPEnabled": false,
        "allowAdvancedQOSConfiguration": false,
        "allowGatewayManagement": false,
        "allowTrustedForwardingClass": false,
        "allowedForwardingClasses": [
            "H"
        ],
        "allowedForwardingMode": null,
        "associatedEnterpriseSecurityID": "d1fc0d9e-a9e1-4c04-894c-5993057b307a",
        "associatedGroupKeyEncryptionProfileID": "8873a09f-2fb9-4b50-92c4-caa4533fb3f4",
        "associatedKeyServerMonitorID": "7b5041a1-609d-45c1-bc6b-a8f1d45f0ca6",
        "avatarData": null,
        "avatarType": null,
        "children": null,
        "creationDate": 1482684131000,
        "customerID": 10009,
        "description": null,
        "dictionaryVersion": 1,
        "enableApplicationPerformanceManagement": false,
        "encryptionManagementMode": "DISABLED",
        "enterpriseProfileID": "f1e5eb19-c67a-4651-90c1-3f84e23e1d36",
        "entityScope": "ENTERPRISE",
        "externalID": null,
        "floatingIPsQuota": 16,
        "floatingIPsUsed": 0,
        "lastUpdatedBy": "8a6f0e20-a4db-4878-ad84-9cc61756cd5e",
        "lastUpdatedDate": 1482684131000,
        "localAS": null,
        "name": "HelloWorld2",
        "owner": "8a6f0e20-a4db-4878-ad84-9cc61756cd5e",
        "parentID": null,
        "parentType": null,
        "receiveMultiCastListID": "081169f6-cb2f-4c6e-8e94-b701224a5141",
        "sendMultiCastListID": "738446cc-026f-488f-9718-b13f4390857b"
    }
]
As you can see, we simply referenced the enterpriseProfileID in the JSON payload.
2.3 Deleting enterprise using curl
So now we have created a new enterprise called “HelloWorld2”, already from the creation response we know its ID (or if you didn’t noticed just read all the enterprises via REST API and mark the ID part) of ff9221e0-47f9-46c2-aa44-ae2fb42fa54f. So let’s delete it using the DELETE method, please note that here we are specifying the enterprise to be deleted by making it part of the URL and not payload:
curl -k -u csproot:4724ef0b-1f37-4817-941d-76a3001dc2f7 \
-X DELETE https://15.163.248.11:3389/nuage/api/v4_0/enterprises/ff9221e0-47f9-46c2-aa44-ae2fb42fa54f \
-H "Content-Type:application/json" -H "X-Nuage-Organization:csp" \
| python -mjson.tool
However the response is not as simple as in previous instances, here the REST API is actually asking us for confirmation.
RESPONSE:
{
    "choices": [
        {
            "id": 1,
            "label": "OK"
        },
        {
            "id": 0,
            "label": "Cancel"
        }
    ],
    "errors": [
        {
            "descriptions": [
                {
                    "description": "Once an enterprise is deleted, it cannot be recovered. Are you sure you want to delete enterprise 'HelloWorld2'?",
                    "title": "Delete enterprise"
                }
            ],
            "property": ""
        }
    ]
}
To confirm the selection of option #1 – OK, you have to send a subsequent DELETE message by adding “?responseChoice=1” to the URL (essentially creating a PUT parameter here):
curl -k -u csproot:4724ef0b-1f37-4817-941d-76a3001dc2f7 \
-X DELETE https://15.163.248.11:3389/nuage/api/v4_0/enterprises/ff9221e0-47f9-46c2-aa44-ae2fb42fa54f/?responseChoice=1 \
-H "Content-Type:application/json" -H "X-Nuage-Organization:csp"
Hint: You can actually delete enterprise on single curl DELETE message if you use the responseChoice=1 immediately ;), there is no need to first get the choice question in advance!
3. REST API a bit nicer using Chrome’s POSTMAN
Now this part is essentially a small evolution of my own path trying to figure out what is the best way to create for myself a library of Nuage REST API calls for reference and experiments, curl is great, but it is hard to share with colleagues and function as a documentation. So at the end I started using POSTMAN, an application from the Chrome APPS environment (but practically runs standalone) that functions as a high level REST API editor and has some neat scripting capabilities to enable us to automate some Nuage REST API specifics.
I would also like to state here that I will go via these examples in a quick-n-dirty fashion to show how cool this is, but I will not bother explaining POSTMAN in detail as that is what you can find in POSTMAN Documentaiton, including a nice “GettingStarted” part.
3.1 Download my POSTMAN collection for Nuage
In the examples below I expect you to download my POSTMAN collection of REST API calls from here and a few global environment variables from here.
After you have these two files, this is how to import and what to check if import was correct:
- Import via big “Import” button in Postman both collection and global variables file from above download links
- Check that the collection “Nuage-REST-API” now exists and has five REST API calls inside
- Check if global variables exists just like on this picture
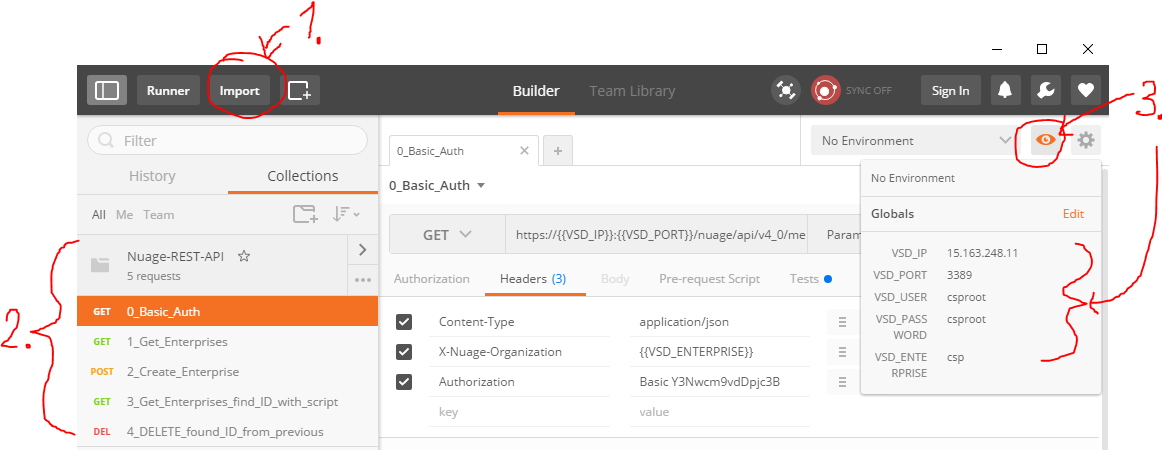
Afterwards you have to edit the global variables VSD_IP and VSD_PORT using the “edit” button and change these to your VSD IP address and port (by default the port is 8443). These changes will prepare Postman to work in your environment.
3.1 Authenticating to Nuage using POSTMAN
Unfortunatelly Postman has troubles importing authentication headers definition, so to avoid this problem we have to do something special before starting each call. On the first authentication REST API call, click on the “0_Basic_Auth” method from the imported collection, open “Authorization” tab and select “BasicAuth” from drop down, then enter {{VSD_USER}} and {{VSD_PASSWORD}} to the username and password fields and click “Update Request” button.
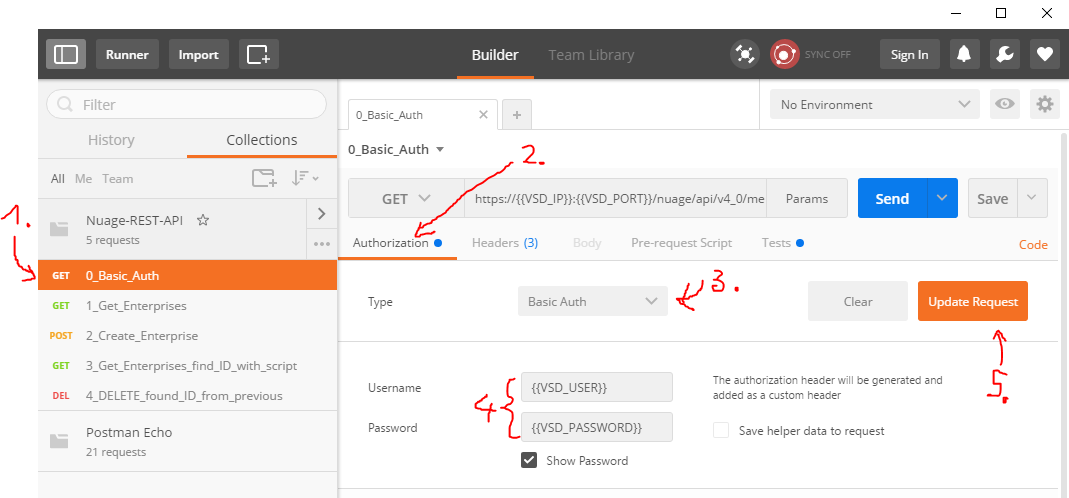
For your information the syntax of {{VARIABLE}} instructs POSTMAN to take the variable data from the global variables, so if you look at the picture above, you can see both the authenticaiton and also the URL, which is using {{VSD_IP}} and {{VSD_PORT}} to construct REST API call towards the VSD for requesting the APIKey just like in previous methods.
If everything looks correct, you can hit the “Send” button and after a moment a response JSON should appear like below:
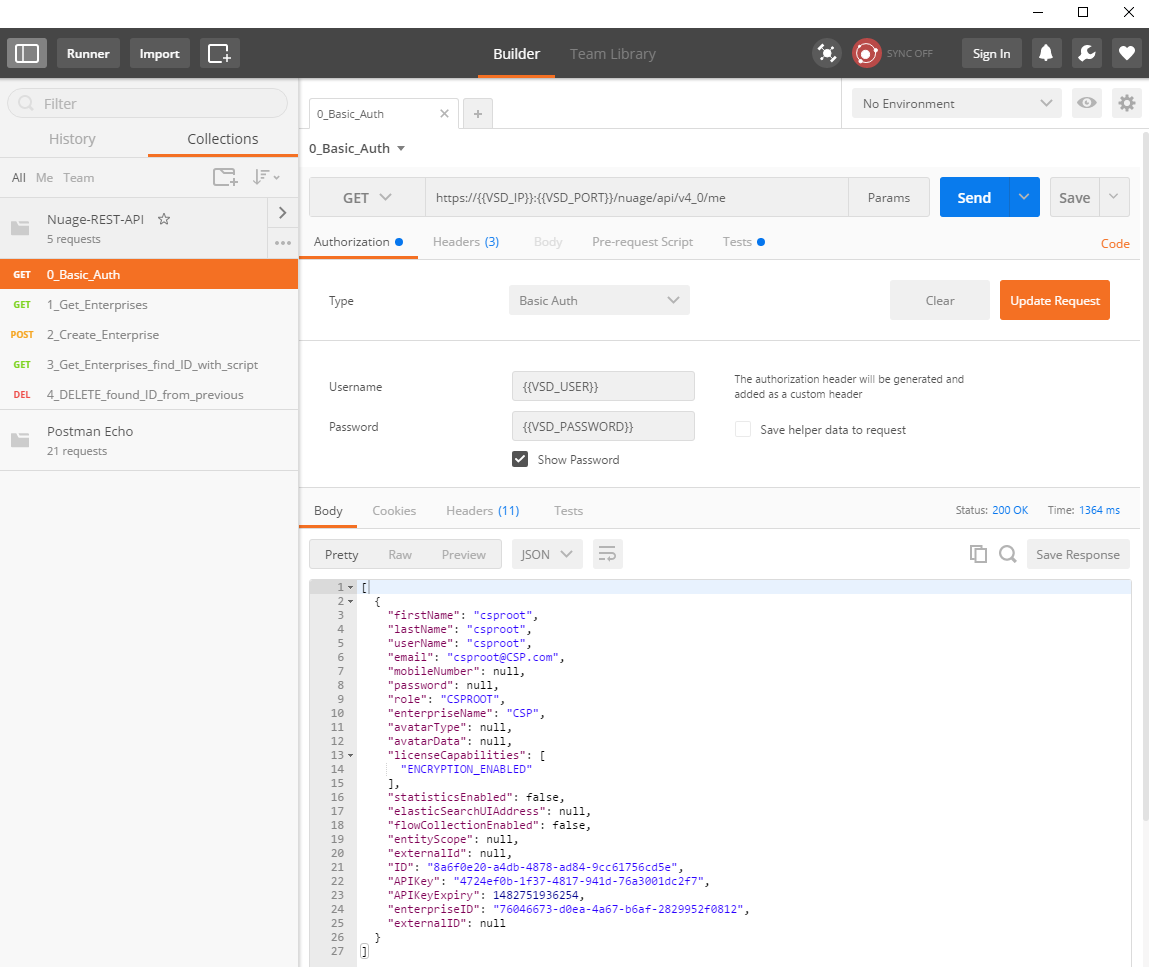
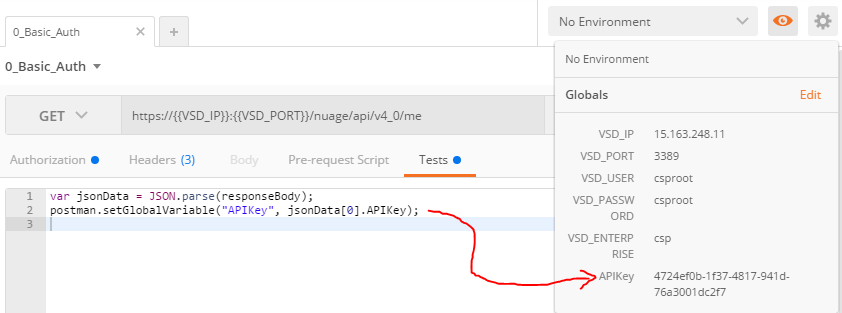
As you can see, we have received “APIKey” in the response, now it would be a good time to take this key and make it a new global variable to be used in the follow-up REST API calls. BUT I do not want to do this manually! With the power of POSTMAN you can have javascript code extracting and doing this for you! And actually if you check the global variables, it is already there because I have created such javascript and it is already part of your collection. See below as part of the “Tests” tab:
var jsonData = JSON.parse(responseBody);
postman.setGlobalVariable("APIKey", jsonData[0].APIKey);
This is a great principle and we will be using it even more in follow-up calls below.
3.2 Listing Enterprises via POSTMAN
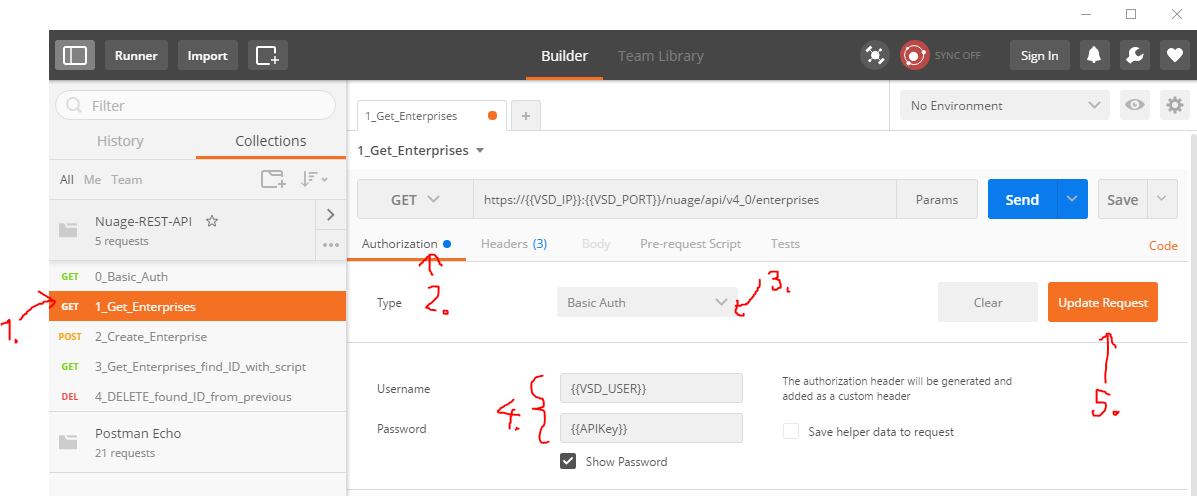
Ok, again the same drill, open “Authorization” and update the “Basic Auth” by pointing to global variable {{VSD_USER}} and {{APIKey}}, and hitting “Update Request” button like below:
Now you can again hit “Send” and you should recieve a full JSON data response with all the enterprises that exist on the VSD. Since this is something we seen several times already from curl examples, I am going to skip this in postman to save space 😉
3.3 Creating new Nuage Enterprise via POSTMAN
We will create a new enterprise called “Postman_Enterprise”, there is already a prepared REST API call called “2_Create_Enterprise” in the collection using a POST method and in this one, the important part is that it has a body payload with the name of the new enterprise, see below:
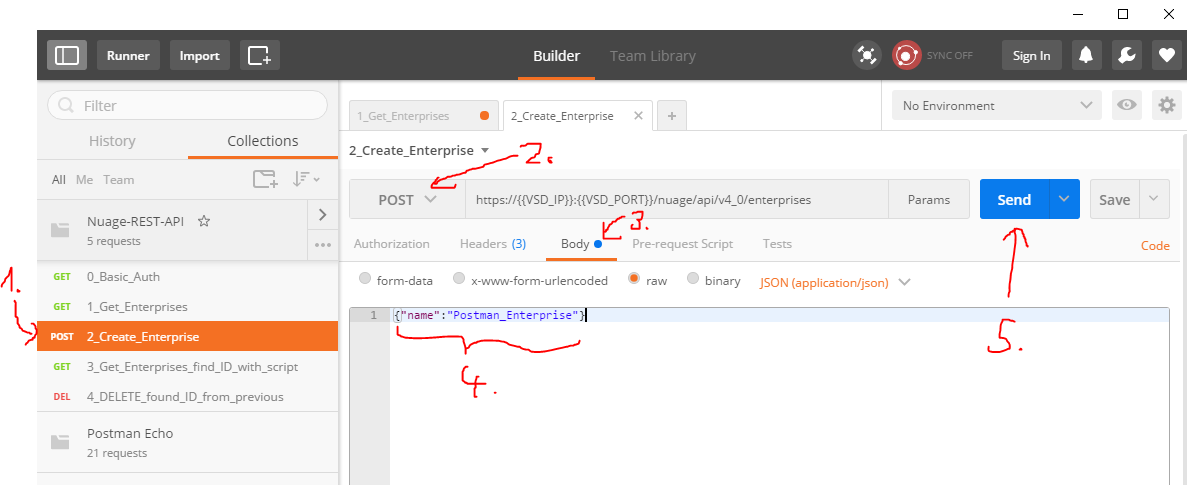
Once you hit “Send” you will receive a JSON response identical like with the GET listing of the new enterprise. You can also check VSD GUI that the new enterprise appeared.
3.4 Searching for enterprise ID using javascript
This is now call called “3_Get_Enterprises_find_ID_with_script” that is from REST API perspective identical like the enterprise listing that we already had in section 3.2, but the difference here is that using some basic javascript we can search for an ID of a specific enterprise. So imagine I need to find an ID of the enterprise “Postman_Enterprise” that we created in previous step. Manually searching the JSON is possible, but I want to again automatically find it and have POSTMAN to create a global variable automatically, I can achieve this using a strip in the “Tests” section like this:
var jsonData = JSON.parse(responseBody);
var arrayLength = jsonData.length;
for (var i = 0; i < arrayLength; i++) {
    if( jsonData[i].name === "Postman_Enterprise" ){
        postman.setGlobalVariable(jsonData[i].name, jsonData[i].ID);
    }
}

3.5 Deleting an enterprise (using ID found in 3.4)
This last example is again very straightforward because the call “4_DELETE_found_ID_from_previous” is already prepared to use the enterprise ID captured in previous part (3.4) and delete this enterprise without a confirmation dialog. If you explore this call, you can notice that it is simply targeting and URL like below, and using DELETE http method:
https://{{VSD_IP}}:{{VSD_PORT}}/nuage/api/v4_0/enterprises/{{Postman_Enterprise}}/?responseChoice=1
This will directly delete the “Postman_Enterprise” enterprise from VSD on one click of the “Send” button as all the global variables are available to fill in this request completely. Also note that there will not be any response payload for this REST API call, the enterprise will simply disappear from VSD.
4. Building web application with REST API calls to Nuage
The title is a little bit critic, the practical benefit here is that with the REST API calls exposed, you can potentially build your own alternative GUI and stop using the Nuage VSD architect at all, or alternatively if you have customers of your own, and you do not want to give them full access to the VSD, you can build them a limited front-end (maybe combined with a payment/business logic). The sky is the limit. My own motivation for building an alternative web GUI is for testing purposes as I personally plan to follow-up with this application by creating a performance and limit testing application. For example I will be testing how VSD can handle thousands of enterprises, domains, networks, etc … and I really do not want to create these manually in VSD GUI.
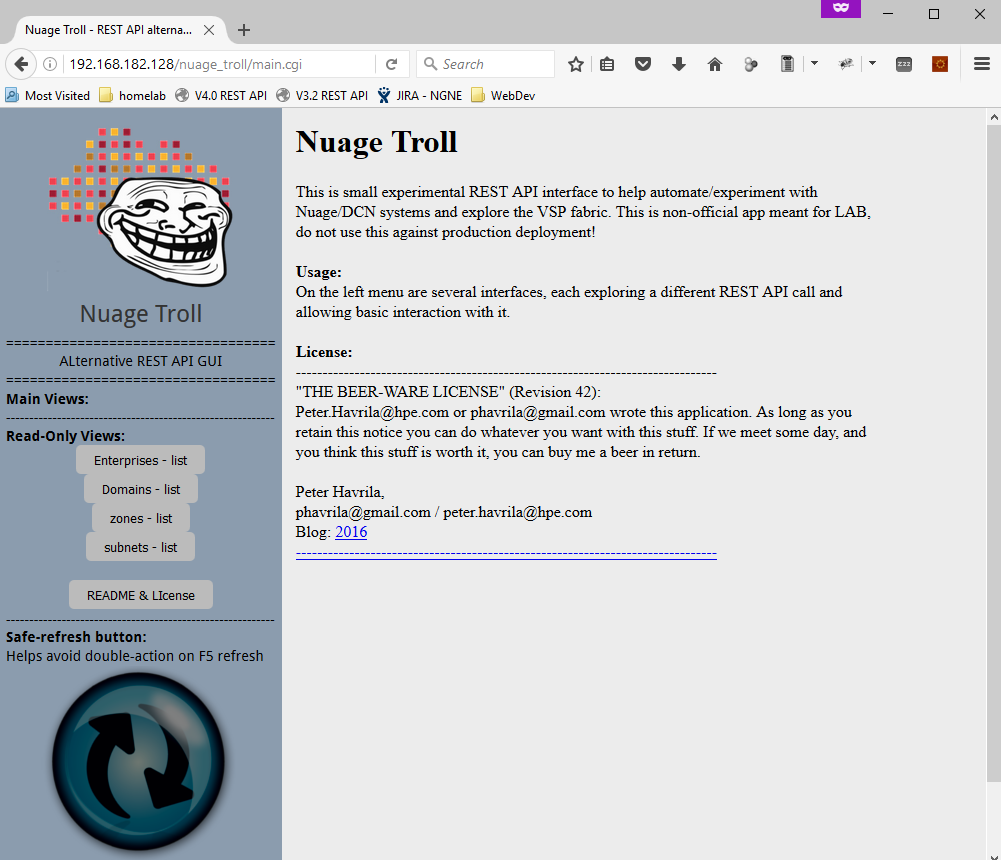
For this reason I called this application (for now as working title) Nuage Troll. It is written in perl and if you want to play with it, you can download it here and load it to apache with perl CGI module. This software is using a simple Bear License (which means that if you find this usefull, you have to buy me a beer if we ever meet in person).
4.1 Exploring “Nuage Troll” alpha version
I really have to stress here that I spent maybe 60 minutes right now for creating this quick application and regular readers will also notice that this is actually a hijacked code of NodeCutter from previous article about the SDN controller application that was also REST API based. I used the same principle of perl-CGI web interface, that runs REST API calls using perl’s JSON and LWP libraries. At this point this application enables authentication for retrieving the APIKey and then to display basic lists of enterprises, domains, zones and subnets from the VSD (yes, missing write/delete at this point). I am going to simply show you the GUI point of view as in the download above, you can actually have a look on the perl code yourself.
4.1. Login to VSD using Nuage Troll
If you downloaded the Nuage Troll from above link, deployed it on apache webserver with perl-CGI enabled, you should see the following when you access its main directory (and index.cgi inside):
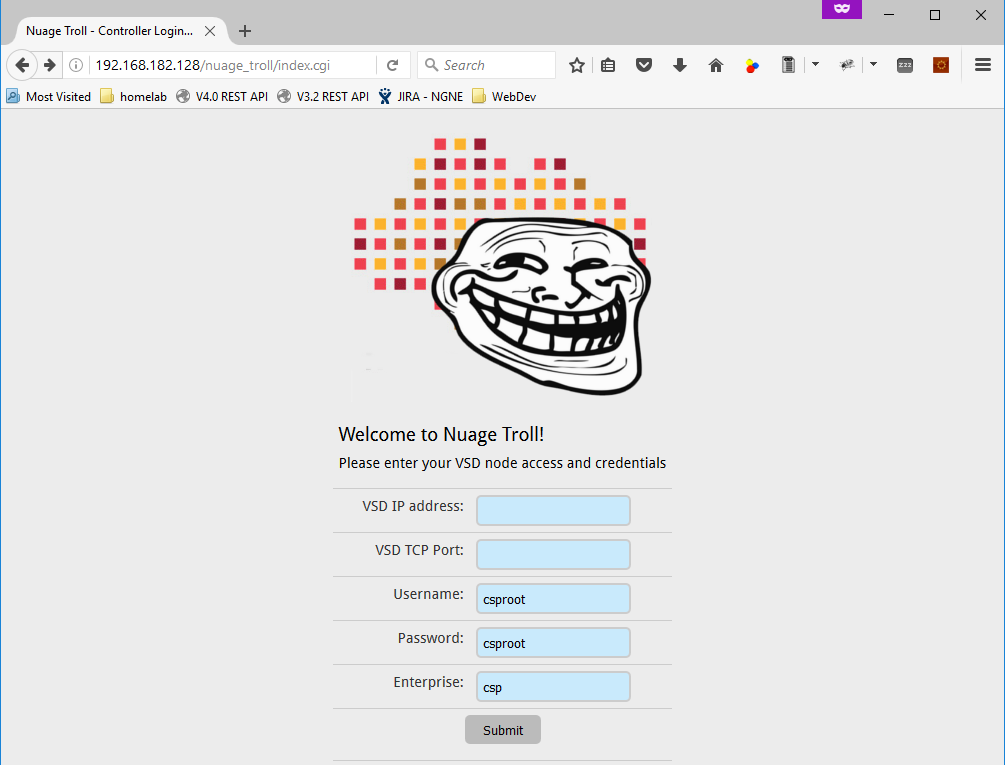
As indicated by the fields, you should put there the VSD IP and port (default is 8443) and change credentials if you are using something else than default. Then you can hit “Submit” as indicated below and you should receive APIKey if successful.

After the APIKey is retrieved, a new button to access the main menu appears, hit this button now to access main menu and this is what you should see next:
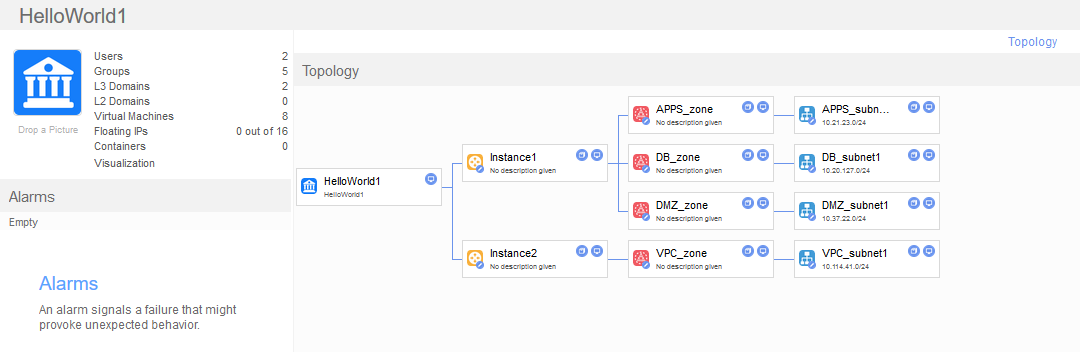
4.2 Reading enterprises/domains/zones/subnets in Nuage Troll
Right now the only capability of Nuage Troll is to read all enterprises, domains, zones and subnets as names from the VSD using REST API, more development is to be done later as needed from my work, but that will be fore next article. For now let’s say that in VSD I have to following enterprise called “HelloWorld1” with a nice network topology:
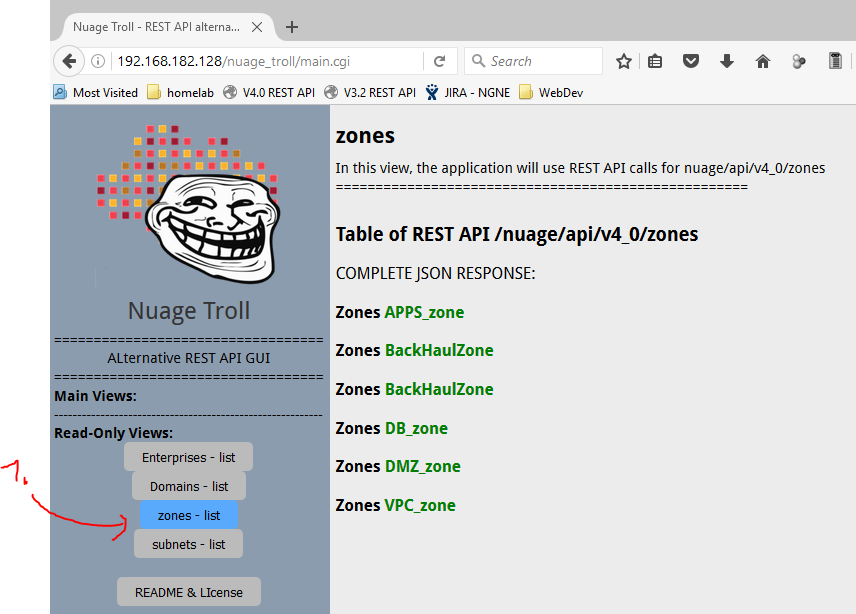
At this point as Nuage Troll is in it’s early prototype, I am not going to bother you with more screenshots, but essentially everything the system can read right now is presented as a simple list, so if you click on “zones” you will get a full list of zones in the main display area like this:
Summary
So we went through ways how to understand (e.g. reverse-engineer) the Nuage/DCN’s native VSD GUI to understand the REST API that it uses. Then I showed you how to do basic operations using both cURL and POSTMAN to interact with VSD using REST API and at the end showed you my quick-n-dirty experiment application to play with REST API of Nuage using perl-CGI based application that I called “Nuage Troll” (yep, very much working title as already after 60minutes of development it lost it’s appeal to me and will be most probably renamed soon).
The ball is not with you, if you have plans with Nuage as the Overlay orchestration solution, there will sooner or later be a need to interact with it beyound the VSD GUI, the REST API interface is “THE” interface of choice for everything, be it doing a simple scripts with cURL or developing your own front-end, I really do hope this article is a useful starting point for whatever direction you will go next.
For me this part #3 concludes this series of Nuage/DCN tutorials. I have a feeling there might be more articles about Nuage/DCN here that will be more specialized (like playing with Nuage/DCN integration with HP Networkings physical switches or further development of Nuage Troll), but right now you should have general idea what Nuage/DCN is about, its main components and interaction both using VSD GUI from part #2 and REST API from this part.
As always, thanks for reading!
Index of article series:
I am attempting to create a script to monitor VSD clusters where an automated alert would be generated if the cluster was to fail.
Do you know how this may be possible through scripting? If so can you share a link to any references that may provide insights for me pls?
Thank you,
#Thanks for the investigation!
#POC in powershell >= 6.0, save as .ps1
Param (
[String] $Endpoint = ‘https://vsd1.org:8443/nuage/api/v5_0’,
[String] $NuageUser = ‘user’, #an admin user in the enterprise needed
[String] $NuagePassword = ‘pass’,
[String] $NuageEnterprise = ‘ENTERPRISE’,
[String] $NuageDomain = ‘DOMAIN’,
[String] $NuageZone = ‘ZONE’,
[String] $NuageSubnet = ‘SUBNET’,
[String] $VMName = ‘VMHOST’,
[String] $VMMAC = ‘0A:0B:0C:0D:0D:0F’
)
#Login and API request
$pass = ConvertTo-SecureString $NuagePassword -AsPlainText -Force
$credpass = New-Object System.Management.Automation.PSCredential ($NuageUser, $pass)
$apikey = (Invoke-RestMethod -Method ‘Get’ -Uri $Endpoint’/me’ -ContentType application/json -Credential $credpass -Headers @{‘X-Nuage-Organization’ = $NuageEnterprise } -SkipCertificateCheck | ConvertFrom-Json -AsHashtable | Select-Object APIKey).Apikey
$key = ConvertTo-SecureString $apikey -AsPlainText -Force
$credkey = New-Object System.Management.Automation.PSCredential ($NuageUser, $key)
#Tree object tour
$enterprise = ((Invoke-RestMethod -Method ‘Get’ -Uri $Endpoint’/enterprises’ -ContentType application/json -Credential $credkey -Headers @{‘X-Nuage-Organization’ = $NuageEnterprise } -SkipCertificateCheck) | Select-Object -Property name, id | Where-Object { $_.name -eq $NuageEnterprise }).ID
$domain = ((Invoke-RestMethod -Method ‘Get’ -Uri $Endpoint’/enterprises/’$enterprise’/domains/’ -ContentType application/json -Credential $credkey -Headers @{‘X-Nuage-Organization’ = $NuageEnterprise } -SkipCertificateCheck) | Select-Object -Property name, id | Where-Object { $_.name -eq $NuageDomain }).ID
$zone = ((Invoke-RestMethod -Method ‘Get’ -Uri $Endpoint’/domains/’$domain’/zones’ -ContentType application/json -Credential $credkey -Headers @{‘X-Nuage-Organization’ = $NuageEnterprise } -SkipCertificateCheck) | Select-Object -Property name, id | Where-Object { $_.name -eq $NuageZone }).ID
$subnet = ((Invoke-RestMethod -Method ‘Get’ -Uri $Endpoint’/zones/’$zone’/subnets’ -ContentType application/json -Credential $credkey -Headers @{‘X-Nuage-Organization’ = $NuageEnterprise } -SkipCertificateCheck) | Select-Object -Property name, id | Where-Object { $_.name -eq $NuageSubnet }).ID
$interfaces = ((Invoke-RestMethod -Method ‘Get’ -Uri $Endpoint’/subnets/’$subnet’/vms’ -ContentType application/json -Credential $credkey -Headers @{‘X-Nuage-Organization’ = $NuageEnterprise } -SkipCertificateCheck) | Select-Object -Property name, interfaces | Where-Object { $_.name -eq $VMName }).interfaces
$vport = ($interfaces | Where-Object { $_.MAC -eq $VMMAC }).VPortID