


HP Networking/Comware NETCONF interface quick tutorial (using python’s ncclient and pyhpecw7)
So let’s learn about NETCONF, but first a bit of history and perspective. Everyone in networking business at least once heard about SNMP (Simple Network Management Protocol), which is the goto protocol for monitoring your network devices, and wondered how cool it would be if you could not only monitor your network with it, but actively configure it (sort of like “SDN wannabe”). But for that purpose the SNMP was not really useful, it supported some write operations but they were so generic and incomplete that it was not really feasible. That is where NETCONF came around 2011 as a standard (it was here before but its RFC 6241 was ratified then) and changed the game in favor of configuring any device, while not restricting vendors from declaring their own NETCONF data structures to fit their features, but lets first check the protocol first before diving into the data structures.
NETCONF is a RCP (remote procedure call) based protocol, using XML formating as payload and YAML language as data modeling (the part that explains to you what XML to send to configure something).
Contents of Article
LAB TOPOLOGY
Ok, lets get to the point, in our excercise I will be focused on the green part of my small lab, so you need at least one comware7 switch and some LLDP neighbors to follow me here. (NOTE: You might even recreate this using the H3C Comware7 simulator, but I haven’t tried that yet for NETCONF)
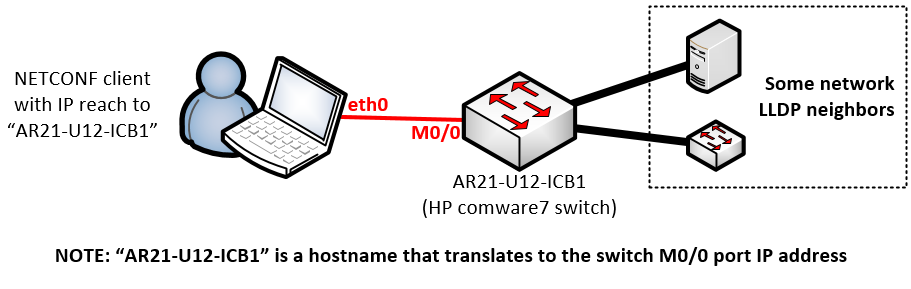
Prerequisite here is to have IP communication from your computer to the comware switches, e.g. SSH to either M0/0 interface or any other IP management interface as NETCONF is actually using SSH layer here. I have used M0/0 interfaces configured with IP addresses here.
HOW TO ENABLE NETCONF ON COMWARE7:
Simple, here is a configuration snapshot that actually enables both NETCONF over SSH layer and creates a single user “admin” with password “admin” to access it.
ssh server enable
netconf ssh server enable

local-user admin class manage
 password simple admin
 service-type telnet ssh terminal
 authorization-attribute user-role network-admin

line vty 0 15
 authentication-mode scheme
 user-role network-operator
 idle-timeout 15 0
NOTE: On comware 7 the NETCONF actually listens on TCP port 830 instead of standard SSH port like on e.g. Cisco box.
PYTHON PREREQUISITES:
I will be assuming that you have python2.7 installed already in the system that you will be using, this can work on both linux and windows, but linux is recommended (run a VM if nothing else). After you have pythin2.7 installed, you need two libraries, one comes simply from python repos using pip command, the second one we simply install from github. Simply follow these commands:
# Install ncclient
pip install ncclient

# Install HPN's pyhpecw7 library
git clone https://github.com/HPENetworking/pyhpecw7.git
cd pyhpecw7
sudo python setup.py install
Test if you have everything working by running python cli interpreter and try to import these libraries to the code like this (no error means install worked!):
[linux-system ~]$ python
Python 2.7.5 (default, Aug  4 2017, 00:39:18)
[GCC 4.8.5 20150623 (Red Hat 4.8.5-16)] on linux2
Type "help", "copyright", "credits" or "license" for more information.
>>> from pyhpecw7.comware import HPCOM7
>>> import ncclient
>>>
Part I. Exploring the NETCONF data models
Ok, so we enabled netconf, but we have absolutely no idea what to send or expect, so now we will go to the device and dump all the “capabilities” in YAML to read what we actually can and cannot do here.
NOTE ON OPTIONAL SKIPPING OF RAW XML PARTS: I will give you a choice, you can use ncclient and parse XML to get access to ALL capabilities, or if you want easy life, you can have a look on the pyhpecw7 library documentation only, which makes most of the hard work for you, but it cannot do everything yet. From my point of view if the python library can support all that you need in your project, you can skip the raw XML sections and look below only on the pyhpecw7 parts.
Step 1.1 Enter XML mode on Comware CLI
To explore the YAML definition, the simplest way is to enter the comware console and type in the “xml” command, which brings you to a special XML/NETCONF mode.
WARNING: I really recommend you try this connected using SSH session so you have option to get out of the console the “hard way” because to get out of the XML mode, you need to enter a special set of xml commands, no CTRL-z / CTRL-c will work here, so there is a chance to get stuck. You have been warned 😉
<AR21-U12-ICB1>xml <?xml version="1.0" encoding="UTF-8"?><hello xmlns="urn:ietf:params:xml:ns:netconf:base: 1.0"><capabilities><capability>urn:ietf:params:netconf:base:1.0</capability><capability> urn:ietf:params:netconf:capability:writable-running:1.0</capability><capability>urn:ietf :params:netconf:capability:notification:1.0</capability><capability>urn:ietf:params:netc onf:capability:validate:1.0</capability><capability>urn:ietf:params:netconf:capability:i nterleave:1.0</capability><capability>urn:ietf:params:netconf:capability:rollback-on-err or:1.0</capability><capability>urn:ietf:params:xml:ns:yang:ietf-netconf-monitoring?modul e=ietf-netconf-monitoring&revision=2010-10-04</capability><capability>urn:hp:params: netconf:capability:hp-netconf-ext:1.0</capability><capability>urn:hp:params:netconf:capa bility:hp-save-point::1.0</capability><capability>urn:hp:params:netconf:capability:not-n eed-top::1.0</capability><capability>urn:hp:params:netconf:capability:module-specified-n amespace:1.0</capability><capability>urn:hp:params:netconf:capability:hp-name2index:1.1< /capability></capabilities><session-id>1</session-id></hello>]]>]]>
You see that you received back a shitload of text, this is an unformatted XML output that you need to “prettify”, I recommend simply opening this XML formating web page in another window and copy&paste the output there, then it looks something like this:
<?xml version="1.0" encoding="UTF-8"?> <hello xmlns="urn:ietf:params:xml:ns:netconf:base:1.0"> <capabilities> <capability>urn:ietf:params:netconf:base:1.0</capability> <capability>urn:ietf:params:netconf:capability:writable-running:1.0</capability> <capability>urn:ietf:params:netconf:capability:notification:1.0</capability> <capability>urn:ietf:params:netconf:capability:validate:1.0</capability> <capability>urn:ietf:params:netconf:capability:interleave:1.0</capability> <capability>urn:ietf:params:netconf:capability:rollback-on-error:1.0</capability> <capability>urn:ietf:params:xml:ns:yang:ietf-netconf-monitoring?module=ietf-netconf-monitoring&revision=2010-10-04</capability> <capability>urn:hp:params:netconf:capability:hp-netconf-ext:1.0</capability> <capability>urn:hp:params:netconf:capability:hp-save-point::1.0</capability> <capability>urn:hp:params:netconf:capability:not-need-top::1.0</capability> <capability>urn:hp:params:netconf:capability:module-specified-namespace:1.0</capability> <capability>urn:hp:params:netconf:capability:hp-name2index:1.1</capability> </capabilities> <session-id>1</session-id> </hello>]]>]]>
This is a list of capabilities that my comware switch (actually a 5940 switch that I used), next we need to pull one of these out.
Step 1.2 Getting a chosen capability YARN definition
As you might realized, the ugly part of this is that you will NOT SEE WHAT YOU TYPE, so just keep copy pasting from this article or from a notepad. Copy&paste this into the XML mode:
COPY&PASTE INPUT:
<hello xmlns="urn:ietf:params:xml:ns:netconf:base:1.0">
<capabilities>
<capability>
urn:ietf:params:netconf:base:1.0
</capability>
</capabilities>
</hello>]]>]]>
<rpc message-id="m-641" xmlns="urn:ietf:params:xml:ns:netconf:base:1.0">
<get>
<filter type='subtree'>
<netconf-state xmlns='urn:ietf:params:xml:ns:yang:ietf-netconf-monitoring'>
<schemas/>
</netconf-state>
</filter>
</get>
</rpc>]]>]]>
OUTPUT:
<?xml version="1.0" encoding="UTF-8"?>
<rpc-reply
	xmlns="urn:ietf:params:xml:ns:netconf:base:1.0" message-id="m-641">
	<data>
		<netconf-state
			xmlns="urn:ietf:params:xml:ns:yang:ietf-netconf-monitoring">
			<schemas>
				<schema>
					.... ~2 ITEMS OMITTED ....
				</schema>
				<schema>
 					<identifier>ietf-netconf</identifier>
					<version>2014-10-12</version>
					<format>yang</format>
					<namespace>urn:ietf:params:xml:ns:netconf:base:1.0</namespace>
					<location>NETCONF</location>
                                </schema>
				<schema>
                                        .... ~ 30 ITEMS OMITTED ....
				</schema>
			</schemas>
		</netconf-state>
	</data></rpc-reply>]]>]]>
The output here is all the different YANG files describing different aspects of configuration that you might be interested in, so lets pick the one identifier “ietf-netconf” above and lets download it YANG schema.
<identifier>ietf-netconf</identifier>
<version>2014-10-12</version>
<format>yang</format>
<namespace>urn:ietf:params:xml:ns:netconf:base:1.0</namespace>
<location>NETCONF</location>
Take the identifier and add it to this XML template :
<rpc message-id=”101″ xmlns=”urn:ietf:params:xml:ns:netconf:base:1.0″>
<get-schema xmlns=’urn:ietf:params:xml:ns:yang:ietf-netconf-monitoring’>
<identifier>ietf-netconf</identifier>
<version>2014-10-12</version>
<format>yang</format>
</get-schema>
</rpc>]]>]]>
And use the create XML as another COPY&PASTE input. This will give you a YANG definition of the schema to the console, so make sure you are capturing text from terminal to a file because this is going to be a very large output once you copy&paste the above.
Part 1.3 Exiting the XML session in CLI
Since traditional CTRL-c is not working, you actually have to exit using this XML as input:
<rpc message-id="101" xmlns="urn:ietf:params:xml:ns:netconf:base:1.0">
<close-session/>
</rpc>]]>]]>
Part II – Using python ncclient to control netconf
Ok, lets now assume you skipped the Part I because, well lets say because you hate XML parsing in text strings (like I do), how would you jump right into using an XML/NETCONF client with HPN Comware without knowing the YANG files … well it is actually not that hard, you can start by listing the whole running configuration (e.g. the NETCONF view on “display current-configuraiton”) by running a python’s ncclient.
Step 2.1 Starting a python CLI interpreter and importing needed libraries
if you get error on anything here, just install xml and ncclient libraries using pip.
[user@linux-host ~]$ python
Python 2.7.5 (default, Aug  4 2017, 00:39:18)
[GCC 4.8.5 20150623 (Red Hat 4.8.5-16)] on linux2
Type "help", "copyright", "credits" or "license" for more information.
>>> from ncclient import manager
>>> import xml.dom.minidom
Step 2.2 downloading NETCONFs complete data view
We are still in the python CLI from previous step, and we enter the following lines ( of course update the hostname / username / password to match your LAB! ) :
with manager.connect(host='AR21-U12-ICB1',
                      port=830,
                      username='admin',
                      password='admin',
                      hostkey_verify=False,
                      allow_agent=False,
                      look_for_keys=False
                      ) as netconf_manager:
  filter = '''
                <top xmlns="http://www.hp.com/netconf/data:1.0">
                </top>
               '''
  data = netconf_manager.get(('subtree', filter))
now you should have some data variable full of XML text string, but not really nice, if you do print data, you will not be able to read it in a “human” way, so lets instead print it like this:
xmlstr = xml.dom.minidom.parseString(str(data))
pretty_xml_as_string = xmlstr.toprettyxml()
print pretty_xml_as_string;
The output printed should be something like this will be more than 50,000 lines (yes, 50k lines!), so feel free to only have a look on this as a txt file here.
NOTE: This is a complete BRAIN-DUMP of a switch, if you investigate this file, you will see details starting from simple as hostname to details like interface and cpu counters! So this is a great source of troubleshooting and if you figure-out what data you are interested in long term with a more detailed filter.
Step 2.3 filtering parts of interest (VLAN view only here)
You do not want to always download everything, so lets try to for example filter VLANs like this
(complete script file this time):
#!/bin/python

from ncclient import manager
import xml.dom.minidom
from pprint import pprint

#####################################
# STEP 2.3 script, get all VLANs info
#####################################

with manager.connect(host='AR21-U12-ICB1',
                      port=830,
                      username='admin',
                      password='admin',
                      hostkey_verify=False,
                      allow_agent=False,
                      look_for_keys=False
                      ) as netconf_manager:
  vlans_filter = '''
                  <top xmlns="http://www.hp.com/netconf/data:1.0">
                          <VLAN>
                              <VLANs>
                              </VLANs>
                          </VLAN>
                  </top>
                 '''
  data = netconf_manager.get(('subtree', vlans_filter))

# Pretty print
xmlstr = xml.dom.minidom.parseString(str(data))
pretty_xml_as_string = xmlstr.toprettyxml()
print pretty_xml_as_string;
The output of this will be something like this because I only have VLAN 1 and VLAN 600 in my system:
<?xml version="1.0" ?>
<nc:rpc-reply message-id="urn:uuid:397858b2-379d-49a6-9257-4d6183600926" xmlns:nc="urn:ietf:params:xml:ns:netconf:base:1.0">
        <nc:data>
                <top xmlns="http://www.hp.com/netconf/data:1.0">
                        <VLAN>
                                <VLANs>
                                        <VLANID>
                                                <ID>1</ID>
                                                <Description>VLAN 0001</Description>
                                                <Name>VLAN 0001</Name>
                                                <UntaggedPortList>1-21,25,29,37-44</UntaggedPortList>
                                        </VLANID>
                                        <VLANID>
                                                <ID>600</ID>
                                                <Description>VLAN 0600</Description>
                                                <Name>VLAN 0600</Name>
                                                <TaggedPortList>1-20</TaggedPortList>
                                        </VLANID>
                                </VLANs>
                        </VLAN>
                </top>
        </nc:data>
</nc:rpc-reply>
Step 2.4 Creating new VLAN using NETCONF and ncclient
Now, lets switch from downloading data to changing something, lets create a new VLAN here, we simply change the filter to contain the VLAN structure that we would like to see like this:
#!/bin/python

from ncclient import manager
import xml.dom.minidom
from pprint import pprint

##########################
# STEP 2.4 Create VLAN 999
##########################

with manager.connect(host='AR21-U12-ICB1',
                      port=830,
                      username='admin',
                      password='admin',
                      hostkey_verify=False,
                      allow_agent=False,
                      look_for_keys=False
                      ) as netconf_manager:
  vlans_change_filter = '''
                  <config xmlns="urn:ietf:params:xml:ns:netconf:base:1.0">
                     <top xmlns="http://www.hp.com/netconf/config:1.0">
                          <VLAN>
                              <VLANs>
                                <VLANID>
                                  <ID>999</ID>
                                  <Description>VLAN 0999</Description>
                                  <Name>TestingVLAN999</Name>
                                </VLANID>
                              </VLANs>
                          </VLAN>
                    </top>
                  </config>
                 '''
  data = netconf_manager.edit_config(target='running',config=vlans_change_filter,default_operation='replace');

# Pretty print
xmlstr = xml.dom.minidom.parseString(str(data))
pretty_xml_as_string = xmlstr.toprettyxml()
print pretty_xml_as_string;
The result this time will be a simple OK via XML like this:
<?xml version="1.0" ?>
<nc:rpc-reply message-id="urn:uuid:7596374d-2dae-411e-b8c1-e3b4e9a51254" xmlns:nc="urn:ietf:params:xml:ns:netconf:base:1.0">
        <nc:ok/>
</nc:rpc-reply>
Additionally a quick check on the switch shows that vlan 999 started existing afterwards:
[AR21-U12-ICB1]disp vlan 999
This VLAN does not exist.
[AR21-U12-ICB1]disp vlan 999
 VLAN ID: 999
 VLAN type: Static
 Route interface: Not configured
 Description: VLAN 0999
 Name: TestingVLAN999
 Tagged ports:   None
 Untagged ports: None
Part III. Using PyHPEcw7 library to avoid XML parsing
The great thing about PyHPEcw7, github linke here, is that it hides all the XML text parsing away from you and gives you python objects to play with. As mentioned above, the INSTALL is simply:
# Install HPN's pyhpecw7 library
git clone https://github.com/HPENetworking/pyhpecw7.git
cd pyhpecw7
sudo python setup.py install
Afterwards you should be able to import the appropriate libraries in your code, try it in the python CLI interpreter.
[user@linux-host ~]$ python
Python 2.7.5 (default, Aug  4 2017, 00:39:18)
[GCC 4.8.5 20150623 (Red Hat 4.8.5-16)] on linux2
Type "help", "copyright", "credits" or "license" for more information.
>>> from pyhpecw7.comware import HPCOM7
>>>
No error means that it works for you 🙂
Step 3.1 Connecting to your comware switch using PyHPEcw7
This is a straightforward procedure with a nice IF test afterwards to know if you are or aren’t connected.
#!/bin/python
from pyhpecw7.comware import HPCOM7

# Change this to match your switch
args = dict(host='AR21-U12-ICB1', username='admin', password='admin', port=830)

# CREATE CONNECTION
device = HPCOM7(**args)
device.open()

# Check if connected
if not device.connected:
  print("Unable to connect to target switch, exiting ... ")
  quit(1)
Step 3.2 Getting list of VLANs
To save a little space, I am going to follow using python CLI interpreter “as if” after the connection example in step 3.1, so if you are building a python script file, put these lines after the step 3.1 example.
vlan = Vlan(device, '')
vlans = vlan.get_vlan_list()
pprint.pprint(vlans)
And the result will be a list of vlans that comes from the NETCONF Interface like this:
['1', '600']
Step 3.3 Create new VLAN
Simple, create a new Vlan python object with needed parameters and have it “built()”, it will automagically appear on the comware switch.
# configure a vlan 777
vlan = Vlan(device, '777')
args = dict(name='NEW 777', descr='DESCRiption 777')
vlan.build(**args)
From the switch:
[AR21-U12-ICB1]display vlan 777
 VLAN ID: 777
 VLAN type: Static
 Route interface: Not configured
 Description: DESCRiption 777
 Name: NEWV 777
 Tagged ports: None
 Untagged ports: None
Step 3.4 Find and remove specific VLAN
Ok, we can list all, create now lets try deleting a VLAN. The variation here is that we simply find the VLAN using a number using Vlan object constructor and then run .remove method on it.
NOTE: You might now realized that I haven’t presented deleting a VLAN using native XML/ncclient in part 2, the reason is that doing this via XML is kind of problematic (or at least I found it), I either had problems doing it directly and I had to go into NETCONFs stage/commit system, which requires you taking whole configuration, doing delta changes and resubmit it all back. I honestly disliked this approach very much and decided to drop deletion part from direct XML/nclicent parts. If you really want to see this, go and have a look on the code of PyHPEcw7 how it is doing this on their github.
# Find and remove a vlan
vlan = Vlan(device, '777')

# Print found VLAN details
print("VLAN object before deletion:")
pprint.pprint(vlan.get_config())

# Remove the vlan
vlan.remove()

# Print the VLAN again to see it is deleted
print("VLAN object after deletion:")
pprint.pprint(vlan.get_config())
OUTPUT:
VLAN object before deletion:
{'descr': 'DESCRiption 777', 'name': 'NEW 777', 'vlanid': '777'}

VLAN object after deletion:
{}
Part IV. BONUS: Help, what I need to do is not part of PyHPEcw7!
Ok, this is a real problem that I actually faced trying to work with this library. For my particular problem I was in need to do some Interfaces changes, but the only way how to work with Interfaces in PyHPEcw7 is to know the interface names in advance (ergo there is no “get all interface names as list” method there) and your way to get Interface as object is something like this (using python CLI here with “device” already connected switch):
>>> from pyhpecw7.features.interface import Interface
>>> interfaceObj = Interface(device,"")
>>> interfaceObj.get_config()
{'admin': 'up', 'duplex': 'auto', 'speed': 'auto', 'description': 'TwentyGigE1/0/1 Interface', 'type': 'bridged'}
So how to get a list of Interfaces, well I had to do a little reverse engineering of the library and I this library is actually having a nice set of XML helper functions that if you know at least a little bit about NETCONF XML structure it can help you as well (because in background it is using ncclient anyway). So armed with the power of what you learned here in ALL sections, you too should be able to construct something like this using their middleware library pyhpecw7.utils.xml.lib.
Here is a code to get all Interfaces as list of Interfaces objects using XML parsing using parts of PyHPEcw7:
@staticmethod
def getInterfaces(device):
  from pyhpecw7.utils.xml.lib import *
  from pyhpecw7.features.interface import Interface
  E = data_element_maker()
  top = E.top(
      E.Ifmgr(
          E.Interfaces(
            E.Interface(
            )
          )
      )
  )
  nc_get_reply = device.get(('subtree', top))

  # Gets an array of interface names from XML
  reply_data_names = findall_in_data('Name', nc_get_reply.data_ele)

  # Constructs interfaces list for reply using only interfaces names
  interfaces = []
  for ifname in reply_data_names:
      interfaces.append(Interface(device,ifname.text))

  return interfaces
Summary
So we went via NETCONF using very raw and direct examples directly in switch CLI, then went via NETCONF client called ncclient (in python) and finally went through basic examples how to have a bit easier life using HP Networking’s PyHPEcw7 library in python to do all the XML work for you more easily. If you absorbed all in this tutorial I am actually proud of you as it took me quite some time to put all this together from various sources. So as always, stay tuned where this rabbit hole leads ….
UPDATE: Follow-up article on using NETCONF in Network Visuzalization
Actually a spoiler here is that as a follow-up on the NETCONF, here us a small article describing an idea how to visualize network topology using information gathered from NETCONF using python. Maybe this will finally get rid of at least partial manual visio map creations…. probably not yet, but one can dream! See here.
Hi Peter, thanks for the intro and links, we are currently evaluating Netconf for VSR since it is (unfortunately) the core of one of our business products 🙂 And let’s say the official documentation is a bit lacking… 🙂
Hi Vlado,
You are welcome, honestly I agree with you that this is not nicely documented when you are doing it for the first time, but hopefully now you can simply dump the whole netconf database and experiment, or what I am mostly doing now is reverse-engineering the pyhpecw7 since my task is to do EVPN configuration on comware via NETCONF …. so hopefully when that works this article will have a followup
Hi Everyone,
I followed all recommandations to use library and ansible-hpe-cw7 module but with CentOS and Debian linux ditribution I obtained the same error.
fatal: [LAB]: UNREACHABLE! => {
“changed”: false,
“msg”: “Authentication or permission failure. In some cases, you may have been able to authenticate and did not have permissions on the target directory. Consider changing the remote tmp path in ansible.cfg to a path rooted in \”/tmp\”. Failed command was: ( umask 77 && mkdir -p \”` echo $HOME/.ansible/tmp/ansible-tmp-1522997534.79-218023192653219 `\” && echo ansible-tmp-1522997534.79-218023192653219=\”` echo $HOME/.ansible/tmp/ansible-tmp-1522997534.79-218023192653219 `\” ), exited with result 1, stdout output: \r\r\n\u0000******************************************************************************\r\r\n* Copyright (c) 2010-2017 Hewlett Packard Enterprise Development LP *\r\r\n* Without the owner’s prior written consent, *\r\r\n* no decompiling or reverse-engineering shall be allowed. *\r\r\n******************************************************************************\r\r\n\r\r\n\u0000/bin/sh -c ‘( umask 77 && mkdir -p \”` echo $HOME/.ansible/tmp/ansible-tmp-1522997534.79-218023192653219 `\” && echo ansible-tmp-1522997534.79-218023192653219=\”` echo $HOME/.ansible/tmp/ansible-tmp-1522997534.79-218023192653219 `\” ) && sleep 0’\r\r\n ^\r\r\n % Unrecognized command found at ‘^’ position.\r\r\n, stderr output: OpenSSH_7.4p1, OpenSSL 1.0.2k-fips 26 Jan 2017\r\ndebug1: Reading configuration data /etc/ssh/ssh_config\r\ndebug1: /etc/ssh/ssh_config line 58: Applying options for *\r\ndebug1: auto-mux: Trying existing master\r\ndebug2: fd 3 setting O_NONBLOCK\r\ndebug2: mux_client_hello_exchange: master version 4\r\ndebug3: mux_client_forwards: request forwardings: 0 local, 0 remote\r\ndebug3: mux_client_request_session: entering\r\ndebug3: mux_client_request_alive: entering\r\ndebug3: mux_client_request_alive: done pid = 6420\r\ndebug3: mux_client_request_session: session request sent\r\ndebug1: mux_client_request_session: master session id: 2\r\ndebug3: mux_client_read_packet: read header failed: Broken pipe\r\ndebug2: Received exit status from master 1\r\n”,
I used a remote_user because with root user (default) no connection was possible.
I ask you if you used connection: netconf command or remote_user to permit connection.
I installed all packages lxml, python 2.7, paramiko, ncclient, pyhpecw7 and configured properly the switch with netconf, ssh, scp enable.
command ssh username@IP -p 830 -s netconf, work properly
Thanks in advance.
Regards.
I cannot comment here as you put Ansible into the “mix” that I haven’t tried. This tutorial is oriented to use pure python with either ncclient or the pyhpecw7 libraries.
Reading the errors you posted tthis looks like the ansible (as ansible is a server automation tool by default) is trying to execute some commands over the ssh that the comware simply doesn’t understand.
Please try following this guide only and avoid mixing with ansible. If you need to use ansible makes sure you understand what it is doing inside the SSH sessions 😉
Going into step 3.2 dont forget to add
“from pyhpecw7.features.vlan import Vlan”
Thanks, highly useful content! spent the day on figuring out how to make NETCONF work on comware devices, was quite a PITA but finally managed to do it and your article helped a lot!
Also, I found out that with the latests patches (for example with the 5130 switch) comes a huge PDF (more than 5k pages) named “HPE Comware 7 NETCONF XML API Reference” which lists a lot of things you can do. The catch is, to make it work you have to :
– add a parameter when you create your manager, as follows : “device_params={‘name’:’hpcomware’}” so that you are then able to use the specific “action” method in place of the netconf standard ones (“get”, “edit_config” etc)
– specify that you are using the http://www.hp.com/netconf/action:1.0 xmlns in your xml request instead of the regular data:1.0
– use the “action” method as stated, example : netconf_manager.action((filter))
Another thing I found while reading the ncclient source code is that using the same “device_params={‘name’:’hpcomware’}”, you can also send arbitrary cli commands with the cli_display method, for instance : netconf_manager.cli_display(“display version”)
However with this one you get basically raw text as a response so it’s not really an APIish way to do things but who knows, maybe someone will have a use for it.