


vmWare vRealize Automation (with embedded vRO) – Full Example of Custom Resources for Executing Ansible Playbooks from Blueprints
This articles exists because I spend a lot of time in the last year inside vmware vRealize Automation (vRA) that includes an embedded vRealize Orchestrator (vRO) on a undisclosed project. And the main take-away is that the documentation in certain aspects that are on the edge of new features of vRA/vRO are, to put it mildly “documented in a very chaotic way”. Additionally, what worked in vRA 8.0 – 8.2 suddenly stopped working in 8.3 and 8.4 when upgraded. So this product is not yet as stable as I would like and for this article it means that it will probably be completely outdated in a year or so. Nevertheless I wanted to put together a simple example that is working end-to-end and providing practical jump of point for building more.
And I have decided that bridging vRA/vRO with traditional Ansible playbook is a good idea for an example. Because it combines the vRAs great Infrastructure As A Code (IaaS) capabilities of using blueprints with a more infrastructure focused automation of Ansible. We will be building an abstract object on a blueprint (these types of objects are called “custom resource” because you are defining what they do, not vmware) to be chained to an Ansible playbook that does something interesting for our infrastructure when a blueprint with this object is deployed or deleted. For you the benefit might be that if you already have existing automation using Ansible (like we had in my company), you can simply replace this example with different playbooks and have an interesting library of vRA IaaS objects ready to use on blueprints, but I will leave that on you to think about in the conclusion section.
So let’s start … enjoy.
Contents of Article
- Vision
- Ansible “demo” playbook used in this example – ping.yml
- Architecture
- Part I. Declaring the “CRforAnsible” and creating empty workflows for it.
- Part II. Writing CREATE workflow for the the “CRforAnsible” object – this will run Ansible
- Part III. Writing DESTROY workflow for the “CRforAnsible” object
- Part IV. Mandatory helper function of “Find myFirstNamespace-CRforAnsible By Id” workflow in vRO
- Part V. Declare custom resource in vRA using the create/destroy wrapper workflows
- Part VI. Using CRforAnsible on blueprints
- Conclusion
Vision
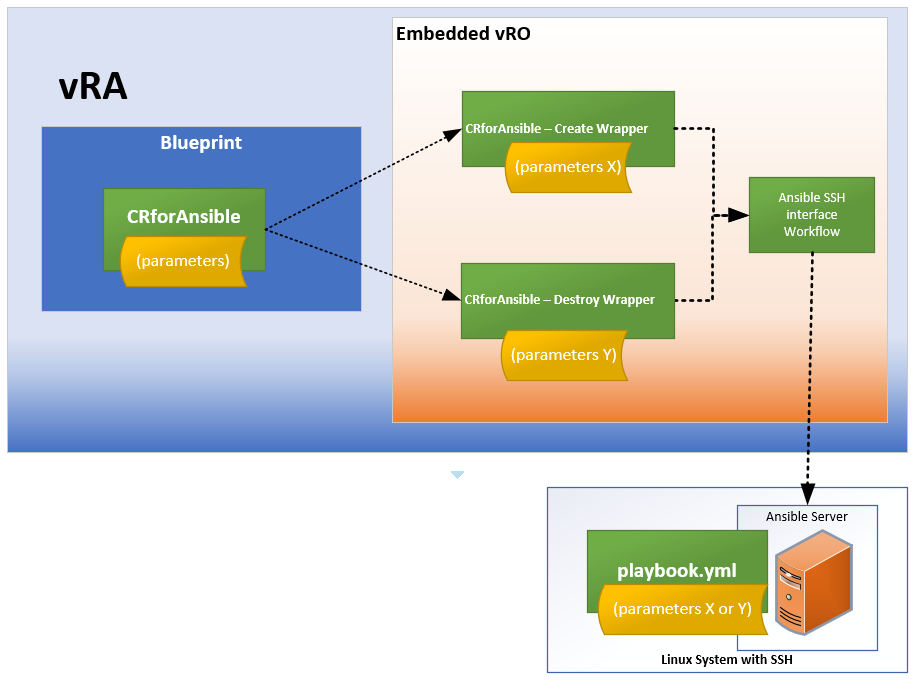
Let me start by declaring how our object should look like when finished on a blueprint. I would ideally like a simple object that can exist on a vRa blueprint, and when that blueprint is deployed and our object is to be created, it runs a vRO+Ansible function I desire. When if instance is terminated (e.g. deployed blueprint is deleted) it runs a different vRO+Ansible function on that event, etc…

As you can see above, I would love an object to be pointing to playbook in full path as /home/vrouser/ansible/playbook.yml and have two set of parameters, one for the _create event and one for _destroy event. This will allow us to pass different inputs to the same object/ansible during these events.
Lastly, I might not always want the Ansible to execute on _destroy event. Imagine that I will do some software install or domain join a VM on the _create event, but I do not necessarily need to uninstall or remove from domain a VM that is being destroyed completely. Why bother uninstalling software if the whole VM is getting deleted. So here the execute_playbook_on_destroy: true/false will be very helpful.
Ansible “demo” playbook used in this example – ping.yml
For our example in this article, I will be using a small playbook called ping.yml, that is simply able to ping any IP that is provided to it using either inventory, or using a parameter called “variable_host” or both. So for example. If I execute something like this:
$ ansible-playbook -i <IP address A>, /home/vrouser/ping.yml -e variable_host=<IP address B>
I will get a ping result from pinging both IP address A and B. Like this:
$ ansible-playbook -i 10.164.135.126, /home/vrouser/ping.yml -e variable_host=10.164.135.127

<<OMITTED TEXT>>

TASK [List successfully pinged hosts] ****
ok: [10.164.135.126] => {
"msg": "SUCCESSFULL PING"
}
skipping: [10.164.135.127]

TASK [List failed hosts] **
skipping: [10.164.135.126]
ok: [10.164.135.127] => {
"msg": "PING FAILED"
}
You can download the ping.yml file here. This will be the playbook for ansible that I will be using in this article and we will get to the point when vRA/vRO will execute this playbook with parameters from blueprint. You can of course replace with any other ansible playbook that you have.
Architecture
Next, lets look at the a how do we actually want to achieve the Ansible playbook execution. On a high level, the blueprint always executes either some function defined for the object’s creation or destruction, so we will write two functions called:
- CRforAnsible – Create Wrapper
- CRforAnsible – Destroy Wrapper
And these two vRO workflows will in the background pass appropriate parameters to a common workflow that will initiate a simple SSH connection to our Ansible server (which is just a linux machine on the network with Ansible installed and playbook.yml stored) and execute the playbook with parameters provided from the blueprint.
Part I. Declaring the “CRforAnsible” and creating empty workflows for it.
First, we need to define something that is called a “DynamicType” inside vRO. This is like an object class that the system will use to represent our custom resource (CR). So let move to the vRO and in section Library->Dynamic Types->Configuration you need to use two pre-made workflows from vmware called
- “Define Namespace” – used to declare a naming space for your CRs, so at least one must exist
- “Define Type” – here you specify your objects name, e.g. “CRforAnsible” and list of parameters you want it to hold.
Define Namespace
Simply hit “RUN” on this workflow and type in anything you want, I will use here “myFirstNamespace”.
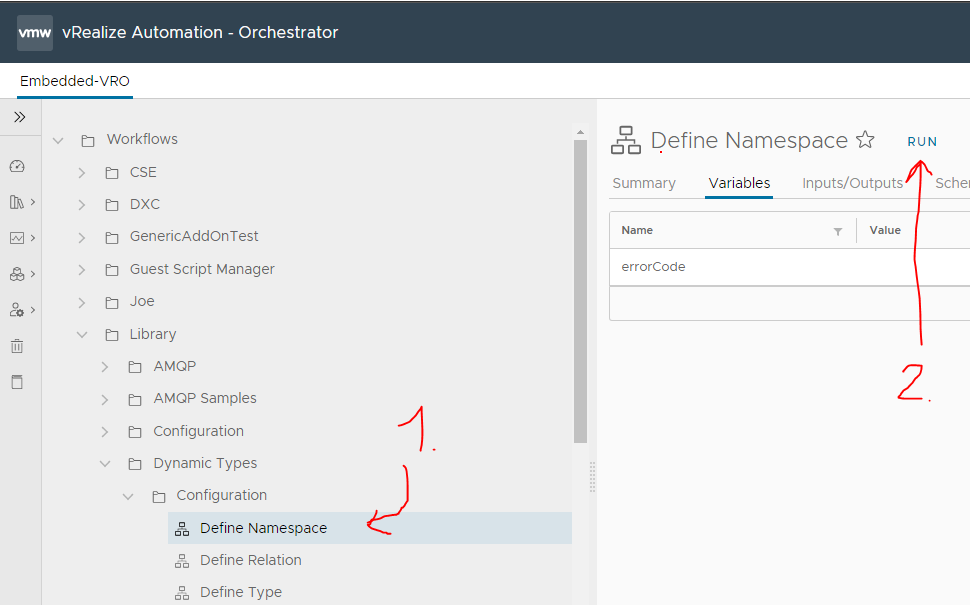

Now we have a namespace in the system. We can continue.
Define Type
Here we will declare the object with all parameters I had planned on the blueprint. As a reminder from the playbook “Vision” section above, the Dynamic Object we want is something like this:
Name: CRforAnsible
Properties:
- playbook_full_path
- parameters_for_ansible_cmd_create
- parameters_for_ansible_playbook_create
- execute_playbook_on_destroy
- parameters_for_ansible_cmd_destroy
- parameters_for_ansible_playbook_destroy
NOTE on DynamicType in vRO vs. CR in vRA for programmers:
The point here is that vRO and vRA are historically independent systems, and vmware needed some way to represent CRs from vRA in vRO in some form, so they came with this trick where CR in vRA is one-to-one represented by DynamicType in vRO. DynamicType itself is like a class in other programming languages in that it is declared with some set of variables/properties and can be instantiated and passed as input/outputs from vRO workflows. You will later see that the workflow that will be run to create our blueprint object that they are practically “constructor” functions for these DynamicTyps “classes”.
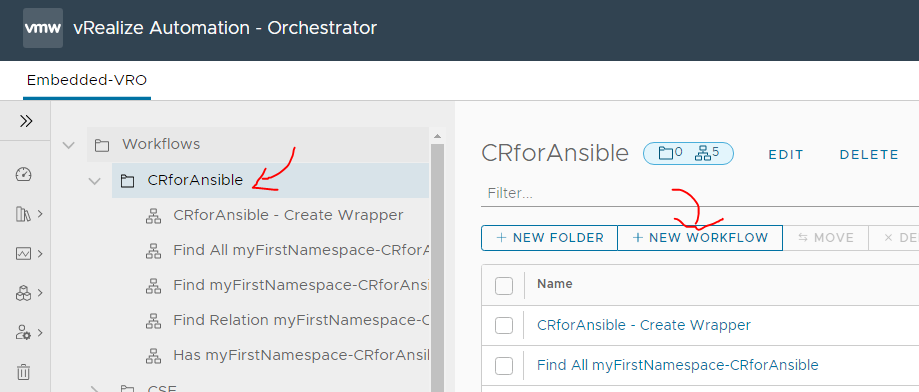
So first lets create a directory in the workflows library for all the functions that will be hosting all the workflows related to our new CR/DynamicType. So let’s do this first like this:

Give it some name and hit “SAVE”:

Once we have a folder in the list, we can now navigate to Library->Configuration->DynamicTypes and “RUN” the DefineType workflow like this:

And enter the objects, name, use the namespace we created previously and type in all the parameters from our “Vision” section above. Note that for icon, you can just select something from the system, I used one of the default item-16×16.png.
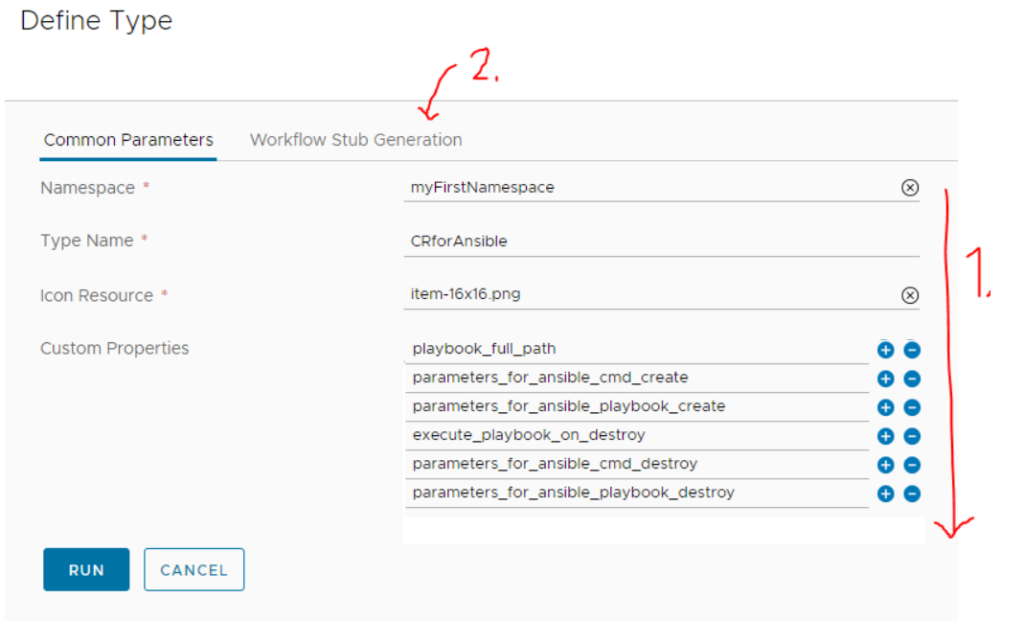
In the second tab called “Workflow Stub Generation” we will simply leave the checkbox to leave vRO to generate a few finder methods for our object and we will point to the directory we created earlier. After this you can hit “RUN”.

Once you see a “Completed” message, we can hit “CLOSE” and move to investigate the “finder methods” that the system created for us.
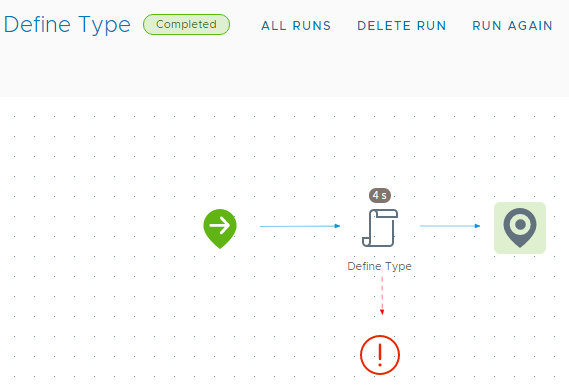
In the directory we created “CRforAnsible”, you can now see four workflows that were created for you:
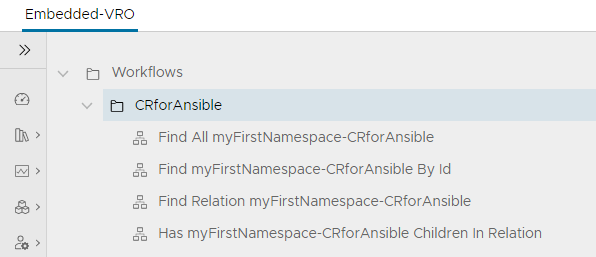
These function for internal needs in the system and we only have to care about is the “Find myFirstNamespace-CRforAnsible By Id“. This function is mandatory as it function as double check for the integration of vRA with vRO in that when vRA creates a new instance of the blueprint object, it will want to find it using it’s ID. We will need to fill this function with at least a minimum code to find this instance in internal database, but will do it later in Part IV below to not confuse you right now.
Part II. Writing CREATE workflow for the the “CRforAnsible” object – this will run Ansible
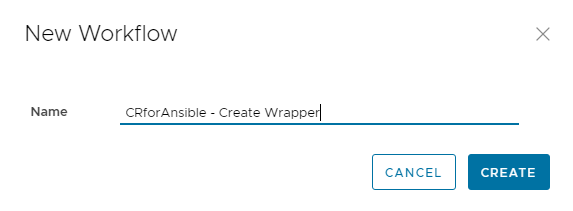
Let’s start with making an empty workflow under the CRforAnsible directory and let’s call it “CRforAnsible – Create Wrapper”. This workflow will act as creator for the vRA object in blueprint creating the instance of the DynamicType we created above, but it will also be that workflow that will execute our Ansible playbook.

First thing we need to do here is to declare input to this workflow to be exactly the same as our parameters we want from blueprint, and a single output that will be instance of the CRforAnsible DynamicType. Something like this:

Now, lets look at the schema and add there two three “Scriptable Tasks” items and call them:
- Print INPUTs
- Create DynamicType output object
- Execute Ansible via SSH


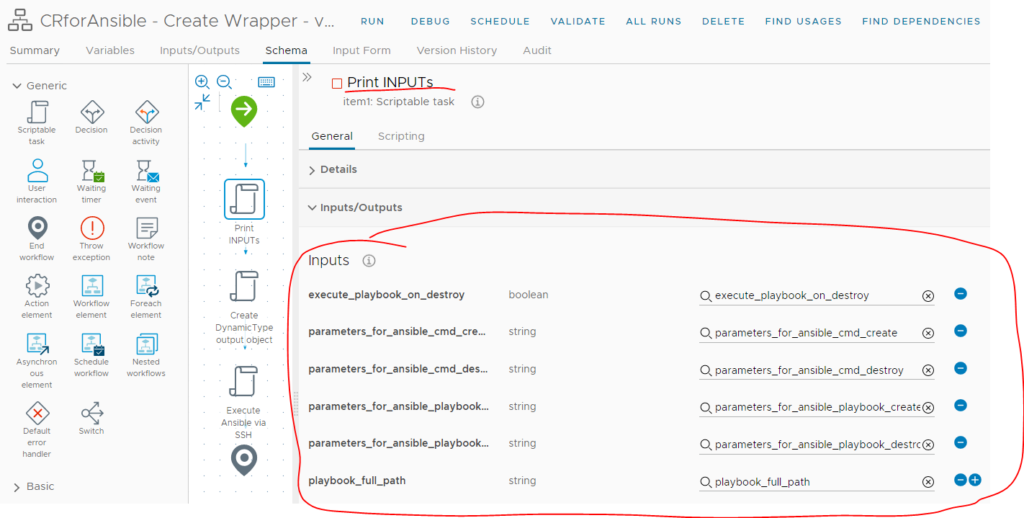
Item #1 on workflow – Print INPUTs
The first scriptable task on our workflow is for a simple purpose of printing to the log all the input parameters that will come in from the blueprint. E.g. if someone puts playbook_full_path: /some/path/playbook.yml to the blueprint, I would like to first print that to the log so that we know this for debug purposes. This object will also help me simply show you how input / outputs of variables to individual schema “boxes” works.
So click on the Print INPUTs box and add as inputs all our global inputs from the whole workflow, it will look like this:

Now if we switch to the “Scripting” tab, you can also see that all these inputs are working as Javascript variables.
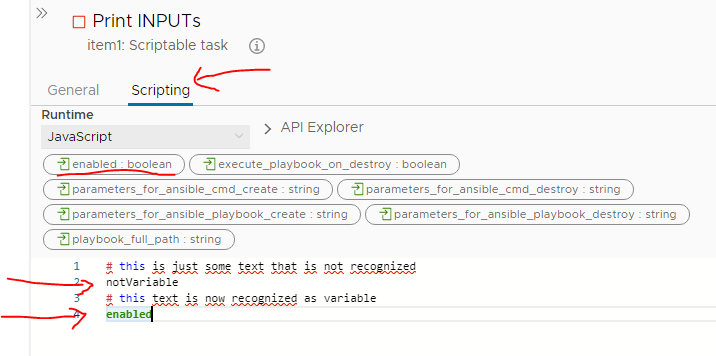
So let’s then write some simple Javascript that will simply print the content of all variables to the log like this:
System.log("execute_playbook_on_destroy:")
System.log(execute_playbook_on_destroy)

System.log("playbook_full_path:")
System.log(playbook_full_path)

System.log("parameters_for_ansible_cmd_create:")
System.log(parameters_for_ansible_cmd_create)

System.log("parameters_for_ansible_playbook_create:")
System.log(parameters_for_ansible_playbook_create)

System.log("parameters_for_ansible_cmd_destroy:")
System.log(parameters_for_ansible_cmd_destroy)

System.log("parameters_for_ansible_playbook_destroy:")
System.log(parameters_for_ansible_playbook_destroy)
This simple text will print to the log the content of all these boolean and string based inputs.
NOTE on printing different data types:
If you by any chance use more complex variable like Properties as input (which is like a dictionary data type), you cannot simply use System.log() for printing it but will have to iterate over key/value pairs inside to see the content. But this is more advanced and we will not use it here today, just FYI.
Hello World run just to Print INPUTs
So right now, we have our simple printing code inside, this is a good position to do a “Hello World” test of it. Simply click RUN above when you have to code above in the Print INPUTs.
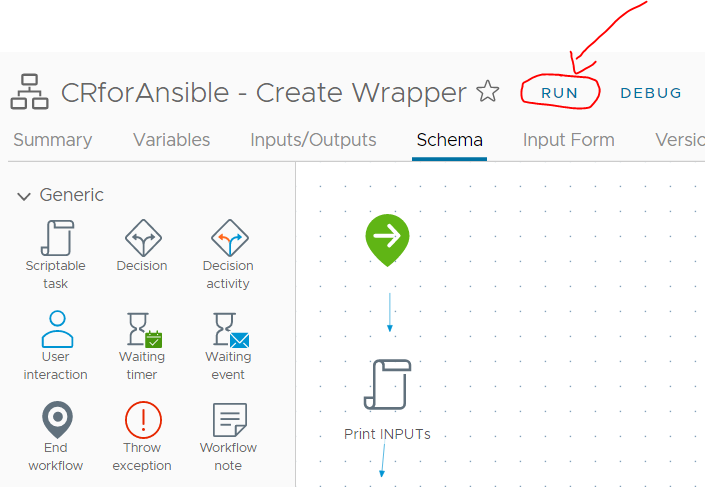
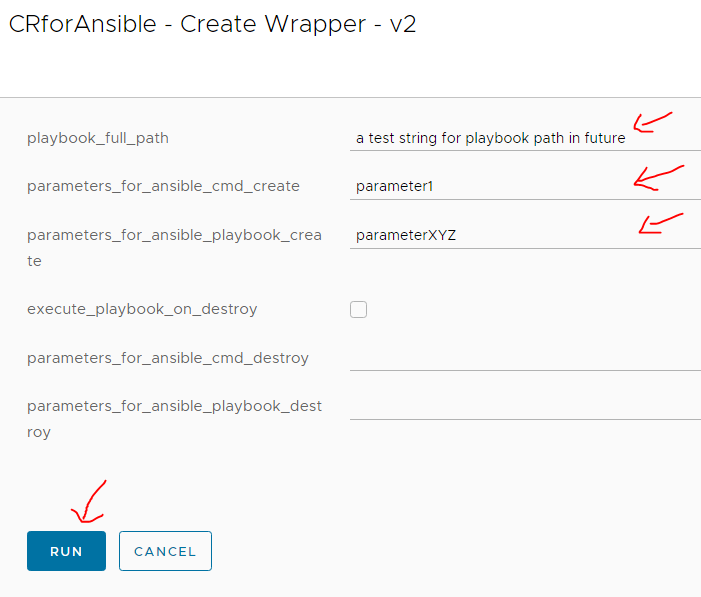
Here you can fill the parameters manually, so lets just fill one or two like this and hit RUN:
Immediately you hit “RUN” the view should change to the running view and you can find your logs here:
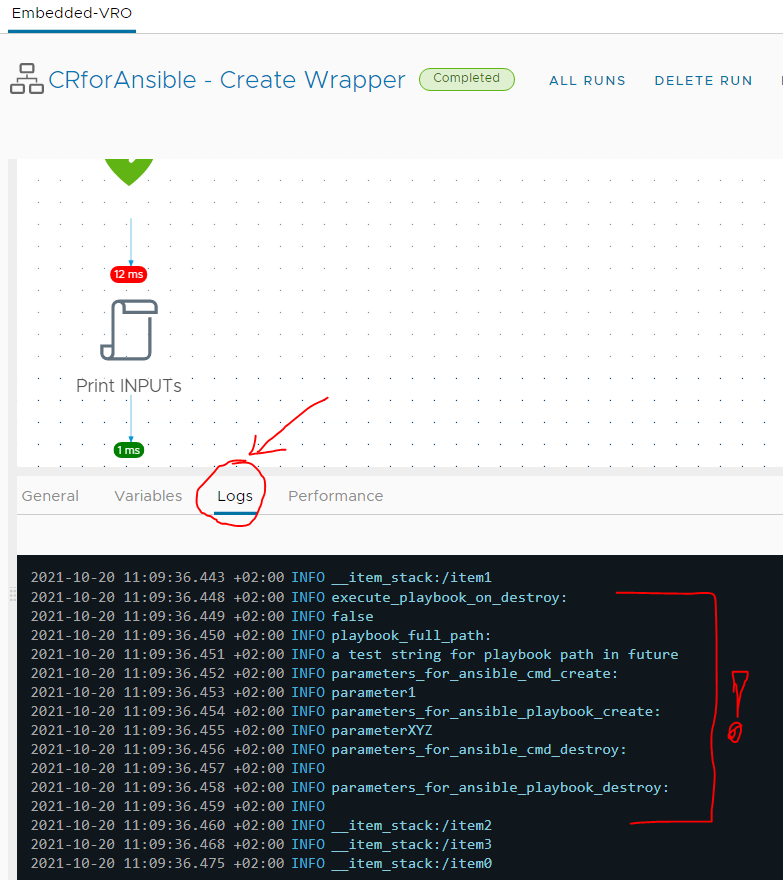
Item #2 on workflow – “Create DynamicType output object”
Ok, now let’s write the second box that is called “Create DynamicType output object” and it’s job is to:
- Create an instance of DynamicType of CRforAnsible
- Write CRforAnsible to the Assets->Configurations database to keep the inputs stored
The above tasks, only the first one is practically mandatory and you do not have to store the object in Assets->Configuration. BUT in my experience you will immediately need this the moment this objects stops being only a training exercise so I am including it. This will help you in later destroy workflow for CRforAnsible retrieve all the parameters that object had and also have access to them manually in vRO web GUI for log/billing/reference purposes.
First step, add all input parameters as inputs to the “Create DynamicType output object”, but also map the outputObject as output from this item as well. Like this:

Javascript Code
Now in regards to the scripting, I am going to show you first the full code (so that you can copy&paste it), and then describe it later. So here is the whole code for the “Scripting” tab, copy&paste it to the vRO:
// 01 - only thing to change for future objects code
dtNamespace = "myFirstNamespace";
dtClass = "CRforAnsible";

// 02 - Helper function to generate the object name for DB storage with timestamp
function nameForItemInDB() {
  var currentTime = new Date();
  var identity = dtClass + "_" + currentTime + '-xxxxxxxx-xxxx-4xxx-yxxx-xxxxxxxxxxxx'
  return identity.replace(/[xy]/g, function(c) {
    var r = Math.random() * 16 | 0, v = c == 'x' ? r : (r & 0x3 | 0x8);
    return v.toString(16);
  });
}

// 03 - name and if for new object and storage
var dtId = nameForItemInDB()
var dtName = dtClass + "_log"
System.log("Generating object: " + dtName)

// 04 - Attaching input parameters to a Properties dictionary that will be DB stored
var dtProps = new Properties();
    dtProps.put("execute_playbook_on_destroy", execute_playbook_on_destroy);
    dtProps.put("playbook_full_path", playbook_full_path);
    dtProps.put("parameters_for_ansible_cmd_create", parameters_for_ansible_cmd_create);
    dtProps.put("parameters_for_ansible_cmd_destroy", parameters_for_ansible_cmd_destroy);
    dtProps.put("parameters_for_ansible_playbook_create", parameters_for_ansible_playbook_create);
    dtProps.put("parameters_for_ansible_playbook_destroy", parameters_for_ansible_playbook_destroy);

    // for object creation id and name is also to be stored
    dtProps.put("id", dtId);
    dtProps.put("name", dtId);

System.log("dtProps : " + dtProps)

// 05 - locating the correct Assets->Configuration DB section
// NOTE: In Assets->Configuration should be a section with name of "CRforAnsible", otherwise this will fail
var genericConfigElement =
    System.getModule("com.vmware.cmbu").getConfigurationElementByPath(
        "web-root/" + dtClass);
System.log("genericConfigElement : " + genericConfigElement)

// 06 - Saving the object with properties into Assets->Configuration DB
var actionResult =
    System.getModule("com.vmware.cmbu").setConfigurationElementVariable(
        genericConfigElement,
        dtId,
        dtProps);
System.log("actionResult : " + actionResult)

// 07 - Creating instance of CRforAnsible class
object = DynamicTypesManager.getObject(dtNamespace,dtClass,dtId);
System.log("object : " + object)
outputObject = object
I have put some indexes to the code so we have a total of //01 to //07 code blocks and I have tried to explain them in the comments, so that should be enough for you to understand it.
PREREQUISITE before we hit “RUN” for object DB store
If you simply run now, you will get this error because the script will fail to find a correct DB location for the objects:

To fix this we have to create a location in Assets->Configuration where our objects will get stored. So navigate to Assets->Configurations and hit “NEW CONFIGURATION” like this:
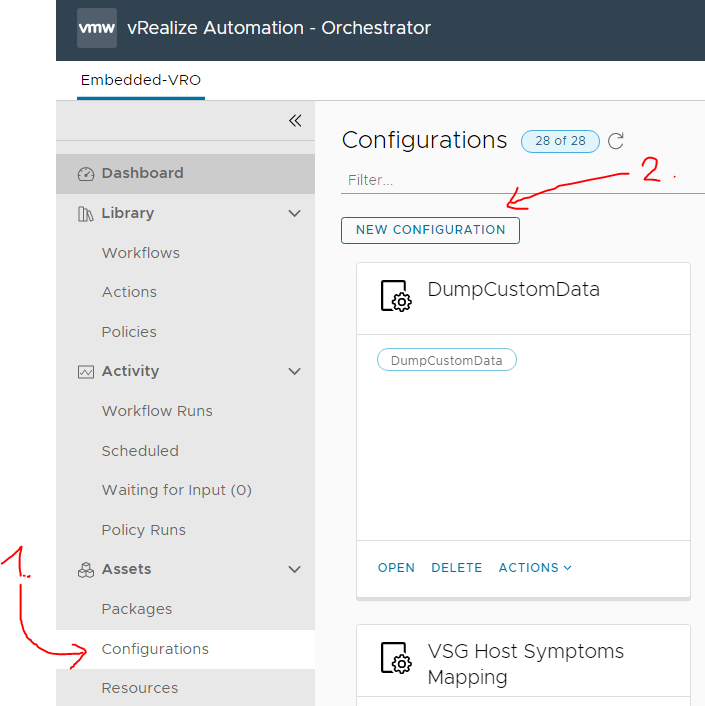
And create a configuration with name of “CRforAnsible”. You do not have to fill anything other than the name and hit “SAVE” like this:

RUN “Create DynamicType output object” item
Now that we have both the javascript code in the item and we have created a DB location in Assets->Configurations, we can again manually try to run, lets test all the inputs this time with some fake values like this:

If you get a successful “COMPLETED” on your “RUN”, like this:

We can have a look to Assets->Configurations->CRforAnsible and navigate to “Variables” and you should see our test inputs:

As you can see above, all our input values are stored, for some funny reason the GUI is a mess (probably a bug in my vesion of vRA) but the the values I highlighted are there. So this is how your data will get stored. And we can later retrieve them in other workflows.
Item #3 on workflow – “Execute Ansible via SSH”
Here, let’s split writing of this last item into two parts, in the first one we will use a conde snippet to introduce the SSH session to a remote linux system where the ansible, but execute just some simple linux test command. Later we will modify that code to construct an ansible-playbook command and run that from blueprint.
Writing SSH “hello world” in vRO
Let’s start with a quick code snippet first, even thought this is not a final one, but this way we can first test it using the “RUN” button and it will create a small file on the target system as proof that the command was executed there.
// 01 - some testing parameters from my lab
// !! change to reflect your environment !!
var username = 'vrouser'
var password = 'password123'
var passwordAuthentication = true
var hostName = '10.164.135.126'
var port = 22
var cmd = 'echo vro_created_this_file > /tmp/success_log'

// 02 - execution of the ssh cmd using javascript
var session = null;
try {

	session = new SSHSession(hostName, username, port);

        // the path variable is null because that would be authentication with ssh key file and path to it,
        // and we are not using that approach now
	session.connectWithPasswordOrIdentity(passwordAuthentication, password, '');

        // If we got here (and the above didn't throw exception, we are connected)
        System.log("Connected!");

	System.log("Executing '" + cmd + "' using Default System Encoding");
	session.executeCommand(cmd, true);

	output = session.getOutput();
	error = session.getError();
	exitCode = session.exitCode;

	System.log("Output: '" + output + "'");
	System.log("Error: '" + error + "'");
	System.log("Exit code: '" + exitCode + "'");

} catch (e) {
	throw "Unable to execute command: " + e;
} finally {
	if (session) {
		session.disconnect();
	}
}
As you can see, this is simply executing the workflow using the “RUN” button and checking logs from vro like this:
Afterwards you can then check on the target machine that a new file /tmp/success_log appeared with text “vro_created_this_file” inside and that is a proof that our SSH command worked.
# cat /tmp/success_log
vro_created_this_file
Adding “ansible-playbook” to the CMD in SSH
Now that we know how to execute linux commands via SSH Interface, let’s extend this example with constructing an ansible execution with parameters coming in from blueprint. This means we only need to change the // 01 section of our code in the above section.
First, map all global input parameters as inputs into our “Execute Ansible via SSH” item like this:

For now, simply change one line, in the code of the “Excute Ansible via SSH” item, on line #8 we have this code:
var cmd = 'echo vro_created_this_file > /tmp/success_log'Change that line to this new (two lines) form:
var cmd = 'ansible-playbook ' + parameters_for_ansible_cmd_create + ' ';
    cmd += playbook_full_path + ' ' + parameters_for_ansible_playbook_create;
These new lines will construct the whole ansible-playbook command, with inputs coming from a blueprint. So let’s try this now using manually added inputs. For example, I would like now to execute our example playbook like this:
ansible-playbook -i 10.164.135.126, /home/vrouser/ping.yml -e variable_host=10.164.135.127So as you now hopefully understand, to construct this command, we need to put the following strings to our input parameters like this:
- ansible_full_path = ‘ /home/vrouser/ping.yml‘
- parameters_for_ansible_cmd_create = ‘ -i 10.164.135.126, ‘
- parameters_for_ansible_playbook_create = ‘ -e variable_host=10.164.135.127‘
So lets try to “RUN” the workflow with these entered manually like this:

And voala! A successful execution of our example playbook ping.yml from a vRO workflow! Including the output.

Congratulations, we have a full workflow now that can instantiate our DynamicType and do something useful as running an ansible playbook as well. Next we still need to create one more workflow in the vRO that deals with the destruction of these objects, so let’s get to that next.
Part III. Writing DESTROY workflow for the “CRforAnsible” object
The job of this one will be to:
- find playbook parameters in DB
- optionally run the same playbook with different parameters
The destroy workflow deals with the “destruction” of the “CRforAnsible” object/DynamicType. This workflow will be executed when someone hits “delete” button on any deployed blueprint in vRA that contains our objects instance. Here most of the actions are optional (practically our workflow doesn’t have to do do anything for vRA to successfully delete a blueprint), but we would like to learn how to find information about our object in the DB and optionally also run the ansible playbook with different parameters as we explained in our “Vision” above.
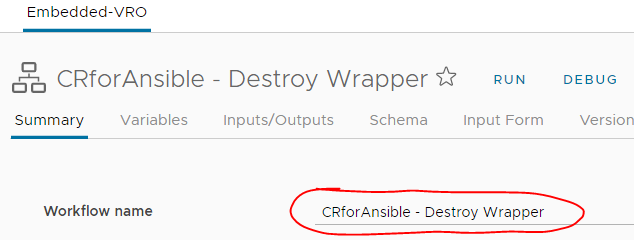
Define new workflow called “CRforAnsible – Destroy Wrapper”
Open the vRO workflows library and in our CRforAnsible directory start a new workflow called “CRforAnsible – Destroy Wrapper” like this:
And as Inputs/Outputs declare a single input that will be called “inputObject” and it will of type “DynamicTypes:myFirstNamespace.CRforAnsible” like this:


Schema items for the CRforAnsible – Destroy Wrapper
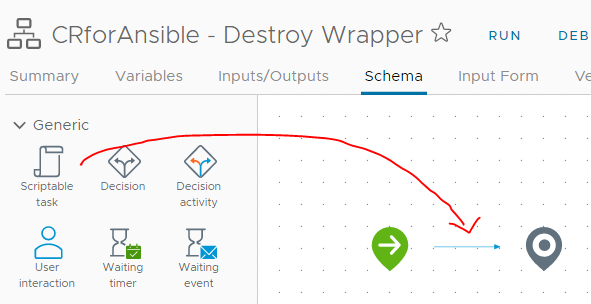
Let’s drag&drop itmes to the schema one by one and fill their content. In overview we will need to do three things:
- Item #1 – Find our object in the DB using the input objects ID and retrieve it’s parameters
- Item #2 – Decide if we want to execute the playbook in this event based on the execute_playbook_on_destroy event
- Item #3 – Execute ansible playbook via SSH just like in the Create Wrapper we did earlier
So lets start with the first one.
NOTE: One disclaimer here is that unlike the Create Wrapper, here we cannot really use “RUN” to test our workflow periodically because of the input being a complex object that we cannot really enter using browser. So we will write the whole workflow and only after we actually use vRA at the end you will see this destroy wrapper workflow in action.
Item #1 – finding details in DB about our object
First item here is a normal “Scriptable task” so just drag and drop it to the Schema plane and make our global inputObject as input to this item as well. Like this:

Hit “SAVE”.

However we also need to someone store the recovered details form the DB for later items, for this reason, jump to the “Variables” tab and create string type variables that will be “as if” inputs to later items, but they will be retrieved from the DB. We do not need all of them, just create:
- execute_playbook_on_destroy
- playbook_full_path
- parameters_for_ansible_cmd_destroy
- parameters_for_ansible_playbook_destroy
Creation of these variables are simple, just hit NEW and fill the name and type as “String” or “Boolean” like this, value just keep empty:


Once we have these variables defined, add them as Outputs to our item #1 – Find inputObject in DB:

Our task now will be to write a code that will based on the inputObject find these parameters in the internal DB in Assets->Configuration.
// Part I. Finding the whole DB for CRforAnsible in Assets->Configuration

// The path for the DB in Assets->Configuration
dbElementPath = 'web-root/CRforAnsible'

//This is stolen from vmware's library to make this a one line in our script
// but you can find this one as aciton in vRO library
confElement = System.getModule("com.vmware.cmbu")
                     .getConfigurationElementByPath(dbElementPath);

// The above code is returning confElement, which is iterable object that represents
// way to access all the variables under Assets->Configuration->CRforAnsible
System.log("ConfigurationElement (represents Assets->Configuration DB): " + confElement)

// Part II. Now we will iterate over the CRforAnsible DB to find the input object using its ID/name

// Lof of the object id and name we are looking for in the DB
System.log("Looking for inputObject.id: " + inputObject.id)
System.log("Looking for inputObject.name: " + inputObject.name)

System.log("Let's iterate over the DB to find the correct name ... ")
for each(var attribute in confElement.attributes){

    // Here we found a match using ID in the DB that is the same as the one in input object
    if(inputObject.id == attribute.name) {

        System.debug("Found a match, here is name and values:")
        System.debug(attribute.name);
        System.debug(attribute.value);
        System.debug(attribute.value.keys);

        // Part III. This is how we can extract the stored parameters under values.keys using iteration
        for each(var key in attribute.value.keys){

            if ("playbook_full_path" == key){
                System.debug("Found playbook_full_path:"
                             + attribute.value.get('playbook_full_path'));
                playbook_full_path = attribute.value.get('playbook_full_path')
            }

            if ("parameters_for_ansible_playbook_destroy" == key){
                System.debug("Found parameters_for_ansible_playbook_destroy:"
                            + attribute.value.get('parameters_for_ansible_playbook_destroy'));
                parameters_for_ansible_playbook_destroy = attribute.value.get('parameters_for_ansible_playbook_destroy')
            }

            if ("parameters_for_ansible_cmd_destroy" == key){
                System.debug("Found parameters_for_ansible_cmd_destroy:"
                            + attribute.value.get('parameters_for_ansible_cmd_destroy'));
                parameters_for_ansible_cmd_destroy = attribute.value.get('parameters_for_ansible_cmd_destroy')
            }

            if ("execute_playbook_on_destroy" == key){
                System.debug("Found execute_playbook_on_destroy:"
                            + attribute.value.get('execute_playbook_on_destroy'));
                execute_playbook_on_destroy = attribute.value.get('execute_playbook_on_destroy')
            }

        }

        // To not waste time iterating over the rest of the items, we can break here the circle
        break;

    }
}
The above code I tried to write in the simplest possible way and add comments to explain individual parts and in summary I believe the code is pretty simple (authors bias maybe). But just focus on the three main parts and do not really focus on the vmware internal functions like ” getConfigurationElementByPath “, those are stolen from vmware libraries and other workflows/actions inside vRO. I do not have proper documentation to them, I just know how they work from playing with them to understand what they do (my way of complaining that vmware doesn’t really have any good public documentation of these calls).
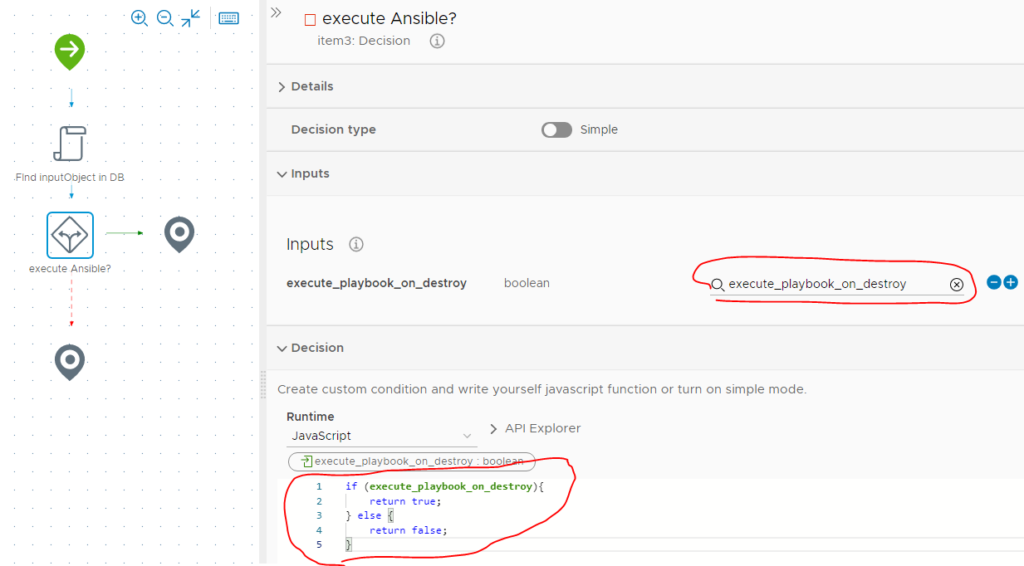
Item #2 – Decide if want to go forward with ansible execution
In the previous item, we retrieved a parameter called “execute_playbook_on_destroy” which should be our boolean that controls (from blueprint remember!) if we should or should not execute the playbook during deletion of deployment in vRA. So to make this decision in our workflow, lets use some visual coding block called “Decision” like this:


This will create two paths in the schema, both going to just “ends” for now, but we will change this soon. For now, just add the “execute_playbook_on_destroy” as input to our new “Decision” box and also rename it to “execute ansible?”.
The decision box is then using a simple javascript logic where you can write ANY condition and if you return true. you will follow the green path, if you return false, you will follow the red path.
So let’s also put there our simple code that returns true if the execute_playbook_on_destroy == true and else return false like this:
if (execute_playbook_on_destroy){
    return true;
} else {
    return false;
}
Item #3 – Execute ansible playbook via SSH
So since the path that the Item #2 with condition is selecting for ansible executions is the green arrow, simply drag & drop another scriptable task there. And simply give it again a name of “Execute Ansible via SSH” just like we had in the create wrapper.

Once we have that object, give it as input the three main points that we want our ansible playbook to be executed by. Those are (just like in the create wrapper, but now with the _destroy postfix):
- playbook_full_path
- parameters_for_ansible_cmd_destroy
- parameters_for_ansible_playbook_destroy

Now let’s show you the code and a disclaimer here is that it is exactly the same as the one in the create wrapper, with only a single line changed that constructs the command for ansible-playbook.
// 01 - some testing parameters from my lab
// !! change to reflect your environment !!
var username = 'vrouser'
var password = 'password123'
var passwordAuthentication = true
var hostName = '10.164.135.126'
var port = 22

// Ansible CMD construction
// example we want to construct this ansible-playbook -i 10.164.135.126, /home/vrouser/ping.yml -e variable_host=10.164.135.127
var cmd = 'ansible-playbook ' + parameters_for_ansible_cmd_destroy + ' ';
    cmd += playbook_full_path + ' ' + parameters_for_ansible_playbook_destroy;


// 02 - execution of the ssh cmd using javascript
var session = null;
try {

	session = new SSHSession(hostName, username, port);

        // the path variable is null because that would be authentication with ssh key file and path to it,
        // and we are not using that approach now
	session.connectWithPasswordOrIdentity(passwordAuthentication, password, '');

        // If we got here (and the above didn't throw exception, we are connected)
        System.log("Connected!");

	System.log("Executing '" + cmd + "' using Default System Encoding");
	session.executeCommand(cmd, true);

	output = session.getOutput();
	error = session.getError();
	exitCode = session.exitCode;

	System.log("Output: '" + output + "'");
	System.log("Error: '" + error + "'");
	System.log("Exit code: '" + exitCode + "'");

} catch (e) {
	throw "Unable to execute command: " + e;
} finally {
	if (session) {
		session.disconnect();
	}
}
So if you noticed, the line #11 and #12 that construct the “var cmd” is changed slightly for using the _destroy versions of the input parameters. Everything else is identical.
Part IV. Mandatory helper function of “Find myFirstNamespace-CRforAnsible By Id” workflow in vRO
We already lightly touched the few workflows that vRO created in the CRforAnsible directory when we declared our DynamicType of CRforAnsible. One of these functions is actually needed and we need to put some code inside it. This function is ” Find myFirstNamespace-CRforAnsible By Id ” here:

So lets open it and start editing it. You will see that there are predetermined inputs of id + type and one output of “resultObj” that is of our DynamicTYpe of CRforAnsible. Our job here is to find this object in the DB, recreate it and return it. IT is VERY similar to what we were doing in the delete wrapper in previous section, but here we just return the object back.
Explanation is that after the object instance is created by vRA from blueprint, it will double-check using this function if it was really stored in a DB. Or at least that was what I understood.
Anyway here will be just a single Scriptable task that you can put this code inside as a derivate of our delete wrapper code for finding objects.
// Part I. Finding the whole DB for CRforAnsible in Assets->Configuration

// The path for the DB in Assets->Configuration
dbElementPath = 'web-root/CRforAnsible'

//This is stolen from vmware's library to make this a one line in our script
// but you can find this one as aciton in vRO library
confElement = System.getModule("com.vmware.cmbu")
                     .getConfigurationElementByPath(dbElementPath);

System.debug("Searching for object with id: " + id);
System.debug("Searching for object with type: " + type);

// Get the class and namespace from the type input
var dtNamespace = type.split(".")[0];
var dtClass = type.split(".")[1];
System.debug("dtNamespace: " + dtNamespace);
System.debug("dtClass: " + dtClass);

// Part II. Locating our specific object in the DB
System.debug("About to walk down DB looking through CRforAnsible storage");
for each(var attribute in confElement.attributes){
    System.debug(attribute.name);
    System.debug(attribute.value);
    System.debug('looking to match id='+id +" with this =" + attribute.name );
    if(id == attribute.name) {
        System.debug('Got a hit...' );
        System.log('------------------------------');
        System.log("dtNamespace : " + dtNamespace)
        System.log("dtClass : " + dtClass)
        System.log("attribute : " + attribute)

        /* Part III. Create an instance of the object from data in DB */
        resultObj  = DynamicTypesManager.makeObject(dtNamespace,dtClass,attribute.name,attribute.value);
        System.log("getOrderedPropertyNames(): " + resultObj.getOrderedPropertyNames())

        // Part IV. Due to some behaviour in vRA 8.4 we need to manually give this object all it's properties
        // from the DB storage (before in 8,2 the makeObject function did this for us, whatever, proprietary code)
        object_properties = new Properties()

        // so ve iterate over all the keys of attributes we found in the sotrage and assign it to the objects properties
        for (var i = 0, keys = Object.keys(attribute.value), ii = keys.length; i < ii; i++) {
            System.debug('resultObj.setProperty(' + keys[i] + ') = ' + attribute.value[keys[i]]);
            resultObj.setProperty(keys[i],attribute.value[keys[i]])
            object_properties.put(keys[i],attribute.value[keys[i]])
        }
        // for object creation also id and name to be added
        resultObj.setProperty("id",attribute.name)
        resultObj.setProperty("name",attribute.name)
        object_properties.put("id",attribute.name)
        object_properties.put("name",attribute.name)

        // Part V. For log purposes here I print out all the parameters we found in the DB
        System.log("getOrderedPropertyNames(): " + resultObj.getOrderedPropertyNames())
        System.log("If it is really the correct object, we should be able to access attribuges:")
        System.log("resultObj.playbook_full_path: " + resultObj.playbook_full_path)
        System.log("resultObj.parameters_for_ansible_cmd_create: " + resultObj.parameters_for_ansible_cmd_create)
        System.log("resultObj.parameters_for_ansible_playbook_create: " + resultObj.parameters_for_ansible_playbook_create)
        System.log("resultObj.execute_playbook_on_destroy: " + resultObj.execute_playbook_on_destroy)
        System.log("resultObj.parameters_for_ansible_cmd_destroy: " + resultObj.parameters_for_ansible_cmd_destroy)
        System.log("resultObj.parameters_for_ansible_playbook_destroy: " + resultObj.parameters_for_ansible_playbook_destroy)
        System.log('------------------------------');

        break
    }
}

System.debug("Found Object: "+resultObj);
System.debug("Found Properties: "+object_properties);
It is a bit different from the destroy wrapper as we also had to create the object using the makeObject function and then manually give it all the properties from the storage, but this is what vRA expects so we have to follow. Without this function non of your deployments with CRforAnsible object will work.
Part V. Declare custom resource in vRA using the create/destroy wrapper workflows
Great, we are here in a culmination of our efforts in vRO. We will now simply configure a new custom resource in vRA. So lets change from vRO to vRA and immediately navigate to the “Cloud Assembly” and there to Design->Custom Resources and hit “NEW CUSTOM RESOURCE”

The process here is very straight forward and I do not need to describe it very much, simply give the resource a name, activate it using switch and using the “ADD” buttons point the Lifecycle Actions to our create wrapper and destroy wrapper workflows. Here is just a screenshot of all these filled:
1/2:
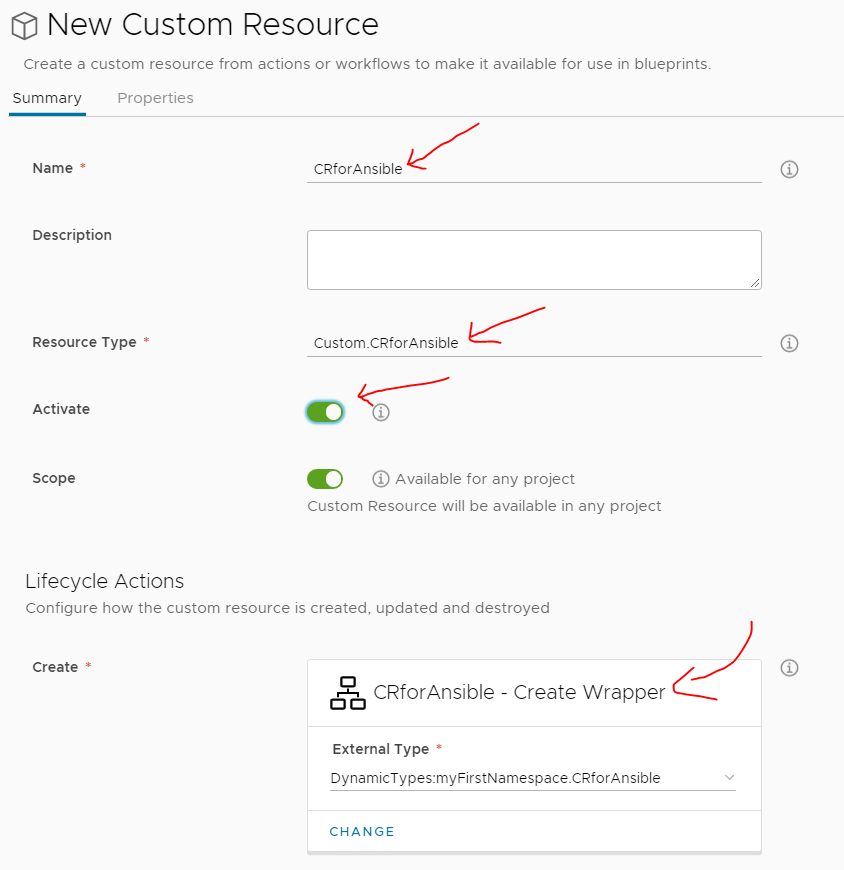

And that is it, you now have a Custom Resource called CRforAnsible that will be visible in the Cloud Templates as new object type and the next chapter we will look at how to use it.
Troubleshooting hit for vRA->vRO sync: If you have a feeling vRA doesn’t see your workflows, or it see them in some weird old version with maybe wrong inputs or missing input or output object, go back to vRO and increase the version on the workflow to a higher number like this:

And once the workflows have a higher version than before, go back to vRA and under Infrastructure->Integrations is a pointer to the embedded vRO that I want you to open like this:

And inside click the “START DATA COLLECTION”.

This way the vRA will soon see the latest versions of the workflows as by vRA’s logic, it only consider a new form of any workflow if it has a higher version number. So always increase the version of any workflow if you want vRA to ever consider it.
Part VI. Using CRforAnsible on blueprints
This will be the simplest part, we will simply create a new empty blueprint, add our new object, give it some parameters and hit “Deploy”. So let’s do that now.
Start a new blueprint:

Drag&Drop the CRforAnsible to the empty blueprint.
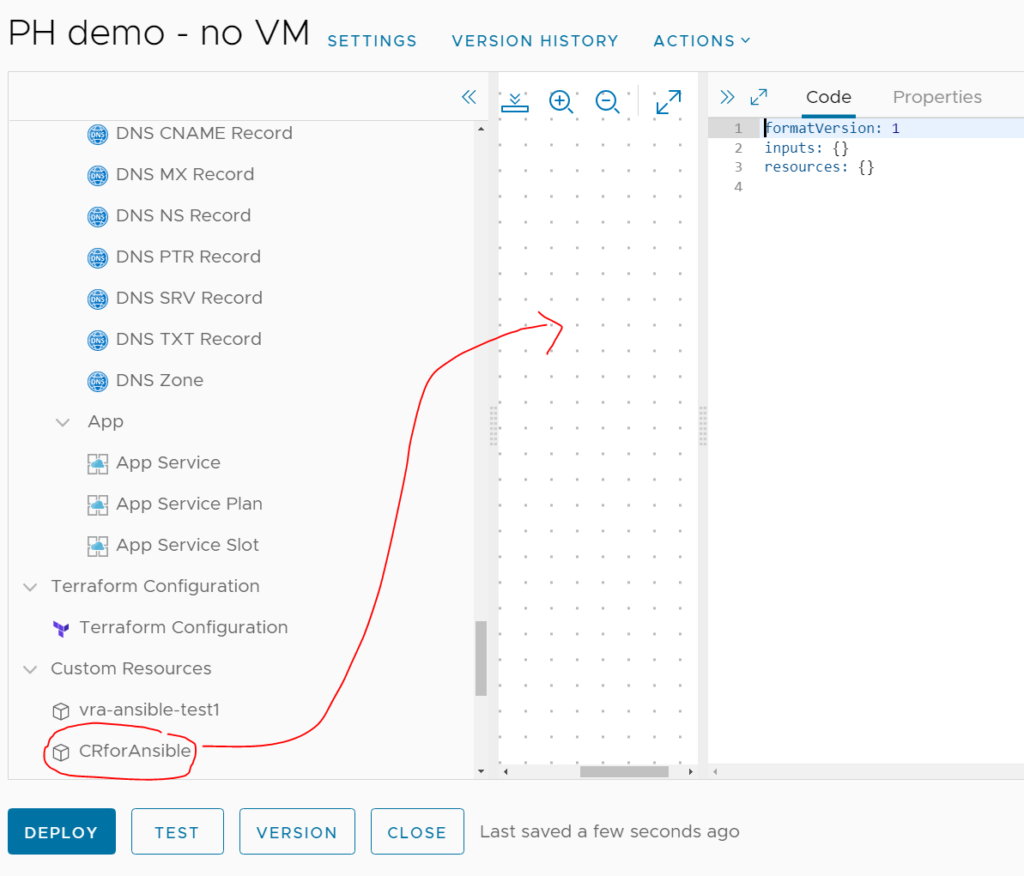
And fill the properties (you can have assistance with the “Properties” tab) just like our original “Vision”, but now with some real inputs for the ansible. Once finished, we can hit DEPLOY.
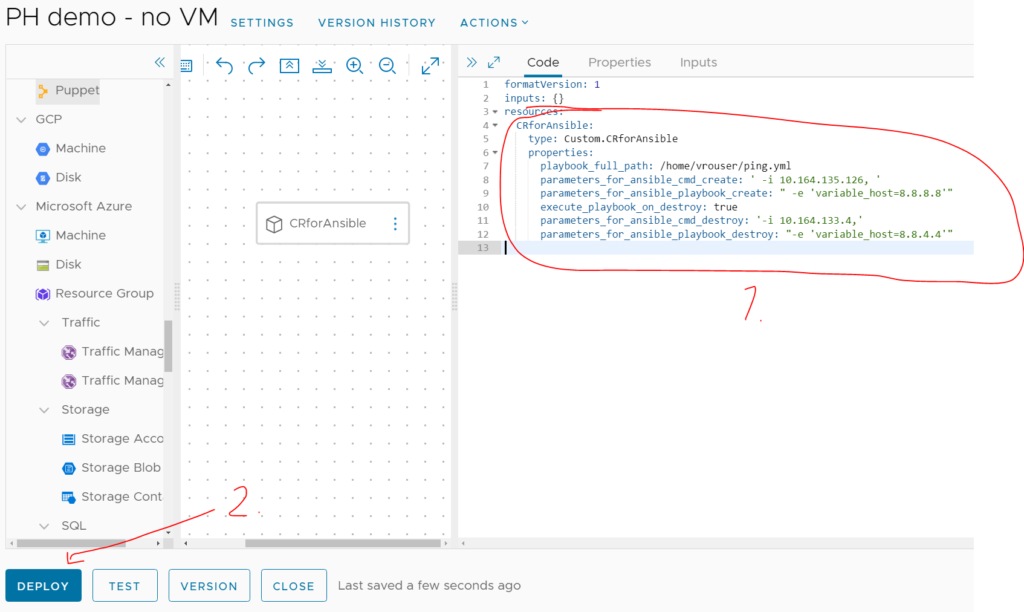
Also note that the playbook variables are double-quoted.
Our deployment is now running, and it will actually be very fast one. You can switch to the “History” tab and wait for success or failure now. In my case below, it simply worked and I got my object created and the ansible in the background was executed.

Logs and Troubleshooting
But where are the logs and where do you actually see what the ansible was doing?! Let me show you how to actually troubleshoot if anything went wrong as this part is again back at the vRO.
Back in vRO navigate to “Workflow Runs” and you can filter for “CRforAnsible” and you will see our create wrapper executed, followed by one or more “find by Id” workflows like this. Note that all these should be “Started by” vro-gateway what means an API call started it, this call was vRA->vRO.

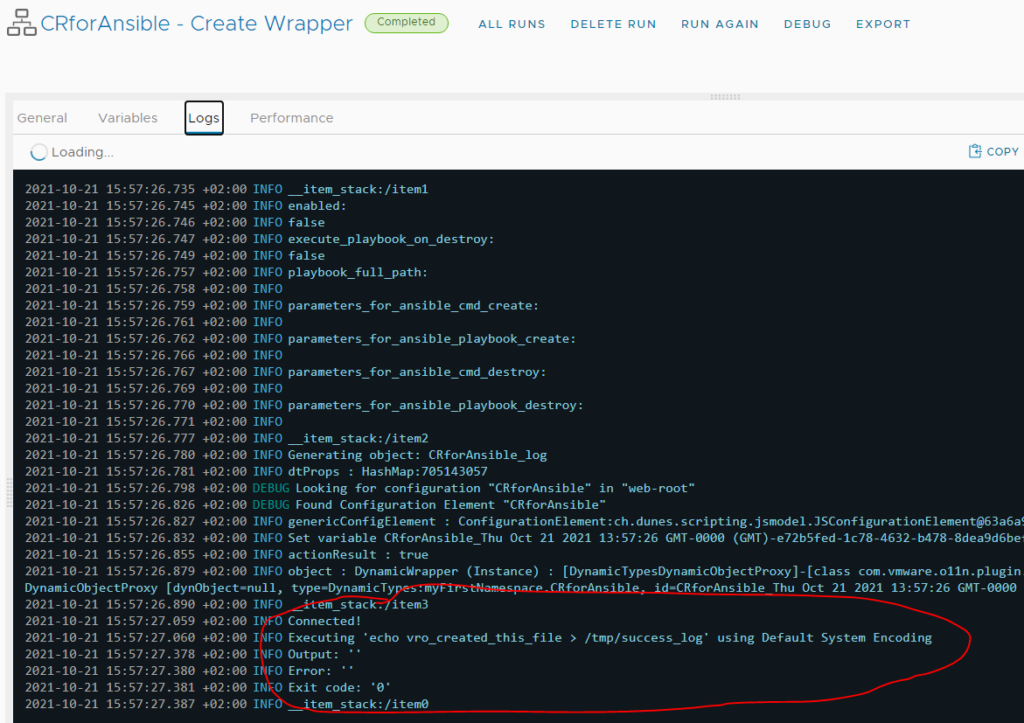
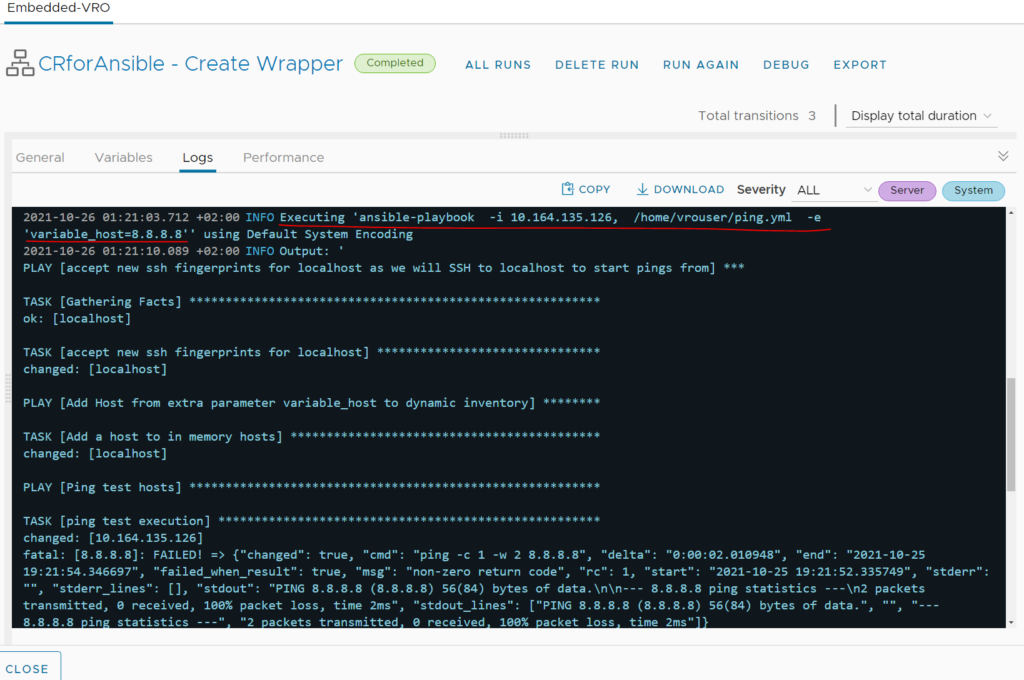
You can open the Create Wrapper by clicking on it and you can now see the logs from our run.
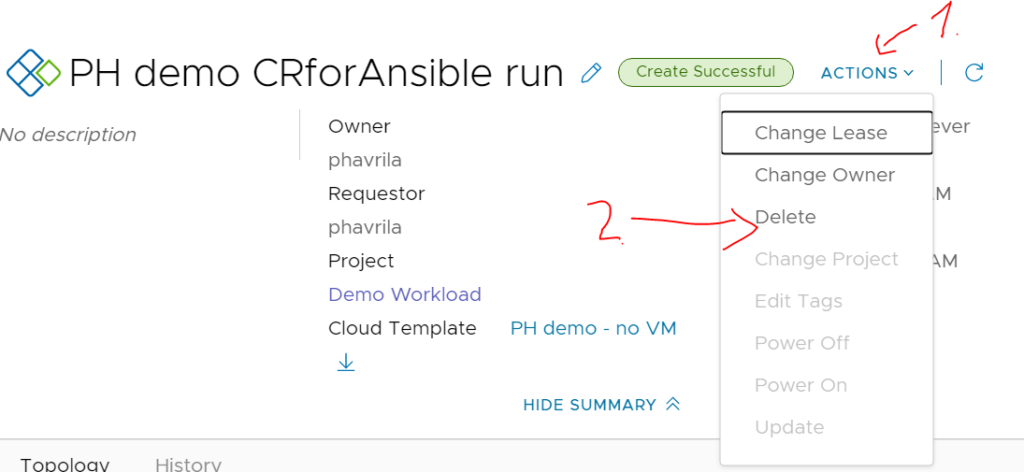
Next, when you delete the deployment using the Actions->Delete, you will see that our Destroy Wrapper was executed in the Workflow runs like this:

And inside it, the logs will now show the ansible executed using the _destroy set of parameters:

Conclusion
In summary we went via the whole process end to end here for creating a custom resource object in vRA that can pretty much do anything here. Even though this was meant mostly for people that already have automation using Ansible and only need that to be connected to vRA (since Ansible is much older and in my company much more used) this approach will allow you to bridge the gap and use existing Ansible playbooks in the vmwares Infrastructure as a Code (IaaS) blueprints.
But you can also use this as building block to using purely vRO to automate things, e.g. just use the declaration part of DynamicType, and how I manipulated storage of the objects in Assets->Configuration and use one of the vRO provided automation methods. FOr example vRO has REST API, SSH, PowerShell integration so that you can directly interact with end systems, not needing Ansible as middleman. But that is for you to figure out.
For me and my team, this was a pain to put together since vRA/vRO integration is very young marriage and documentation is … meh. Maybe this example will help someone out there struggling to create his first custom resource “Hello World”