Cisco IOS XR – Complete Getting Started Examples Guide, Part1/2
 Ever wanted quick reference for IOS XR in basic security, configuration committing, RIP, OSPF, EIGRP, IS-IS, IPv6 and comparisons with classic IOS? It’s right here fore you. There is not much to learn about IOS XR from a network theory point of view. It is just another command line on a router, but as many people are getting afraid of touching this new beast, I have decided to do myself a reference point on all the basics of the IOS XR. This article is supposed to be summary of some CCNA level configurations on IOS XR. For creating and verifying this article, I have used ASR9000 that I managed to get access to via Cisco partner learning program.
NOTE: This article expects you have some grasp of the original IOS configuration and this article will go through the IOS similarities and differences. I will not explain all details of network theories behind protocols or IPv4/IPv6 routing. But some basic summary will be given if you need to remember things like IS-IS.
Contents
IOS vs. IOS XE vs. IOS XR ?
OK, I know now I have maybe killed some of you with confusion that there are actually three difference types. The point here is evolution. IOS XE is evolution of the original IOS and has nearly exactly the same syntax as original IOS. IOS XE was build to provide better high availability and rapid feature delivery utilizing the existing worldwide knowledge of the IOS Command Line Interface (CLI). In summary the IOS XE is an improved version of IOS internally, but doesn’t mean much for basic configuration.
IOS XR however is completely build from scratch on a micro-kernel architecture, memory-protected and preemptive multitasking. IOS XR have advantages over the original IOS and IOS XE in:
- Improved high-availability – largely through support for hardware redundancy and fault containment methods such as protected memory space. Also processes are self-restartable.
- Better Scalability – for large hardware configurations a distributed software infrastructure and two-stage forwarding architecture is available
- Package-based software distribution model – this allow for installing/removing router features like multicast/MPLS to be added while router is running and with no downtime. Also patches can be installed without outage (potentially).
- Also web-based GUI for system management (support for XML configuration automation)
What router is running what IOS?
- IOS – Cisco ISR Series Routers (800,1900,2900,3900 series), Cisco 7200 and 7600 Series and all legacy routers and Catalysts 6500
- IOS XE – ASR 1000 Series and Catalyst 4500E Series Switches
- IOS XR – Cisco CRS-1 and CRS-3, Cisco ASR9000 and Cisco XR12000
IOS XR Command Line Access and Configuration Principles
Along with the basic access to physical console and auxiliary port, IOS XR comes with dedicated physical management interfaces. On ASR9000 these are :
interface MgntEth0/RSP0/CPU0/0
interface MgntEth0/RSP0/CPU0/1
If you want IP management access to the router, you need to configure these interfaces with IPs from the management subnet. Either physical or virtual IPs supported.
Additionally, the IOS XR prompt on ASR9000 has the following structure of the prompt:
RP/0/RSP0/CPU0:PE1#
- RP – route processor
- 0 – for single rack chassis
- RSP0 – Route Switch Processor (either RSP0 or RSP1)
- CPU0 – should always be the same on ASR9000
- PE1 – the router hostname
Login and access privileges
In the initial IOS XR configuration an “root-system user” username and password is created. This user is the only capable of creating other users in the IOS XR system. You can think of this one as “root” on linux.
Furthermore the IOS XR has a build-in concept of users and task groups. The concept of user group, task group and inheritance is important of understanding permissions.
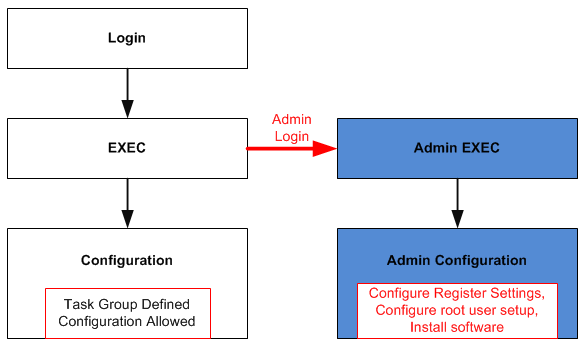
In the following diagram, I hope to give you the idea of configuration in a task group and configuration as root-system users or Admin.
Based on the command line, you are able to identify where you are in the IOS XR command prompt.
EXEC
RP/0/RPS0/CPU0:router#
Global config
RP/0/RPS0/CPU0:router# configure
RP/0/RPS0/CPU0:router(config)#
Interface and subinterface mode
RP/0/RPS0/CPU0:router(config)# interface pos 0/2/0/0
RP/0/RPS0/CPU0:router(config-if)#
Protocol and submode config
RP/0/RPS0/CPU0:router(config)# router bgp 2524
RP/0/RPS0/CPU0:router(config-bgp)# address family ipv4
RP/0/RPS0/CPU0:router(config-bgp-af)#
Admin
RP/0/RPS0/CPU0:router# admin
RP/0/RPS0/CPU0:router (admin)#
Admin config
RP/0/RPS0/CPU0:router(admin)# configure
RP/0/RPS0/CPU0:router(admin-config)#
TIP: You do not have to always go to admin mode to get admin commands output. You can do “admin <XY>” command also in EXEC mode to get a command that is available in admin mode only. For example some command have different outputs depending where you are like “show platform“, if you want admin version of this command, you can use “admin show platform“.
Configuration Editing and Committing on IOS XR
Lets start bluntly, there is no concept of startup-config and running-config on IOS XR. The new way to do things is via a two-step configuration method.
In the first stage you make a collection of changes to the current configuration. You can check you changes for corrections in the system. Personally this is the same as many of us doing changes in a notepad or other txt editor before going to the router to apply it. This is a bit the same thing except directly supported by the IOS XR.
In the second stage, you can commit the configuration to the target configuration. “Commit” is all or nothing acceptance of your changes. If even one of your prepared commands is not correct, the whole configuration changes will not be applied. You can see your configuration changes with “show config“.
There are some other methods of applying the commit command to the router, as I do not want to go to details a quick look to the “commit ?” should be enough.
RP/0/RSP0/CPU0:PE (config) # commit ?
 best-effort   Commit the configuration changes via best-effort operation
 comment       Assign a comment to this commit
 confirmed     Rollback this commit unless there is a confirming commit
 force         Override the memory checks
 label         Assign a label to this commit
 replace       Replace the contents of running configuration
 save-running  Save running configuration to a file
 <cr>          Commit the configuration changes via pseudo-atomic operation
TIP: To erase current startup configuration you can use “commit replace” with empty configuration changes.
TIP: To load or save configuration from or to a file, use the load or save commands.
Basic committing commands summary:
- show config – Show uncommitted configuration
- show config merge – Show future configuration expected after commit
- show config changes – Show future configuration if “commit replace” used
- commit best-effort – Commit all configuration that can be committed (this will negate the “all or nothing” logic).
- commit confirmed seconds – Commit for the duration of the times (unless committed before timer elapses)
- commit label – commits and adds a description of the changes to the history
- commit comment – adds a comment to the committed history entry
- show configuration failed – If your committed changes generate and error and revert back, you can see what went wrong in this output.
Configuration Management and Commits History
Whenever a commit change is applied the configuration both old and new is maintained in the configuration history. This is great because if there are troubles, you can revert back X number of commits. Each commit is given a unique ID known as commitID to what you can rollback to.
To see the configuration history on IOS XR, issue the “show configuration history as on example below.
RP/0/RP1/CPU0:CRS# show configuration history
Thr Oct 18 11:37:20.623 CEDT
Sno. Event    Info                             Time Stamp
~~~~ ~~~~~    ~~~~                             ~~~~~~~~~~
1    commit   id 1000001848                    Thr Oct 18 09:22:19 2012
2    commit   id 1000001349                    Thr Oct 18 09:24:38 2012
3    commit   id 1000001950                    Thr Oct 18 09:15:27 2012
4    commit   id 1000002051                    Thr Oct 18 09:05:49 2012
5    backup   Periodic ASCII backup            Thr Oct 18 09:06:36 2012
6    shutdown sync for potential shutdown      Thr Oct 18 09:29:57 2012
You can then rollback using the “rollback configuration” either using relative movement with “rollback configuration last 2” or to a exact commit number with “rollback configuration to 4“. The system automatically checks for feature incompatibility so if you want to revert back to a configuration that has commands not supported by current IOS XR package, you get an error and the operation will fail.
Exclusive Configuration Sessions
Some of you might have now get the idea and realize that there is a potential for two users collisions when two users start to edit the configuration changes. To avoid configuration collisions on the configuration, you can enter configuration not with the normal “configure [terminal]” but instead with the “configure exclusive” command you entered an exclusive mode and you locked out all other users from entering any configuration at all.
If someone else has entered this mode and is preventing you from doing changes, you can find out who is currently holding the exclusive session by using “show configuration lock” and show configuration sessions.
RP/0/RSP0/CPU0:PE1#show configuration lock
Tue Jun 28 11:22:10.449 UTC

Session Write Lock
00000212-00245489-00000000

RP/0/RSP0/CPU0:PE1#show configuration sessions
Tue Jun 28 11:23:13.269 UTC
Current Configuration Session  Line   User       Date
Lock
00000212-00245489-00000000     vty0   admin      Thr Oct 18 11:40:20 2012 *
NOTE: Entering configuration mode is possible while someone else is having an exclusive session, but until the exclusive lock is released nobody else can commit their changes.
Basic IOS XR routing protocol configuration examples
Please note that the IOS XR by default uses the Virtual Routing and Forwarding (VRF) and as such these basic examples apply to the default VRF in which all routing is by default.
1. Static Routes Configuration
Interesting to note here is that in IOS XR also static routes are behind the router subsection called “router static”. The following example will configure a static route to the 10.1.10.0/24 network with 192.168.101.11 as next hop. The topology to which I will be adding the static routes looks like this:

Configuration of the static routes on the ASR9000 is as follows for exact static route.
router static
  address-family ipv4 unicast
    10.1.10.0/24 192.168.101.11
This is for default route example which is the same as static route using 0.0.0.0/0 as destination.
router static
  address-family ipv4 unicast
    0.0.0.0/0 192.168.101.11
As with any routing, you can have a look if your routes are working by looking at the routing table with show route.
RP/0/RSP0/CPU0:PE1#show route
 < omitted >
 Gateway of last resort is 192.168.101.10 to network 0.0.0.0

 S*     0.0.0.0/0 [1/0] via 192.168.101.10
 L      10.1.1.1/32 is directly connected, 19:09:10, Loopback0
 S      10.1.10.0/24 [1/0] via 192.168.101.11, 00:03:08
 C      192.168.101.0/24 is directly connected, 16:52:13, GigabitEthernet0/0/0/0
 L      192.168.101.10/32 is directly connected, 16:52:13, GigabitEthernet0/0/0/0
2. RIPv2 (IPv4) configuration on IOS and IOS XR
In the following example we start the basic RIPv2 (IPv4) on two interfaces of IOS XR router and IOS router configured with the well known RIPv2 configuration. The following picture shows the topology I will be using and the IOS router neighbor RIPv2 configuration.
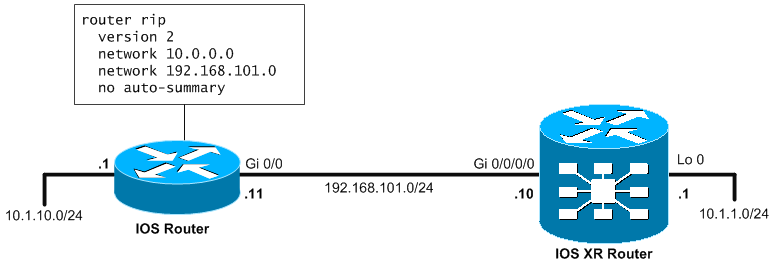
The following configuration can be applied to the ASR9000 router to enable RIPv2 on the two interfaces and start receiving and announcing routes.
router rip
  interface loopback 0
  !
  interface GigabitEthernet 0/0/0/0
NOTE: On IOS XR the RIP “version 2” is enabled by default.
Verification of RIP working on IOS XR is simple and we just will look if we are getting the 10.1.10.0/24 network from the IOS Router neighbor.
RP/0/RSP0/CPU0:IOSXRRouter#show route rip
Fri Apr 14 23:22:08.242 UTC

R       10.1.10.0/24 [120/1] via 192.168.101.11, 00:05:50, GigabitEthernet0/0/0/0
Also on the other side you can verify that the IOS Router is getting the 10.1.1.0/24 route from the IOS XR Router.
IOSRouter#show ip route rip
< omitted >

10.0.0.0/8 is variably subnetted, 3 subnets, 2 masks
R       10.1.1.0/24 [120/1] via 192.168.101.10, 00:00:19, GigabitEthernet0/0
To see the RIPv2 basic configuration including timers, you can enter the show rip command.
RP/0/RSP0/CPU0:PE1#show rip
Sat Apr 15 00:45:13.259 UTC

RIP config:
Active:                     Yes
Added to socket:            Yes
Out-of-memory state:        Normal
Version:                    2
Default metric:             Not set
Maximum paths:              4
Auto summarize:             No
Broadcast for V2:           No
Packet source validation:   Yes
NSF:                        Disabled
Timers: Update:             30 seconds (26 seconds until next update)
Invalid:                    180 seconds
Holddown:                   180 seconds
Flush:                      240 seconds
To also see interfaces associated with interfacesshow protocols rip default-context
RP/0/RSP0/CPU0:PE1#show protocols rip default-context
Sat Apr 15 00:50:54.530 UTC
Routing Protocol RIP
  VRF default is Active
    2 interfaces configured, 2 active
    4 routes, 3 paths allocated
    Timers: Update 30s (next in 27s), Invalid 180s, Holddown 180s, Flush 240s
    OOM state is "Normal"
      Interface              Active        IP-Address State Send Recv Nbrs
      GigabitEthernet0_0_0_0 Active 192.168.101.10/24 Up    2    2    1
      Loopback0              Active       10.1.1.1/24 Up    2    2    0
3. EIGRP on IOS XR
Lets recreate the scenario from the RIPv2, this time we configure the IOS router with EIGRP with Autonomous System number 100. And we move to configure the IOS XR with EIGRP in the default ipv4 address family with the following configuration syntax:
router eigrp 100
 address-family ipv4
 interface Loopback0
 !
 interface GigabitEthernet0/0/0/0
The whole topology and configuration should look like this.
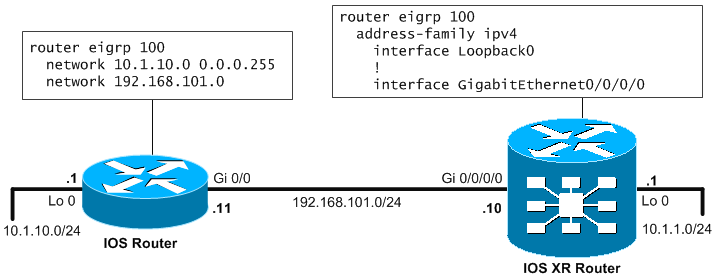
On the Cisco IOS XR router you need to manually enable adjactancy neighbour logs in console to see the neighbor IOS router comming up in EIGRP, to do this you can use the following configuration using the “log-neighbor-changes”.
router eigrp 100
  address-family ipv4
    log-neighbor-changes
You will see this output on the Cisco IOS XR router when EIGRP adjacency comes up:
RP/0/RSP0/CPU0:Oct 18:11:43.139 : eigrp[1022]: %ROUTINGEIGRP-
5-NBRCHANGE : default-v4 100: Neighbor 192.168.101.11
(GigabitEthernet0/0/0/0) is up: new adjacency
The Cisco IOS and IOS XE show ip route eigrp and Cisco IOS XR show route eigrp
commands display the current EIGRP entries in the routing table.
Auto-Summarization
Older IOS routers had auto-summarization enabled by default (before 12.2(33)). New IOS version have it disabled by default. This is also disabled by default on all IOS XR.
To enable auto-summarization, you can go under the address-family and issue “auto-summary” command.
router eigrp 100
  address-family ipv4
    auto-summary
Verification if auto-summary is enabled or disabled can be gained from the show protocols eigrp. Example below.
RP/0/RSP0/CPU0:PE1#show protocols eigrp
 Tue Oct 19 11:57:00.240 UTC
 Routing Protocol: EIGRP, instance 100
 Default context AS: 100, Router ID: 10.1.1.1
 Address Family: IPv4
 Auto summarization, Logging neighbor changes
 Default networks not flagged in outgoing updates
 Default networks not accepted from incoming updates
 Distance: internal 90, external 170
 Maximum paths: 4
 EIGRP metric weight K1=1, K2=0, K3=1, K4=0, K5=0
 EIGRP maximum hopcount 100
 EIGRP maximum metric variance 1
 EIGRP NSF: enabled
 NSF-aware route hold timer is 240s
 NSF signal timer is 20s
 NSF converge timer is 120s
 Time since last restart is 01:18:20
 SIA Active timer is 180s
 Interfaces:
   GigabitEthernet0/0/0/0
   Loopback0
IPv6 support in EIGRP
EIGRP is a modular protocol that can support multiple different routed protocols including IPv6. Configuration is straight forward, these commands will be done on our IOS XR to configure EIGRP to support IPv6.
interface Loopback0
  ipv6 enable
!
interface GigabitEthernet0/0/0/0
  ipv6 enable
!
router eigrp 100
  address-family ipv6
    log-neighbor-changes
    interface Loopback0
    !
    interface GigabitEthernet0/0/0/0
Final configuration including the IOS neighbor can be seen on the picture below.
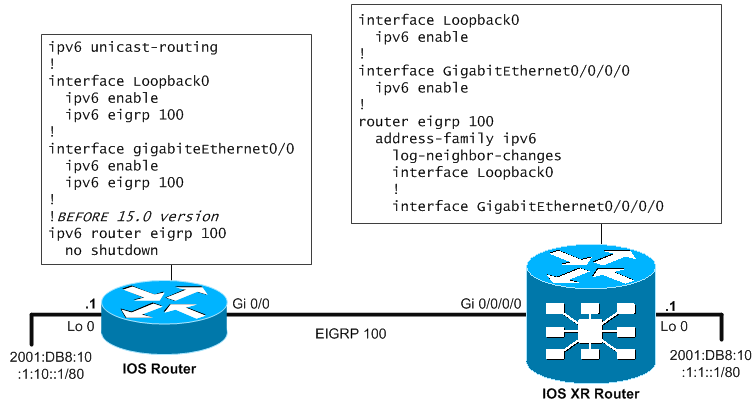
Verification can be done quickly with the following commands:
show eigrp 100 ipv6 neighbors
RP/0/RSP0/CPU0:PE1#show eigrp 100 ipv6 neighbors
IPv6-EIGRP neighbors for AS(100) vrf default
H   Address                    Interface  Hold  Uptime   SRTT RTO Q   Seq
                                          (sec)          (ms)     Cnt Num
0   Link Local Address:        Gi0/0/0/0  11    00:06:36 2    300 0   6
    fe80::eab7:48ff:fe2c:a180

show eigrp 100 ipv6 interfaces
RP/0/RSP0/CPU0:PE1#show eigrp 100 ipv6 interfaces
IPv6-EIGRP interfaces for AS(100)

                        Xmit Queue   Mean Pacing Time Multicast   Pending
Interface         Peers Un/Reliable  SRTT Un/Reliable Flow Timer  Routes
Gi0/0/0/0           1     0/0           2    0/10         0          0
Lo0                 0     0/0           0    0/10         0          0

show eigrp 100 ipv6 topology
RP/0/RSP0/CPU0:PE1#show eigrp 100 ipv6 topology
IPv6-EIGRP Topology Table for AS(100)/ID(10.1.1.1)

Codes: P - Passive, A - Active, U - Update, Q - Query, R - Reply,
       r - reply Status, s - sia Status

P 2001:db8:10:1:1::/80, 1 successors, FD is 128256
        via Connected, Loopback0
P 2001:db8:10:1:10::/80, 1 successors, FD is 153856
        via fe80::eab7:48ff:fe2c:a180 (153856/128256), GigabitEthernet0/0/0/0
EIGRP Equal and Unequal Cost Load-Balancing
As we all know from our CCNA courses, EIGRP does equal cost load-balancing along by default 4 paths that are valid.
On IOS XR you can get up to 32 maximum paths load-balancing done with the maximum-path parameters under EIGRP. Example:
router eigrp 100
  address-family ipv4
    maximum-paths 32
EIGRP also support unequal load-balancing thanks to the advanced metric that can avoid loops thanks to the feasible backup condition (Advertised Distance < Feasible Distance). To activate this feature, use the variance modification. Configuration:
router eigrp 100
  address-family ipv4
    variance 2
NOTE: Variance is a value from 1 to 128 (default is 1) that is a multiplier of the best path metric to select unequal paths. To select another route with worse metric as a unequal load-balance candidate, its feasible metric have to be lower than the best route multiplied with the variance. Also in addition, the Feasibility condition have to be met (the Advertized Distance of the route candidate have to be lower than the current best route Feasible Distance).
For example we have a primary route with FD = 500 and AD = 300. And we have two other routes to the same destination. Route 1 with FD = 600 and AD = 400 and Route 2 with FD = 550 and AD = 520.
We change multiplier variance to 2. So the candidates for unequal load-balancing have to have cost less than FD=500*2 = 1000. Both Route 1 and Route 2 are valid in this perspective. However, only Route 1 is selected as it also is valid for the feasibility condition. Route 2 is invalid for load-balancing because Route 2 AD = 520 is higher than best route FD = 500. This protects from loops in the load-balancing.
EIGRP IOS XR Authentication
For both IPv4 configuration and IPv6 configuration, create first a key change with keys:
key chain <name>
  key 1
    key-string <key1>
  key 2
    key-string <key2>
Then you can apply the authentication with keychain to either IPv4:
router eigrp 100
  address-family ipv4
    interface GigabitEthernet0/0/0/0
    authentication keychain PE1chain
Or to IPv6 address family
router eigrp 100
  address-family ipv6
    interface GigabitEthernet0/0/0/0
    authentication keychain PE1chain
NOTE: Because Cisco IOS XR supports only MD5 authentication, there is no need to define authentication mode.
4. OSPF and OSPFv3 on IOS XR configuration example
First of all I would like to point to excellent Cisco OSPF on IOS XR documentation that can be found here. So for anything you do not find here, go to that link.
As this article is not intended to explain everything in regards to OSPF, but some super quick IOS XR logic with OSPF will be presented and will be followed immediately with IPv4 OSPF example configuration for IOS XR and IPv6 OSPF example.
First, on IOS XR, both OSPFv2 (IPv4) and OSPFv3 (IPv6) are implemented. OSPFv2 uses 224.0.0.5 for multicast hello packets and OSPFv3 uses FF02::5 for hello packets. Both versions use 32bit router ID (on cisco represented in IPv4 format for better readability – also in IPv6 environment).
NOTE: In IPv6 environment you have to manually enter “router ID as x.x.x.x” to have router ID created if no IPv4 interfaces exist on the router.
Adding interfaces to OSPF in IOS, IOS XE and IOS XD comparison
- Cisco IOS XR : Specify interface under router configuration mode
- IOS and IOS XE (IPv4 only) : Specify network under router configuration mode
- IOS and IOS XE : Specify OSPF process under interface configuration mode
Configuration example of IOS XR with IPv4 network
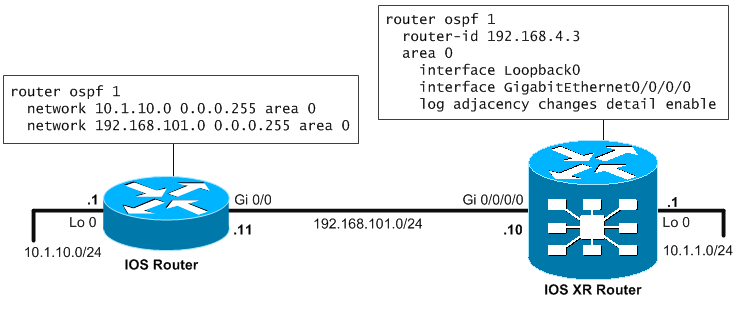
Explanation, is that on IOS router with IPv4, you go the usual way by defining the networks and area with the “network” command. This command specifies both networks and interfaces to be used by the ospf process.
router ospf 1
  network 10.1.10.0 0.0.0.255 area 0
  network 192.168.101.0 0.0.0.255 area 0
On IOS XR, the configuration is used in a more “topological” way. On IOS XR, you define directly the interfaces that should work with OSPFv2.
router ospf 1
  router-id 192.168.4.3
  area 0
    interface Loopback0
    interface GigabitEthernet0/0/0/0
    log adjacency changes detail enable
NOTE: On IOS XR, the neighbors states are not logged as you are maybe used to on IOS, to activate this use the “log adjacency changes detail enable” command.
Configuration example of IOS XR with IPv6 network
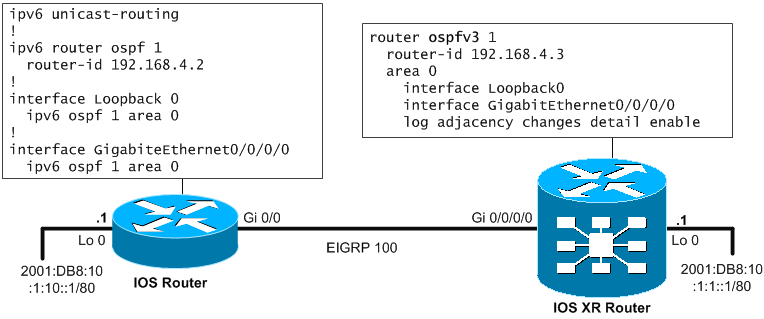
Again explanation is that on IOS, the IPv6 routing protocols are configured directly under interfaces (with common configuration under “ipv6 router ospf 1”. Please note that if you have completely IPv6 environment, ergo no interface has IPv4 address, then you need to manually configure the router-id.
ipv6 unicast-routing
!
ipv6 router ospf 1
  router-id 192.168.4.3
!
interface Loopback 0
  ipv6 ospf 1 area 0
!
interface GigabiteEthernet0/0/0/0
  ipv6 ospf 1 area 0
On IOS XR, this is nice that the configuration is extremely identical except that you must use the “ospfv3” keyword.
router ospfv3 1
  router-id 192.168.4.3
  area 0
    interface Loopback0
    interface GigabitEthernet0/0/0/0
    log adjacency changes detail enable
Verification on IOS XR
You can do “show protocols” on IOS XR as an alternative for IOS “show ip protocols“.
RP/0/RSP0/CPU0:P2# show protocols
Routing Protocol OSPF 1
  Router Id: 192.168.4.2
  Distance: 110
  Non-Stop Forwarding: Disabled
  Redistribution:
    None
  Area 0
    Loopback0
    GigabitEthernet0/0/0/0
If you want to check if your OSPF have found any neighbors already, have a look to “show ospf neighbors” for IPv4 OSPFv2 or “show ospfv3 neighbors” for IPv6 OSPFv3 neighbors.
RP/0/RSP0/CPU0:PE1# show ospf neighbor

Neighbors for OSPF 1

Neighbor ID  Pri  State      Dead Time  Address          Interface
192.168.4.2  1    FULL/BDR   00:00:36   192.168.101.1    GigabitEthernet0/0/0/0
    Neighbor is up for 05:54:11

Total neighbor count: 1

-------------------------------------------------------------------------------
RP/0/RSP0/CPU0:PE1# show ospfv3 neighbor
Tue Oct 19 11:58:00.240 UTC

Neighbors for OSPFv3 1

Neighbor ID    Pri   State   Dead Time   Interface ID    Interface
192.168.4.2    1     FULL/DR 00:00:33    7               GigabitEthernet0/0/0/0
    Neighbor is up for 00:45:41
The same logic applies to verification of routing tables, you can use “show route” for IPv4 routing and “show route ipv6” for IPv6 routing.
OSPF equal cost load-balancing
On IOS you know that OSFP manages by default equal cost load-balancing of maximum 4 paths by defaut, and by 8 is the configurable limit. On IOS XR, the load-balancing maximum is 32 paths, but depending on the platform, it can be reduced:
ASR9000 has by defaut 8, while maximum configuratble is also 8
ASR12000 has by default 16 and maximum configurable is also 16
CSR-1 has by default 32 and maximum configurable is also 32
OSPFv2 and OSPFv3 Authentication on IOS XR and IOS
There is a big difference between OSPFv2 (IPv4) version and OSPFv3 (IPv6) version by nature. OSPFv2 uses plaintext or MD5 has that is internally calculated and added for every OSPF packet and checked internally in OSPF process.
On IOS XR, the OSPFv2 security can be configured in different places. It can be configured under routing process, under area configuration or under interface. The lowest configuration is used in the hierarchy process->area->interface. If lower configuration doesn’t exist, it inherits configuration from above.
Example:
router ospf 1
  area 0
    interface GigabitEthernet0/0/0/0
      authentication message-digest
      message-digest-key 1 md5 networkgeekstuffRulez
On IOS, the configuration of OSPFv2 was done either in area or interface configuration and the same hierarchy logic applied, however the key could only be configured under interface.
Example:
interface FastEthernet0/0
  ip ospf authentication message-digest
  ip ospf message-digest-key 1 md5 networkgeekstuffRulez
OSPFv3 relies on IPv6 native security via IP Security (IPSec). For this you need the key, but also something called SPI (Security Parameter Index). SPI is something like a port number for IPSec packets because in IPSec, the AH or ESP header goes directly behind IPv6 header and TCP/UDP ports are not known. When you specify SPI you are telling your router what SPI packets to check for OSPF, otherwise it would have to check all IPSec packets he gets.
On IOS XR the OSPFv3 authentication and encryption can be configured at the same levels as OSPFv2.
Example:
router ospfv3 1
  area 0
    interface GigabitEthernet0/0/0/0
      authentication ipsec spi 256 sha1 networkgeekstuffRulez
On IOS the authentication of OSPFv3 can be only configured under area configuration.
Example:
interface FastEthernet0/0
  ipv6 ospf authentication ipsec spi 256 sha1 networkgeekstuffRulez
5. IS-IS Basics on IOS XR
Intermediate System to Intermediate Systems (IS-IS) is a great protocol, my favorite actually. In summary to its theory, it is a link-state protocol (like OSPF) and it uses dijkstra for path calculation. What is interesting about it is that in runs over a stand-alone routed protocol with its own addressing called Connectionless Network Service (CLNS). So you will not see packets of this protocol use any form of IPv4/IPv6. It has its own.This makes this protocols easily extendable and now supports both IPv4 and IPv6 easily.
Also from architecture point of view, it also uses two layers called Level 1 and Level 2. Level 2 is something like a distributed backbone and Layer 1 is like an area in OSPF, it hosts all other non-core subnets. This concept then also moves to routers position withing the hierarchy, unlike OSPF where borders where place on routers (one interface in area x and another in area y), in IS-IS the borders are on links.
This creates for us routers that can be designated based on their position in the Level1-Level2 hierarchy as follows:
- Level 1 routers learn about paths withing the area that they connect to (that is intra-area)
- Level 2 routers are routes propagating paths between areas (that is, interarea)
- Level 1-2 routers that have paths both interarea and intraarea.
The following diagram should make you understand quickly the principles:
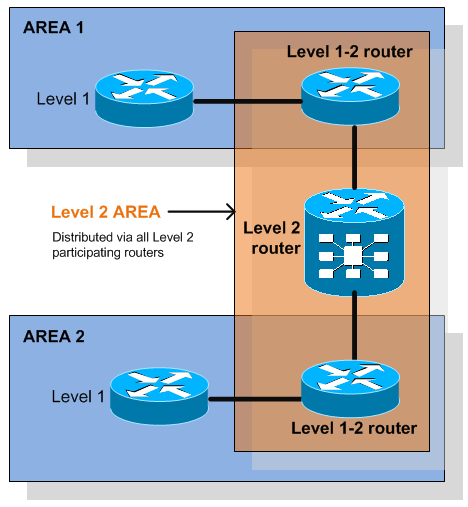
NOTE: As boundaries are on links, each IS-IS router belongs to exactly one area.
CLNS Addresses
Ok, I promised no theory but this piece is important. IS-IS requires the use of CLNS addressing to communicate between routers, therefore it is necessary to understand them a little. The most common format for CLNS addresses is called NSAP and is as follows:
- First 2 bytes set to “49” -> identifies private addresses inside CLNS (like 10.0.0.0/8 in IPv4)
- 4bytes considered Area ID -> you give numerical ID of the IS-IS area number here
- 6 bytes considered System ID -> most often people put here the IPv4 address to have link to the IPv4 address of a router easily recognizable
- NSEL (2bytes) -> this is CLNS integrated alternative to TCP/UDP ports. Normally “.00” means the system management plane and is called “NET address”
Example:
49.0001.1921.6800.1001.00
IS-IS Metric
There is absolutely no metric calculation for a link in IS-IS, every link is by default of metric “10”. If you want something else, you will configure it manually. This is actually very good for most ISP networks. By default the metric is 6bit value for interface metric and 10bit value for complete path metric (called narrow-style). Optionally you can switch to 24bit interface metric and 32bit path metric called (wide-style).
IS-IS Configuration example for IOS and IOS XR
Following the topology used in all examples, here is both IOS XR and IOS configuration for a very limited IS-IS functionality.
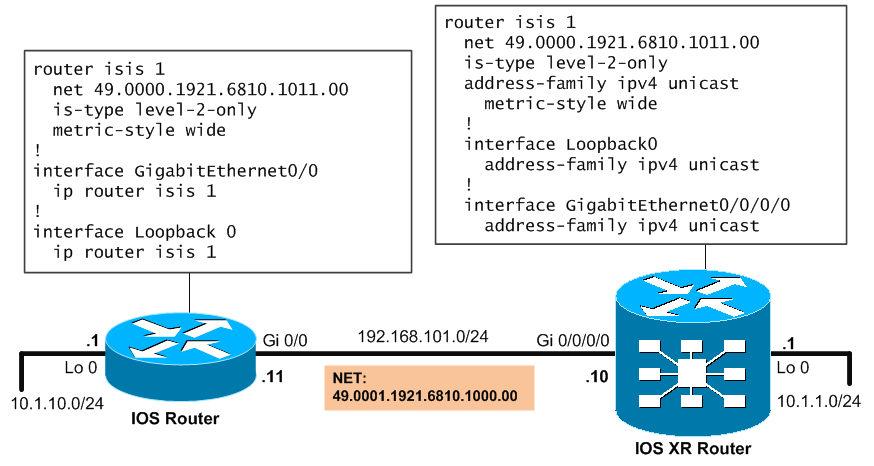
Explanation,
On both routers we entered “router isis 1” where “1” is the process designation. Configuration of CLNS NET addresses is done here, doesn’t have to occur on interfaces as CLNS addressing logic doesn’t address interfaces but whole nodes. On normal IOS router, ISIS is configured, assigned NET address, set to level2-only mode and metrics set to wide-style, also on IOS, the interfaces have to be explicitelly enabled for ISIS:
router isis 1
  net 49.0000.1921.6810.1011.00
  is-type level-2-only
  metric-style wide
!
interface GigabitEthernet0/0
  ip router isis 1
!
interface Loopback 0
  ip router isis 1
On IOS XR, the same configuration is shown, the only different is that on IOS XR, the concept of address-families was added, you will see the benefits when we move to IPv6 for this.
router isis 1
  net 49.0000.1921.6810.1011.00
  is-type level-2-only
  address-family ipv4 unicast
    metric-style wide
  !
  interface Loopback0
    address-family ipv4 unicast
  !
  interface GigabitEthernet0/0/0/0
    address-family ipv4 unicast
For verification, I would recoment show protocols isis , show isis neighbors and show route on IOS XR:
RP/0/RSP0/CPU0:PE# show protocols isis

IS-IS Router: 1
  System Id: 1921.6810.1011
  IS Levels: level-2-only
  Manual area address(es):
    49.0000
  Routing for area address(es):
    49.0000
  Non-stop forwarding: Disabled
  Most recent startup mode: Cold Restart
  Topologies supported by IS-IS:
    IPv4 Unicast
      Level-2
        Metric style (generate/accept): Wide/Wide
        Metric: 10
        ISPF status: Disabled
      No protocols redistributed
      Distance: 115
Interfaces supported by IS-IS:
  Loopback0 is running actively (active in configuration)
  GigabitEthernet0/0/00/ is running actively (active in configuration)

-------------------------------------------------------------------------

RP/0/RSP0/CPU0:PE1# show isis neighbors

IS-IS 1 neighbors:
System Id    Interface      SNPA             State Holdtime Type IETF-NSF
R1           Gi0/0/0/0      cc47.567c.4ac0   Up    26       L2   Capable

-------------------------------------------------------------------------

RP/0/RSP0/CPU0:PE1# show route isis
Tue Oct 19 17:57:00.240 UTC

Codes: C - connected, S - static, R - RIP, B - BGP
       D - EIGRP, EX - EIGRP external, O - OSPF, IA - OSPF inter area
       N1 - OSPF NSSA external type 1, N2 - OSPF NSSA external type 2
       E1 - OSPF external type 1, E2 - OSPF external type 2, E - EGP
       i - ISIS, L1 - IS-IS level-1, L2 - IS-IS level-2
       ia - IS-IS inter area, su - IS-IS summary null, * - candidate default
       U - per-user static route, o - ODR, L - local, G - DAGR
       A - access/subscriber, (!) - FRR Backup path

Gateway of last resort is not set

i L2  10.1.10.0/24 [115/20] via 192.168.101.11, 1:27:24, GigabitEthernet0/0/0/0
IS-IS Load Balancing
On IS-IS to load-balance, costs to destination via more paths have to be equal. Maximum paths are then limited based on platform and the same table as on OSPF applies here:
ASR9000 has by defaut 8, while maximum configuratble is also 8
ASR12000 has by default 16 and maximum configurable is also 16
CSR-1 has by default 32 and maximum configurable is also 32
To configure maximum-paths on IOS XR, you can use this example:
router isis 1
  address-family ipv4 unicast
    maximum-paths 2
On IOS routers the example is a bit less complex:
router isis 1
  maximum-paths 2
IS-IS Authentication
IS-IS supports both plaintext and md5 authentication, as usual plaintext is to be avoided at all times. What is interesting is that in IS-IS, you can configure authentication of Hello packets separately toLSP packets.
Configuration examle of IOS router IS-IS authentication for both Hello packets and LSP packets authentication looks like this:
key chain NetworkGeek_IS-IS
  key 1
    key-string networkgeekrulez
!
interface FastEthernet0/0
  isis authentication mode md5
  isis authentication key-chain NetworkGeek_IS-IS
!
router isis 1
  authentication mode md5
  authentication key-chain NetworkGeek_IS-IS
Configuration example of IOS XR IS-IS authentication looks much more simle as the interface level configurations were aggregated under the isis process.
router isis 1
  lsp-password hmac-md5 networkgeekrulez
  interface GigabitEthernet0/0/0/0
    hello-password hmac-md5 networkgeekrulez
Basic IOS XR router security, User Groups and Task Groups
This section is the most boring as we do not go to much details, simply put these well known IOS commands still work as expected, but do not forget to use commit.
line console 0
login
password cisco
!
line vty 0 4
login
password sanjose
!
enable password cisco
enable secret cisco   ! enable secret negates the "enable password" ability to login
!
service password-encryption
!
banner login #Access for authorized users only.#
banner motd #Maintenance scheduled for 4:00am tomorrow#
Enable SSH access to the IOS XR router is also nothing new:
RP/0/RSP0/CPU0:IOSXRRouter(config)#username cisco password cisco
RP/0/RSP0/CPU0:IOSXRRouter(config)#domain name cisco.com
RP/0/RSP0/CPU0:IOSXRRouter#crypto key generate rsa general-keys
The name for the keys will be: the_default
Choose the size of the key modulus in the range of 512 to 2048 for your General
Purpose Keypair. Choosing a key modulus greater than 512 may take a few minutes.
How many bits in the modulus [1024]: <Enter>
Generating RSA keys ...
Done w/ crypto generate keypair
[OK]
RP/0/RSP0/CPU0:IOSXRRouter(config)#ssh server v2
RP/0/RSP0/CPU0:IOSXRRouter(config)#line default transport input ssh
RP/0/RSP0/CPU0:IOSXRRouter(config)#commit
Task Groups and User Groups
Now comes the fun part. On IOS XR you can define:
- User group – a group of users with similar level of authorization to a group of tasks
- Task group – Collection of tasks that are identified by unique task ID for each class of actions
- Task IDs – Permission to perform a given task. This is grouped into a task group and assigned to a group of users.
By diagram, it can look something like this:
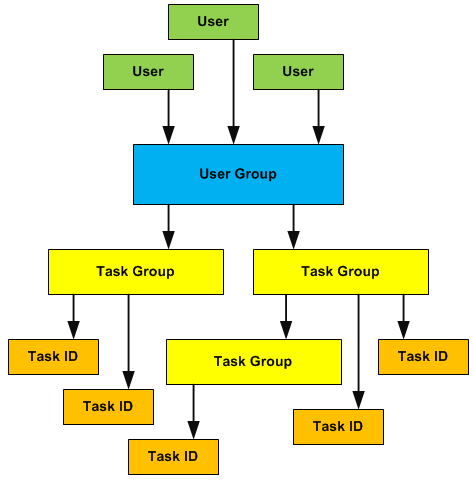
Configuration Example of Task Groups, Tasks and Users in User Groups
Lets start with what is predefined already in the IOS XR system. In a freshly booted IOS XR, these user groups already exist with predefined task groups assigned.
- root-system – Displays and execute all commands for all RSPs in the system.
- root-lr – Displays and execute all commands with a simple RSP.
- netadmin – Configure network protocols as BGP and OSPF (used by network administrators)
- sysadmin – Perform system administration tasks for the router, as maintaining core dumps and setting system core protocols as NTP.
- operator – Can perform monitoring activities to the system (cannot modify config, cannot do extensive debugging).
- cisco-support – Can deby and troubleshoot features (usually needed by Cisco TAC people).
You can add your new user to one of the existing groups, or create a specific group all youself. In the next example this will configure task group, user group and assign new user to a new user group to have modification powers over OSPF, ISIS and BGP.
taskgroup BGP
  task execute bgp
  task read bgp
  task write bgp
!
taskgroup OSPF
  task execute ospf
  task read ospf
  task write ospf
!
taskgroup ISIS
  task execute isis
  task read isis
  task write isis
!
taskgroup BGPISISOSPFTasks
  inherit taskgroup OSPF
  inherit taskgroup BGP
  inherit taskgroup ISIS
!
usergroup BGPISISOSPFAdmins
taskgroup BGPISISOSPFTasks
!
username zerxen
  group BGPISISOSPFAdmins
  secret ahoj
Configuring AAA, RADIUS and TACACS+
Basic AAA configuration is nearly identical to the IOS flavor, therefore only example below from ASR9000 IOS XR config:
radius-server host 192.168.1.1
  key radiuskey
radius source-interface Gi0/1/0/1
!
tacacs-server host 192.168.1.2
  key tacacskey2
tacacs source-interface Gi0/1/0/1
!
tacacs-server host 192.168.1.3
  key tacacskey3
tacacs source-interface Gi0/1/0/1
!
aaa group server radius RADIUS
  server 192.168.1.1
aaa group server tacacs+ TACACS
  server 192.168.1.2
  server 192.168.1.3
!
aaa authentication login RADIUSlogins group radius RADIUS line none
aaa authorization exec EXEC group TACACS local
aaa accounting commands default stop-only group tacacs+ TACACS
!
line vty 0 4
  authorization exec EXEC
  login authentication LOGIN
Configuring Syslog and SNMP logging
Again very identical to IOS as only as reference:
logging on
 logging buffered 200000
 logging 192.0.2.65
 logging 192.0.2.66
 logging trap warnings
 logging monitor notifications
 logging console disable
On IOS XR, you can also periodically store logs from logbuffer to files on flash: or harddrives: with feature called local archive. The example below creates weakly file storage for logs on harddrive.
logging archive
 archive-size 100
 archive-length 52
 file-size 1
 frequency weekly
 device harddisk
SNMPv1 ans SNMPv2 are as easily configured as one line of configuration:
snmp-server community publickey RO
snmp-server community privatekey RW
snmp-server traps bgp
snmp-server host 10.1.1.254 version 2c cisco
SNMPv3 is more complex as it incorporates usernames, groups ans TreeView limits. So I will omit this now for space conservation. IOS XR config guide on cisco.com has much more detail if you are interested in having secure SNMPv3.
Suspending, Resuming, and closing a Telnet sessions.
Again the usual as on IOS devices. If you are telneting from IOS XR to a remote destination and you want to return back to the IOS XR source box without terminating you telnet session, you can pres Ctrl+Shift+6 (or Ctrl+^) followed by “x“.
To resume a suspended session you can use “resume <number>” command. To cancel a connection in the background you can use “disconnect <number>“. To find out what is the number of all currently running/suspended sessions, you can issue show sessions.
Cisco Discovery Protocol on IOS XR
By default both on global and on interface level the CDP is DISABLED on IOS XR platforms. To enable CDP on IOS XR platforms, you have to enable CDP globaly with the cdp command and also enable cdp on any interface with cdp command as in the following example:
 cdp
 !
 interface GigabitEthernet0/0/0/0
   cdp
Verification can be as simple as showing cdp configuration (times, etc) with the show cdp command and displaying neighbors with show cdp neighbors command:
RP/0/RSP0/CPU0:PE1# show cdp
Tue Oct 16 12:52:54.828 UTC
Global CDP information:
     Sending CDP packets every 60 seconds
     Sending a holdtime value of 180 seconds
     Sending CDPv2 advertisements is enabled
RP/0/RSP0/CPU0:PE1# show cdp neighbors
Tue Oct 16 08:29:50.994 UTC

Capability Codes: R - Router, T - Trans Bridge, B - Source Route Bridge
                  S - Switch, H - Host, I - IGMP, r - Repeater
Device ID      Local Intrfce      Holdtme    Capability     Platform    Port ID
SW1            Gi0/0/0/0          123        S I            ME-3400E-   Fa0/2
NetFlow IOS XR configuration
Netflow is a life-saviour sometimes as this is the only thing to allow you to see the traffic going over your IOS XR and IOS routers. Cisco IOS XR supports only NetFlow version 9 and up and basic configuration is as follows for external collector:
ip flow-export destination 10.1.1.1 9991
ip flow-export version 9
interface FastEthernet 0/0/0
   ip flow {ingress | egress}
Summary
Well, I hope you liked this article, I definitely had a great time remembering all these things and learning a few about IOS XR. I tried to make this article as best structured as possible as it will be serving as a reference for me to search in from time to time. Next in the line is the mighty MPLS, BGP and some more features that needs to be mentioned for IOS XR, but for the extensive coverage of MPLS and BGP, I will leave that to separate another article as MPLS and BGP are big in scale.
PART 2/2 of this IOS XR Getting Started Examples Guide available here.











Very useful and well planned document. Covers all the basic configurations. must for someone who is new to XR.
Its a very nice document
Thanks for your initiative and post this on your blog! it has been helpful for my CCNA SP Study!
Excellent!!!
Good stuff. Definitely bookmarked this page as reference.
Very excellent article and an obvious huge effort exerted. Thank you very much for this precious help.
Mohamed Nidhal Beyrem Jaziri
CCIE #38232
Tunisia
Excellent!!!!!really great….i was just looking the cisco book for fundamental of IOS XR, and thinking what it is!!!!!!!!suddenly google it and get this link and went through…wort to google it instead fighting with cisco book…
Once again, thanks you very much for your effort and doc……
Excellent and precise document!!!!!!!!!!!!!!!!!!!!
Peter, Well Done!
Thank you for your successful effort in producing this concise, well documented work that simply displays the comparison of these operating systems. Your time and attention to detail is very much appreciated, excellent job!
Very helpful .. !! thanks … (Y)
Great article.
Thanks for knowledge sharing.
Hi,all. I am test,On this site RIPng configuration is wrong,I found the IOS-XR seems not support RIPng,
“RP/0/0/CPU0:R3(config)#ipv6 unicast-routing
^
% Invalid input detected at ‘^’ marker.
RP/0/0/CPU0:R3(config)#”
Hello Zhiyunzhang,
Honestly when I read your comment, at first I wanted to defend the RIPng on IOS XR, but then I noticed that the configuration of RIPng was identical to the IOS one on the topology picture above it. Because it is now more than one year since I created this article and because I failed to find in cisco documentation this. I have decided that the best approach would be to remove this portion from article to maintain a professional approach here. I personally think I did a copy&paste error of IOS XE config, so it will be better to remove this part altogether until I will have again access to IOS XR in a lab.
Feedback welcomed and accepted 😉
Hi Friend,
How are you for new years, Hope you good so now I’ve some issue to solve about L2VPN (IOS-XR CRS1) monitoring problems.
I am facing a big problem through my core network, i need to monitor our L2VPN with customer . now we are monitoring with show L2VPN Xconnect command, but customer need to know more they ask me for IP-SLA, EEM but i don’t have ideas for both options.
so if any one has a recommendation or ideas to help.
waiting for your support.
Thanks,
Excellent document. very well written! Thanks !