Tutorial for creating first external SDN application for HP SDN VAN controller – Part 2/3: Influencing Flows via cURL commands
In this tutorial series, I will show you by example, how to build your first external REST API based SDN application for HP SDN VAN controller, with web interface for the user control. Target will be to learn how to use REST API, curl and perl scripting to generate some basic and useful code to view and also manipulate network traffic.
This article is part of “Tutorial for creating first external SDN application for HP SDN VAN controller” series consisting these articles:
- Part 1/3 – LAB creation and REST API introduction
- Part 2/3 – Influencing Flows via cURL commands
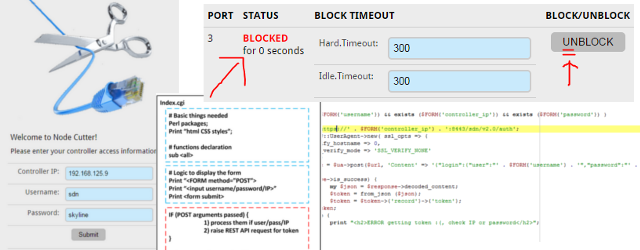
- Part 3/3 – “Node Cutter” perl application with web interface
In this Part 2/3, we will discuss how to create a few cURL commands in linux environment, authenticate to the controller REST API interface and generate flows to modify the forwarding path overriding the controller decisions.
Contents
Step 1) cURL command line tool to authenticate to the REST API and receive a token
Lets start with the basics, in linux console exists a utility command “curl” that we will use. The command to send basic JSON structure with username/password to the controller /auth in REST API is as follows:
$ curl -k -H 'Content-Type:application/json' \
       -d'{"login":{"user":"sdn","password":"skyline","domain":"sdn"}}' \
       https://192.168.125.9:8443/sdn/v2.0/auth
Explanation:
-k: Allow connections to SSL sites without certs (H) , we need this because of the self-signed certificate used by default
-H: This parameter enables adding information to the HTTP header, we need to insert here that the content of this HTTP header is going to be a JSON data structure
-d: This parameter is giving cURL the content to add to the content of this HTTP request.
[url]: Every curl rrequest needs a URL where to send it, in our case notice that the URL is the SDN REST API URL that you know from the previous part of this tutorial
NOTE: If you are missing this on your ubuntu VM that we discussed in previous part, install this command with:
$ sudo apt-get install curl
How should the output look-like? This is what you should probably get when you execute this command on the LAB environment:
# curl -sk -H 'Content-Type:application/json' \
       -d'{"login":{"user":"sdn","password":"skyline","domain":"sdn"}}' \
       https://192.168.125.9:8443/sdn/v2.0/auth
Outcome:
{"record":{"token":"ca6f17e6e47946eb9fccba74493de371","expiration":1432050428000,"expirationDate":"2015-05-19 17-47-08 +0200","userId":"8cc58ebf5b0a42b78384a66f577de3a2","userName":"sdn","domainId":"4ffb24500bcc4122905435c4e6882d6d","domainName":"sdn","roles":["sdn-user","sdn-admin"]}}
Uff, … what a mess. This is not really readable, so lets try to format it a little better. We can using the python json library command python -mjson.tool that takes the STDIN and formats it in a human readable way. So again, just note that I have added a pipeline at the end with the python at the end.
# curl -sk -H 'Content-Type:application/json' \
       -d'{"login":{"user":"sdn","password":"skyline","domain":"sdn"}}' \
       https://192.168.125.9:8443/sdn/v2.0/auth \
| python -mjson.tool
Outcome:
{
    "record": {
        "domainId": "4ffb24500bcc4122905435c4e6882d6d",
        "domainName": "sdn",
        "expiration": 1432050873000,
        "expirationDate": "2015-05-19 17-54-33 +0200",
        "roles": [
            "sdn-user",
            "sdn-admin"
        ],
        "token": "53c50d119559431e9dd555d1c7cb916c",
        "userId": "8cc58ebf5b0a42b78384a66f577de3a2",
        "userName": "sdn"
    }
}
Much better! Now you can see that we have again received a “token” that is a value we are going to need with all the following cURL requests to other parts of the REST API. So, lets make this a little bit more easy, lets have this command to only extract the token value and add it to a global variable in bash (which should be your default ubuntu command line, if not, enter bash command to activate it).
First let’s filter the token value from all the other stuff. I will do it the old fashion way with grep/tr/cut commands. The command is now this:
curl -sk -H 'Content-Type:application/json' \
       -d'{"login":{"user":"sdn","password":"skyline","domain":"sdn"}}' \
       https://192.168.125.9:8443/sdn/v2.0/auth \
| python -mjson.tool \
| grep "token" \
| tr -d [:space:] \
| tr -d "\"," \
| cut -d ":" -f 2
Explanation:
grep – command to filter only lines of STDIN where a given string is present
tr – truncate command that replaces all appearances of one letter from source string with another letter, in this case we used it twice, once to remove white spaces and second time to clear quotation marks and comma sign.
cut – this tool is used to cut a certain words from a single line STDIN (imagine grep, but vertical) with the deminator of “:” and we want the second column.
NOTE: JSON can be quite nicelly parsed in different languages and there is also a nice “jq” tool that I personally like to use, but I wanted this tutorial to avoid dependencies as much as possible so JSON parsing will be done in this old-fasion way here (at least until we get to perl). If you want to try something much more simple, check jq tool that can be used to get you any JSON variable directly.
Outcome:
2c8bbb5ac2db4162a2f95a064706dcc4
Cool, I now only have a quick script to get the value. So lets just export it to a file in /tmp directory in bash shell so that all our next scripts can use this without asking the controller for it again, but for this, lets start making this as a bash script so open your favorite editor and write this into the file:
#add our token to the variable "token"
token=`curl -sk -H 'Content-Type:application/json' \
     -d'{"login":{"user":"sdn","password":"skyline","domain":"sdn"}}' \
     https://192.168.125.9:8443/sdn/v2.0/auth \
              | python -mjson.tool \
              | grep "token" \
              | tr -d [:space:] \
              | tr -d "\"," \
              | cut -d ":" -f 2`;

echo "This is the token recoeved $token,";
echo "will place it in /temp/SDNTOKEN file for later use.";
echo "$token" > /tmp/SDNTOKEN
Step 2) Retrieving some basic information via cURL (nodes/devices/flows)
Identically as in the previous part1 of this series where we retrieved this directly in the REST API web interface, the most important information that we are interested in are the list of switches, list of active nodes and flows from a particular switch.
/nodes – retrieving list of end nodes via cURL
The curl command for this looks as follows, it is using the token holding file from previous script and queries the controller for the nodes.
curl -sk -H "X-Auth-Token:`cat /tmp/SDNTOKEN`" \
     -H "Content-Type:application/json" \
     https://192.168.125.9:8443/sdn/v2.0/net/nodes \
| python -mjson.tool
Explanation:
The only difference here is that we are adding two header lines with two “-H” parameters, one for declaring that the content is to be JSON format and the second is adding the X-Auth-Token parameter with the inclusion of the token from the /tmp/SDNTOKEN file we created previously.
Outcome:
{
    "nodes": [
        {
            "dpid": "00:00:00:00:00:00:00:03",
            "ip": "10.10.2.1",
            "mac": "a2:3a:9d:26:39:6b",
            "port": 3,
            "vid": 0
        },
        {
            "dpid": "00:00:00:00:00:00:00:06",
            "ip": "10.10.2.254",
            "mac": "c2:76:34:44:16:44",
            "port": 3,
            "vid": 0
        }
    ]
}
/devices – retrieving a list of switches via cURL
This is again the cURL command to use:
curl -sk -H "X-Auth-Token:`cat /tmp/SDNTOKEN`" \
     -H "Content-Type:application/json" \
     https://192.168.125.9:8443/sdn/v2.0/net/devices \
| python -mjson.tool
Outcome:
{
    "devices": [
        {
            "Device Status": "Online",
            "uid": "00:00:00:00:00:00:00:03",
            "uris": [
                "OF:00:00:00:00:00:00:00:03"
            ]
        },
        {
            "Device Status": "Offline",
            "uid": "00:00:00:00:00:00:00:10",
            "uris": [
                "OF:00:00:00:00:00:00:00:10"
            ]
        },
        {
            "Device Status": "Offline",
            "uid": "00:00:00:00:00:00:00:14",
            "uris": [
                "OF:00:00:00:00:00:00:00:14"
            ]
        },
        {
            "Device Status": "Online",
            "uid": "00:00:00:00:00:00:00:06",
            "uris": [
                "OF:00:00:00:00:00:00:00:06"
            ]
        },
        {
            "Device Status": "Offline",
            "uid": "00:00:00:00:00:00:00:09",
            "uris": [
                "OF:00:00:00:00:00:00:00:09"
            ]
        },
        {
            "Device Status": "Online",
            "uid": "00:00:00:00:00:00:00:01",
            "uris": [
                "OF:00:00:00:00:00:00:00:01"
            ]
        },
        {
            "Device Status": "Offline",
            "uid": "00:00:00:00:00:00:00:08",
            "uris": [
                "OF:00:00:00:00:00:00:00:08"
            ]
        },
        {
            "Device Status": "Online",
            "uid": "00:00:00:00:00:00:00:04",
            "uris": [
                "OF:00:00:00:00:00:00:00:04"
            ]
        },
        {
            "Device Status": "Online",
            "uid": "00:00:00:00:00:00:00:05",
            "uris": [
                "OF:00:00:00:00:00:00:00:05"
            ]
        },
        {
            "Device Status": "Online",
            "uid": "00:00:00:00:00:00:00:02",
            "uris": [
                "OF:00:00:00:00:00:00:00:02"
            ]
        }
    ]
}
/of/datapath/{dpid}/flow
This one is more interesting because you need to send the specific switch dpid identification to the cURL request content for REST API to understand which switch you are asking for. But what DPID to choose, this is up to you, I was interested in the flow between H1 and G1 so I manually selected the DPID of S3 that is 00:00:00:00:00:00:00:03 and added it to another /tmp/SDNDPID file for temporary storage. Then I actually used two commands:
echo "00:00:00:00:00:00:00:03" > /tmp/SDNDPID
curl -sk -H "X-Auth-Token:`cat /tmp/SDNTOKEN`" \
       -H "Content-Type:application/json" \
       https://192.168.125.9:8443/sdn/v2.0/of/datapaths/`cat /tmp/SDNDPID`/flows \
| python -mjson.tool
Outcome:
{
    "flows": [
        {
            "byte_count": "15042",
            "cookie": "0xffff000000000000",
            "duration_nsec": "325000000",
            "duration_sec": 15396,
            "flow_mod_flags": [
                "send_flow_rem"
            ],
            "hard_timeout": 0,
            "idle_timeout": 0,
            "instructions": [
                {
                    "apply_actions": [
                        {
                            "output": "CONTROLLER"
                        }
                    ]
                }
            ],
            "match": [],
            "packet_count": "225",
            "priority": 0,
            "table_id": 0
        },
        {
            "byte_count": "1465",
            "cookie": "0xfffa000000002328",
            "duration_nsec": "707000000",
            "duration_sec": 1,
            "flow_mod_flags": [
                "send_flow_rem"
            ],
            "hard_timeout": 0,
            "idle_timeout": 60,
            "instructions": [
                {
                    "apply_actions": [
                        {
                            "output": 3
                        }
                    ]
                }
            ],
            "match": [
                {
                    "in_port": 1
                },
                {
                    "eth_type": "ipv4"
                },
                {
                    "ipv4_src": "10.10.2.254"
                },
                {
                    "ipv4_dst": "10.10.2.1"
                }
            ],
            "packet_count": "5",
            "priority": 29999,
            "table_id": 0
        },
        {
            "byte_count": "439",
            "cookie": "0xfffa000000002328",
            "duration_nsec": "660000000",
            "duration_sec": 1,
            "flow_mod_flags": [
                "send_flow_rem"
            ],
            "hard_timeout": 0,
            "idle_timeout": 60,
            "instructions": [
                {
                    "apply_actions": [
                        {
                            "output": 1
                        }
                    ]
                }
            ],
            "match": [
                {
                    "in_port": 3
                },
                {
                    "eth_type": "ipv4"
                },
                {
                    "ipv4_src": "10.10.2.1"
                },
                {
                    "ipv4_dst": "10.10.2.254"
                }
            ],
            "packet_count": "5",
            "priority": 29999,
            "table_id": 0
        }
    ],
    "version": "1.3.0"
}
Step 3) Pushing first flow with cURL
Ok, we know how to construct a basic cURL request towards REST API interface to retrieve information, now let’s try to influence something. I will now switch gear a little and will tell you that we will completely change the route for the H1 host communication with G1 host.
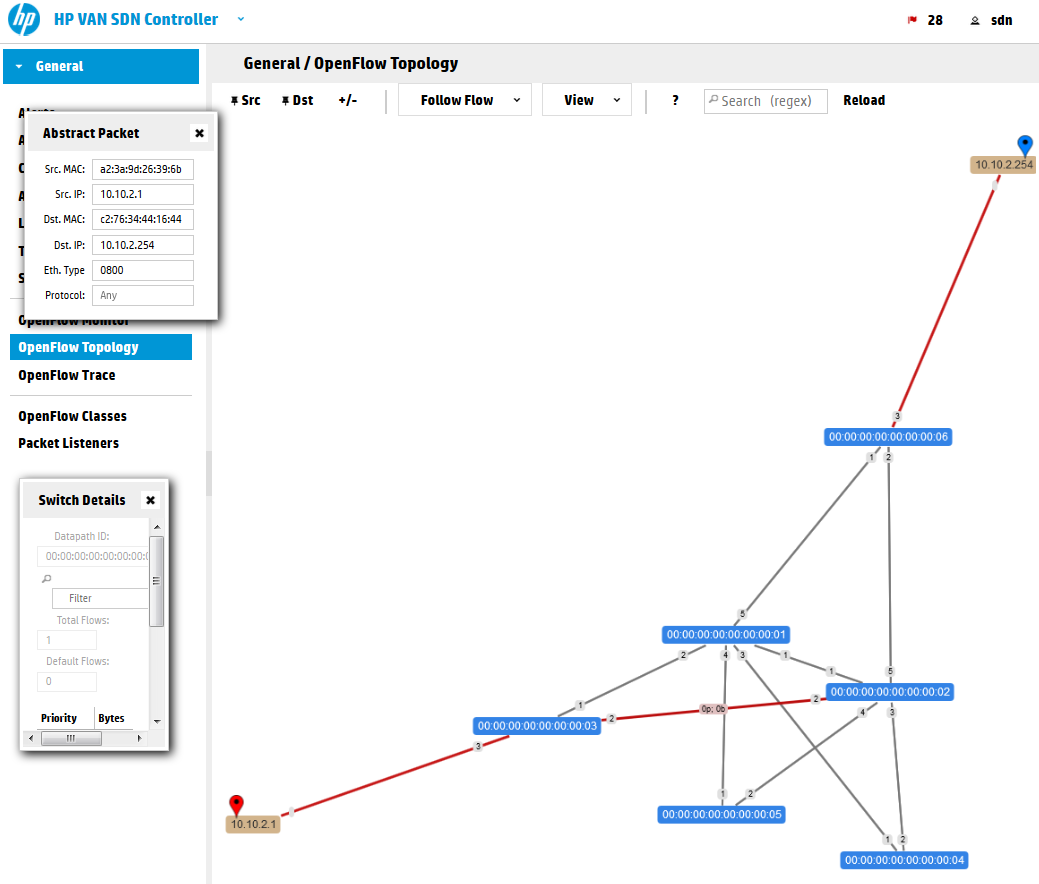
First remember the view from previous part of this series that showed the OpenFlow Topology view from the controller GUI? In your mininet network, ping from H1(10.10.2.1) to G1(10.10.2.254) and check the “Abstract Packet” tracking again like this:
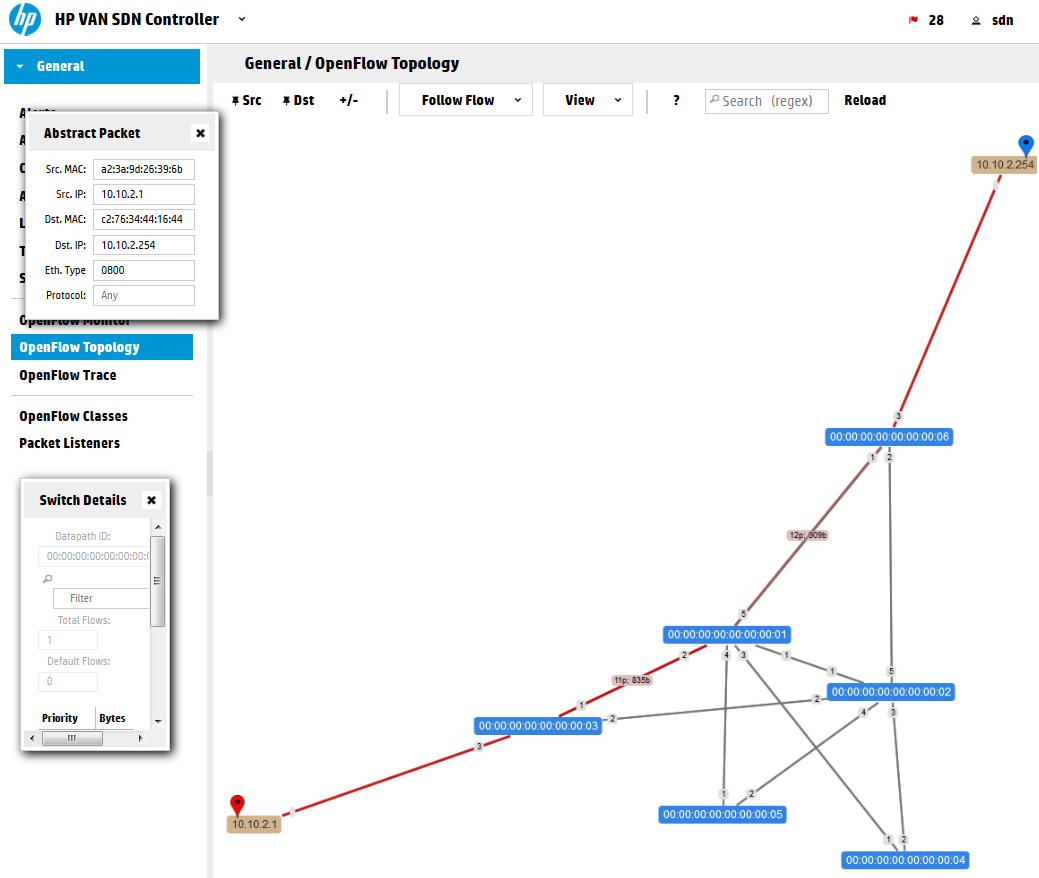
You can see that the path is using the Shortest Path First (SPF) algorithm that the controller is using to select a path on new traffic. Let’s have a look on the flow table to check how we can override this.
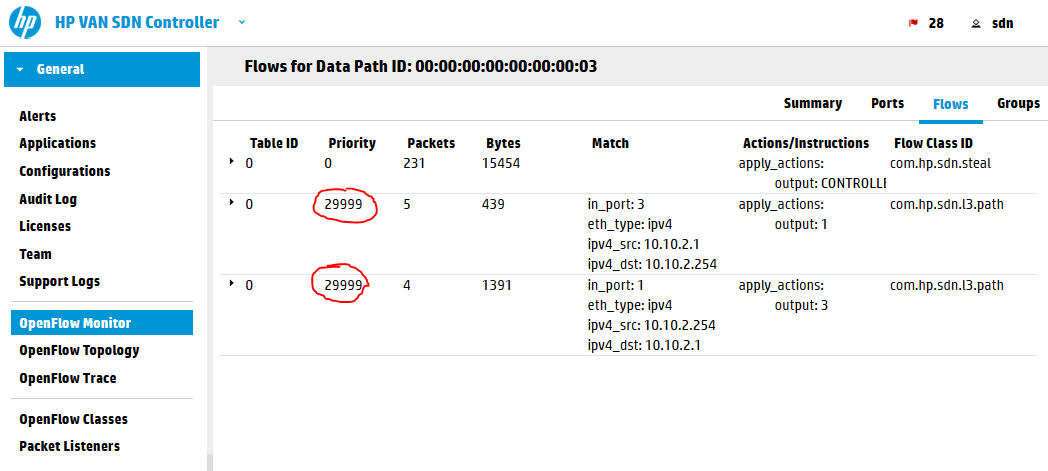
The controller is using rule sin table #0 (which is the default table as OpenFlow 1.3 standard is allowing to have multiple tables and rules jumping between them) and priority of 29999. You can think about priority right now as a form of preference for a request. If there are two rules matching a packet, the one with higher priority will be used. So what we need to do here is to insert a flow with priority of 30000 to override this.
NOTE: Alternative is that the SPF flows have quite a small idle timer of 60seconds. So if you create your flows with lower priority at the time the SPF rules already timed-out, the switch will not ask the controller for new SPF rules because it already knows what to do with the packets and will not bother to ask the controller. So feel free to experiment with the priority values and check the behavior of switches.
Constructing the flow JSON data to insert via REST API
Ok, looking at the topology, lets have a simple target that we want to add a flow to switch S3, to push packets for G1/10.10.2.254 destination out of port “2” towards switch S2. This should be easy to do, right? 🙂 What we need is:
- REST API call for flows inclusion
- flow JSON structure to enter into this call
- construct cURL call to push it with HTTP POST method.
1) REST API call
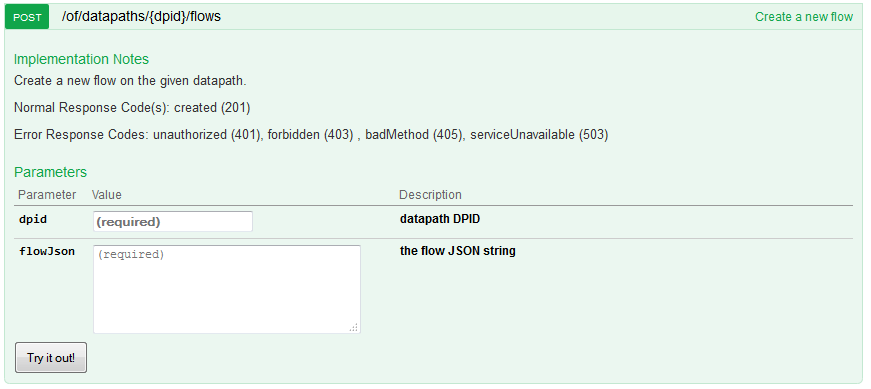
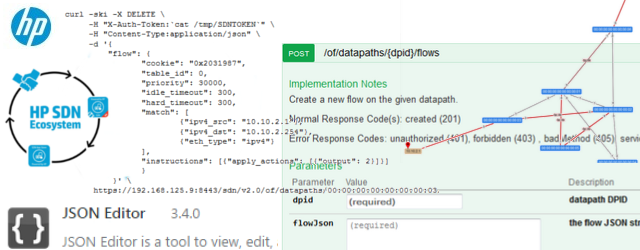
The REST API function that we want to use is /of/datapath/{dpid}/flow, but the POST version which is for inserting (not reading) flows. But when you look at this method, there is no hint how to construct the required “flow” JSON fields:
2) “flow” JSON definition
The REST API has one very nice feature and that is that all JSON data models can be viewed in a controller URL: https://192.168.125.9:8443/sdn/v2.0/models
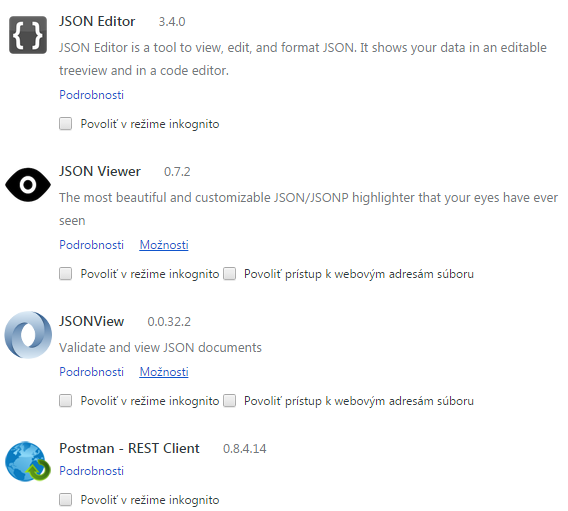
Please note that if you open this in default browser, you will see only a lot of unstructured text, you need a plugin to change this to a readable format. I recommend that you install JSON tools to chrome browser in order to read this in a very easy way:
Once you have them, go to the URL https://192.168.125.9:8443/sdn/v2.0/models with Chrome and full text search how the “flow” data-structure is defined, it will be looking like this:
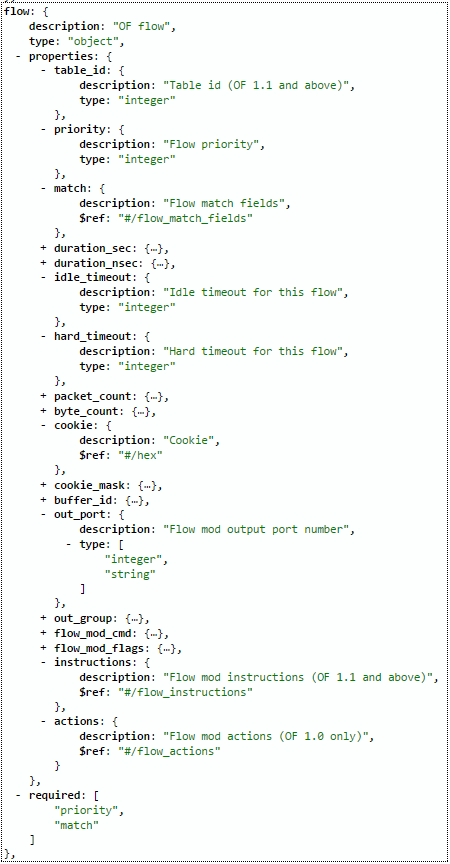
Ok, we have the structure, lets construct the JSON flow for switch S3 dpid: 00:00:00:00:00:00:00:03 , to push traffic from H1 IP: 10.10.2.1 for destination G1 IP: 10.10.2.254 out of port “2”. In addition I want to override the default priority used by the controller so my priority will be 30000 and I am also setting idle and hard timeout values for these rules to make this rule dissapear automatically after 5minutes (Warning: with hard timeout this will be deleted after 5minutes even if there is active traffic using this rule!). This is there sulting JSON specifically for this (note that I used “instructions” because I have OpenFlow 1.3 running mininet, if you have OpenFlow 1.0 use “actions” as defined above):
{
        "flow": {
                "cookie": "0x2031987",
                "table_id": 0,
                "priority": 30000,
                "idle_timeout": 300,
                "hard_timeout": 300,
                "match": [
                        {"ipv4_src": "10.10.2.1"},
                        {"ipv4_dst": "10.10.2.254"},
                        {"eth_type": "ipv4"}
                ],
                "instructions": [{"apply_actions": [{"output": 2}]}]
        }
}
Explanation:
- cookie – this is a hexa value that you can choose youself, it has no effect on the forwarding, but for me it is usefull later when I will be looking at flowtables to differentiate between the flows I have included and flows from other applications. I choosed this value as reference to my birthday 🙂
- table_id – we can have multiple tables, but since we do not require this now, lets use the default table with ID: 0
- priority – as mentioned, to override default SPF flows with priority 29999, we choose priority of 30000
- idle_timeout – this is a timere that if it reaches 300 seconds will remove the flow, however it gets refreshed with every packet matching this rule, so if the session is active, it will not be removed
- hard_timeout – this timeout is strictly going to reach 300 seconds will remove this rule, ignoring if the traffic is active or not, we will use this now for experiment to avoid the need to manually clean our flows (later I will show how to remove flows via cURL)
- match – this parameter is taking an array as input that is defined by [ ] brackets. Inside these we will defined the rules for matching this flow. See https://192.168.125.9:8443/sdn/v2.0/models and search for definition of “match” JSON structure to see all the options, right now we used only the basic ipv4_src and ipv4_dst and defined that we are looking for ipv4 traffic with eth_type.
- instructions – another array defined by [ ] brackets, inside we will have only one action, which recursivelly also takes an array because one rule can do multiple things with the packet! and by “output”:2 we say that we want the packet to be forwarded out of port 2.
3) cURL call to push the new flow
So we have constructed the JSON, if we use the previously showed way of adding JSON to cURL command it would look like this:
curl -ski -X POST \
     -H "X-Auth-Token:`cat /tmp/SDNTOKEN`" \
     -H "Content-Type:application/json" \
     -d '{
         "flow": {
                "cookie": "0x2031987",
                "table_id": 0,
                "priority": 30000,
                "idle_timeout": 300,
                "hard_timeout": 300,
                "match": [
                        {"ipv4_src": "10.10.2.1"},
                        {"ipv4_dst": "10.10.2.254"},
                        {"eth_type": "ipv4"}
                ],
                "instructions": [{"apply_actions": [{"output": 2}]}]
                }
          }' \
      https://192.168.125.9:8443/sdn/v2.0/of/datapaths/00:00:00:00:00:00:00:03/flows
Outcome of this command should be code “200 OK” or “201 Created” like shown below:
HTTP/1.1 201 Created
Server: Apache-Coyote/1.1
Location: https://192.168.125.9:8443/sdn/v2.0/of/datapaths/00:00:00:00:00:00:00:03/flows
Cache-Control: no-cache, no-store, no-transform, must-revalidate
Expires: Tue, 19 May 2015 18:05:36 GMT
Access-Control-Allow-Origin: *
Access-Control-Allow-Methods: GET, POST, PUT, HEAD, PATCH
Access-Control-Allow-Headers: Content-Type, Accept, X-Auth-Token
Content-Type: application/json
Content-Length: 0
Date: Tue, 19 May 2015 18:05:36 GMT
We can also have a quick view now on the OpenFlow topology and OpenFlow Monitor (flows table on S3) and you will see something like this:
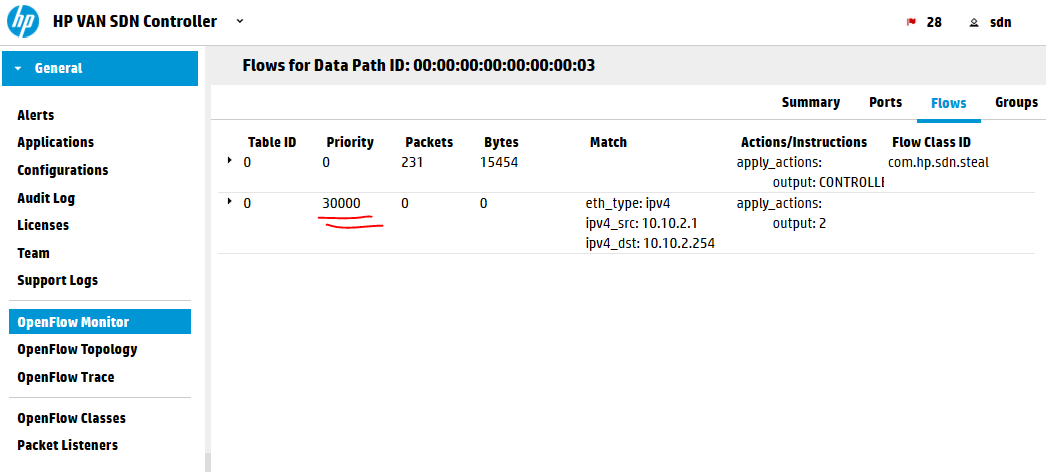
However, the worst thing here is that if you now try to ping from H1 to G1 it will fail, the reason is that if we start doing this manually, we should do this end-to-end to satisfy connectivity. So let’s do just that ….
Step 4) Redirecting the flow end to end
I will try to have some fun here, so bear with me and let’s forward make the path this way H1->S3->S2->S5->S1->S6->G1 in a very funny loop :), but will demonstrate the power of what we are doing here. Here is the complete script, but really since I am choosing this path manually there is no really added value logic to this to justify calling it a “script”. Just consider this a list of commands for each switch in this artificial path:
#!/bin/bash
### SCRIPT TO REDIRECT H1-to-G1 via artificial path
### H1->S3->S2->S5->S1-G1

#S3 redirect
curl -ski -X POST \
     -H "X-Auth-Token:`cat /tmp/SDNTOKEN`" \
     -H "Content-Type:application/json" \
     -d '{
         "flow": {
                "cookie": "0x2031987",
                "table_id": 0,
                "priority": 30000,
                "idle_timeout": 300,
                "hard_timeout": 300,
                "match": [
                        {"ipv4_src": "10.10.2.1"},
                        {"ipv4_dst": "10.10.2.254"},
                        {"eth_type": "ipv4"}
                ],
                "instructions": [{"apply_actions": [{"output": 2}]}]
                }
          }' \
      https://192.168.125.9:8443/sdn/v2.0/of/datapaths/00:00:00:00:00:00:00:03/flows

#S2 redirect
curl -ski -X POST \
     -H "X-Auth-Token:`cat /tmp/SDNTOKEN`" \
     -H "Content-Type:application/json" \
     -d '{
         "flow": {
                "cookie": "0x2031987",
                "table_id": 0,
                "priority": 30000,
                "idle_timeout": 300,
                "hard_timeout": 300,
                "match": [
                        {"ipv4_src": "10.10.2.1"},
                        {"ipv4_dst": "10.10.2.254"},
                        {"eth_type": "ipv4"}
                ],
                "instructions": [{"apply_actions": [{"output": 4}]}]
                }
          }' \
      https://192.168.125.9:8443/sdn/v2.0/of/datapaths/00:00:00:00:00:00:00:02/flows

#S5 redirect
curl -ski -X POST \
     -H "X-Auth-Token:`cat /tmp/SDNTOKEN`" \
     -H "Content-Type:application/json" \
     -d '{
         "flow": {
                "cookie": "0x2031987",
                "table_id": 0,
                "priority": 30000,
                "idle_timeout": 300,
                "hard_timeout": 300,
                "match": [
                        {"ipv4_src": "10.10.2.1"},
                        {"ipv4_dst": "10.10.2.254"},
                        {"eth_type": "ipv4"}
                ],
                "instructions": [{"apply_actions": [{"output": 1}]}]
                }
          }' \
      https://192.168.125.9:8443/sdn/v2.0/of/datapaths/00:00:00:00:00:00:00:05/flows

#S1 redirect
curl -ski -X POST \
     -H "X-Auth-Token:`cat /tmp/SDNTOKEN`" \
     -H "Content-Type:application/json" \
     -d '{
         "flow": {
                "cookie": "0x2031987",
                "table_id": 0,
                "priority": 30000,
                "idle_timeout": 300,
                "hard_timeout": 300,
                "match": [
                        {"ipv4_src": "10.10.2.1"},
                        {"ipv4_dst": "10.10.2.254"},
                        {"eth_type": "ipv4"}
                ],
                "instructions": [{"apply_actions": [{"output": 5}]}]
                }
          }' \
      https://192.168.125.9:8443/sdn/v2.0/of/datapaths/00:00:00:00:00:00:00:01/flows

#S6 redirect
curl -ski -X POST \
     -H "X-Auth-Token:`cat /tmp/SDNTOKEN`" \
     -H "Content-Type:application/json" \
     -d '{
         "flow": {
                "cookie": "0x2031987",
                "table_id": 0,
                "priority": 30000,
                "idle_timeout": 300,
                "hard_timeout": 300,
                "match": [
                        {"ipv4_src": "10.10.2.1"},
                        {"ipv4_dst": "10.10.2.254"},
                        {"eth_type": "ipv4"}
                ],
                "instructions": [{"apply_actions": [{"output": 3}]}]
                }
          }' \
      https://192.168.125.9:8443/sdn/v2.0/of/datapaths/00:00:00:00:00:00:00:06/flows
When executing the above script, you should only get “201 Created” responses back.
NOTE: If you want, you can avoid mixing JSON to the cURL command and simply add the JSON flow definitions to a file and then call the cURL command -d parameter with the file reference like this “-d @/file_with_flow_definition.json” and you can limit this script amount of lines quite significantly.
Verification of routing is again via the SDN controller gui that should now in the OpenFlow topology show something like this (this is really great!):
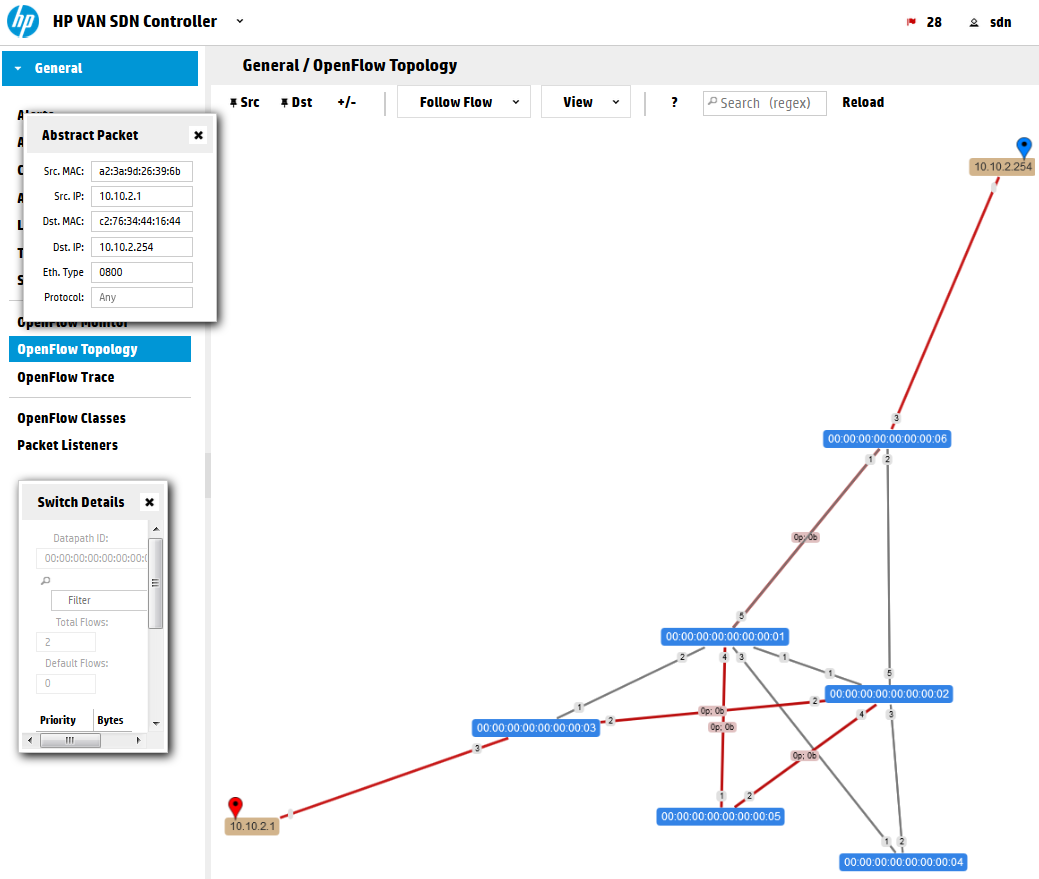
Additionally, the ping should work in this path in mininet now (also note that because the rules exist in advance, the first ping doesn’t have the usual increased delay until controller makes a routing decision):
mininet> h1 ping g1
PING 10.10.2.1 (10.10.2.1) 56(84) bytes of data.
64 bytes from 10.10.2.1: icmp_seq=1 ttl=64 time=0.026 ms
64 bytes from 10.10.2.1: icmp_seq=2 ttl=64 time=0.032 ms
64 bytes from 10.10.2.1: icmp_seq=3 ttl=64 time=0.041 ms
^C
--- 10.10.2.1 ping statistics ---
3 packets transmitted, 3 received, 0% packet loss, time 1999ms
rtt min/avg/max/mdev = 0.026/0.033/0.041/0.006 ms
Step 5) Explicit removal of the flows you just done
On one side you can just wait 300 seconds until the hard.timeout clears our flows, but in real deployment you would definitely not used hard.timeout that often, so lets at the end look how you can remove a flow via REST API.
The easy/basic way is that you take the script shown in previous steps and only change the HTTP method from -X POST to -X DELETE and supply the same JSON description of the rule. That’s it:
curl -ski -X DELETE \
     -H "X-Auth-Token:`cat /tmp/SDNTOKEN`" \
     -H "Content-Type:application/json" \
     -d '{
         "flow": {
                "cookie": "0x2031987",
                "table_id": 0,
                "priority": 30000,
                "idle_timeout": 300,
                "hard_timeout": 300,
                "match": [
                        {"ipv4_src": "10.10.2.1"},
                        {"ipv4_dst": "10.10.2.254"},
                        {"eth_type": "ipv4"}
                ],
                "instructions": [{"apply_actions": [{"output": 2}]}]
                }
          }' \
      https://192.168.125.9:8443/sdn/v2.0/of/datapaths/00:00:00:00:00:00:00:03/flows
The correct code that should return is “204 No Content”.
The above method is however only valid for us here because we already have the JSON description of exactly the rule we want to remove, in real application when you do not know this, you would normally search the flows that exist using the REST API’s GET /of/datapath/{dpid}/flow, extract the JSON of a rule that you want removed from there (maybe by searching for the cookie value we used to identify “our” flows) and remove that.
END of Part 2/3 – Influencing Flows via cURL commands
In this part, we have demonstrated how you can via basic cURL commands do some quite significant calls from a linux bash console. The purpose here was not to tell you how to script in linux console, so all the example had only very primitive and straight-forward logic, but it should be now clear to you how to communicate with the controller this way and it is up to your imagination what you want to do with this knowledge.
Index:








Hi, this an excellent tutorial. I am trying to follow this but I am stuck at one of the steps.
under Step 2) Retrieving some basic information via cURL (nodes/devices/flows)
sdn@sdnctl1:/tmp$ curl -sk -H “X-Auth-Token:`cat /tmp/SDNTOKEN`” \
> -H “Content-Type:application/json” \
> https://192.168.56.11:8443/sdn/v2.0/net/devices \
> | python -mjson.tool
I get the following error message:
{
“error”: “com.hp.api.auth.AuthenticationException”,
“message”: “Failed authentication due to: invalid token”
}
Note: 192.168.56.11 is my SDN controller
Hi,
If you’re getting an “invalid token” error, this means you need to create a new authentication token as described at the top of this page with the command:
# curl -sk -H ‘Content-Type:application/json’ \
-d'{“login”:{“user”:”sdn”,”password”:”skyline”,”domain”:”sdn”}}’ \
https://192.168.125.9:8443/sdn/v2.0/auth
how i can write the code in SDNTOKEN
Can you show me the the command please