


Tutorial for creating first external SDN application for HP SDN VAN controller – Part 1/3: LAB creation and REST API introduction
In this tutorial series, I will show you by example, how to build your first external REST API based SDN application for HP SDN VAN controller, with web interface for the user control. Target will be to learn how to use REST API, curl and perl scripting to generate some basic and useful code to view and also manipulate network traffic.
This article is part of “Tutorial for creating first external SDN application for HP SDN VAN controller” series consisting these articles:
- Part 1/3 – LAB creation and REST API introduction
- Part 2/3 – Influencing Flows via cURL commands
- Part 3/3 – “Node Cutter” perl application with web interface
In this Part 1/3, we will discuss creation of a quick development lab with HP SDN VAN controller and Mininet network and explore the REST API interface quickly.
Contents of Article
- Internal vs External SDN applications
- My current take on SDN:
- Pre-requisite and LAB/development setup:
- Step 0) Building a mininet virtual LAB network
- Step 1) Checking your HP SDN VAN controller running your LAB
- Step 2) Intruduction to the REST API
- Step 3) Getting list of switches, list of end-nodes and flow tables via REST API
- END of Part 1/3 – LAB creation and REST API introduction
Internal vs External SDN applications
The difference is this, external applications do not need to run inside the SDN controller itself and can rely on REST API commands transferred over network from your “stand-alone” application towards any controller. This makes them more easy to create (because REST API is easy to understand and code against) but you have to have more emphasis on what is your target and how to achieve it because this interface can only act in a “pro-active” way it is relatively slow. For example if you want to do a SDN firewall as external application, you have to push all your rules via REST API to the controller (and in a result all the way down to SDN switches) before the switch has to make a decision on a new packet. REST API will not make a callback event from controller to your external application to ask what to do with a new packet/session in a “re-active” way because it would take too long (imagine 50-100 ms processing delay on every FW decision if this was done via REST API). The problem is also that because we are still talking about switches executing all the rules, it is probably not a good idea to push all these rules via REST API pro-actively as it would generate a lot of intentionally not-needed rules inside each switch.
The SDN firewall application example is actually a good example where if you need something like this, you should make this project an internal application where your application can be notified for each new session even, and make firewall-like decisions only when needed and avoid spamming the SDN switches with all the rules in the firewall logic. However internal application development is not in scope of this article, so if this is your target, go to HP SDN Dev Center and grab an SDK that will help you build such an app in Java an load it to the controller. Or maybe soon such article I will also create here as this is also in my TODO list (actually with the firewall example app :)).
My current take on SDN:
(disclaimer on author’s personal opinion on SDN vs. traditional networking, feel free to skip if you are here only for technical parts)

Software Defined Networking (SDN) is becoming a hot topic. Some people consider it a hype, some consider it a much needed revolution to a completely sterile networking industry that has not changed in principle for more than 20 years. I am personally considering SDN also a much needed fresh air and I am hoping in its success because, if you think about it, we are still configuring network devices box-by-box using proprietary command lines of each vendor and you have to technically study each vendor command line specifics to do the same thing you in principle know very well, but need to study how to execute it on this particular vendor devices. You probably know or understand the overhead if you need to switch vendors for some reason and in my opinion why so many customers are simply strictly following using Cisco devices despite they are competitors with at least 30% cheaper alternatives on feature/performance scale with the same quality …. it is simply because cisco has an army of zombies that only know the cisco command line. And network industry has CCIE certification as the most prestigious tech certification in the world, why do you think this is ? And think about the fact that programmers/applications architects/hardware ASIC creators are having a much more creative and complex jobs than network configuration guys! The reason is that to become good at networking (and get nice paycheck), you have to absorb huge amount of low-level (proprietary!) commands and all we are doing is distributed architecture and distributed algorithms, but executed in the worst possible way individually on each device. Today you need in a company like HP 1 engineer to handle roughly 1000 to 10 000 servers, but you need 1 engineer to handle 100 network devices just because we are still manually configuring things like routing/vlan-to-port/etc ….. this is from a principal point of view absolutely needless overhead and SDN is promising us the same revolution here that universal operating systems did to PC industry (you remember computers in the 80s where you bought a computer with relatively fixed feature-set?) or the transition from mobile phones (also here the era was that each mobile had it’s fixed set of functions) to smartphones with universal operating systems and apps.

If SDN achieves this, only time will tell because we are all still humans and subject to the “Worse is Better” factor as we witnessed with TCP vs. OSI or 802.11 wifi vs. other more powerful wifi standards that loose only because they were more expensive.
Also SDN is a huge fear factor to major vendors (yes, mostly to Cisco… ) as this would mean they loose the ability to charge for features bundled with each router/switch they sell and competitiveness moves to software apps, where many small companies would become rivals doing advanced features and using HW only as featureless forwarding plane.
My personal opinion after being exposed to some current SDN products is that there is already huge potential in security, QoS and traffic engineering solutions, but also there is a long road ahead until SDN becomes universally more useful in all situations that we have in current networks (especially end-to-end routing/switching and HW support).
And at the end, one of my favorite white papers from Google about their SDN deployment experiences:
https://www.opennetworking.org/images/stories/downloads/sdn-resources/customer-case-studies/cs-googlesdn.pdf
Pre-requisite and LAB/development setup:
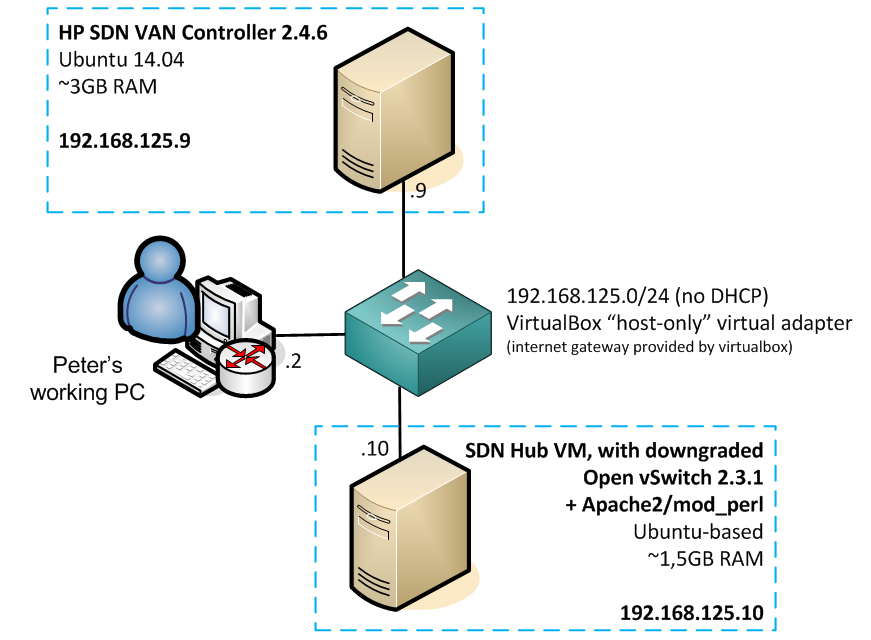
The only I used in this example is running two virtual machines.
First VM is running the HP SDN VAN controller 2.4.6 that you can download from here, regarding installation/license I have old article guiding how to install 2.0 version here, luckily the install process is in principle the same, or it become even easier, so here is a quick coockbook for 2.4 version on Ubuntu 14.04 that I put together to make it more easy for you. But note that getting a demo/development license can vary for you, so consult with SDN Dev Center to get one (it was more easy for me as HP person internally in the cookbook).
Second VM you can run any linux and install mininet and apache2 with perl module to simulate virtual network for the controller and have perl/apache for your development. Or to make it more easy for your, either download already created mininet VM from mininet.org or I am actually using SDNhub.org VM here (only note that the SDNhub VM is using Open vSwitch 2.3.9 for OpenFLow 1.4 experimental support and this version of switch even if forced to run OpenFLow 1.3 is having problem with HP controller, so please downgrade the Open vSwitch by installing only the latest stable 2.3.1 version from openvswitch.org).
Step 0) Building a mininet virtual LAB network
This is a straight-forward task and you can even build your own topology if you want (mininet.org quick walk through here), but this is the topology I will use and maybe you should follow for the first time so that all the examples of curl/REST API in the next steps match on the IP/flow level.
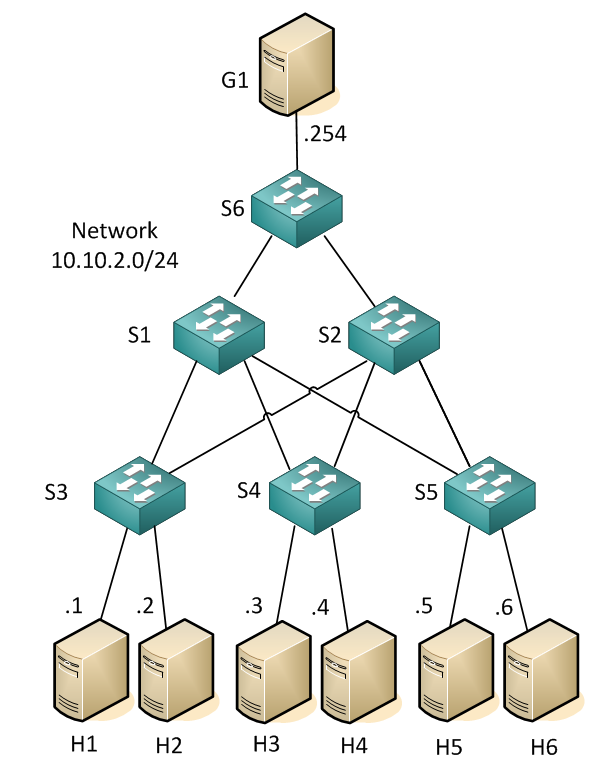
Here is the mininet launch script that I am using to launch my lab (just create a file in your mininet VM “double_star.py” and make it executable), I think just by looking at it it is quite clear what these lines achieve and also how you should edit it if you want new switch or a host:
#!/usr/bin/python

from mininet.topo import Topo
from mininet.net import Mininet
from mininet.node import Node , Controller, RemoteController, OVSSwitch
from mininet.log import setLogLevel, info
from mininet.cli import CLI
from mininet.util import irange
from mininet.link import TCLink

c0=RemoteController( 'c0', ip='192.168.125.9' )

class NetworkTopo( Topo ):
    "A simple topology of a double-star access/dist/core."

    def build( self ):

        h1 = self.addHost( 'h1', ip='10.10.2.1/24', defaultRoute='via 10.10.2.254' )
        h2 = self.addHost( 'h2', ip='10.10.2.2/24', defaultRoute='via 10.10.2.254' )
        h3 = self.addHost( 'h3', ip='10.10.2.3/24', defaultRoute='via 10.10.2.254' )
        h4 = self.addHost( 'h4', ip='10.10.2.4/24', defaultRoute='via 10.10.2.254' )
        h5 = self.addHost( 'h5', ip='10.10.2.5/24', defaultRoute='via 10.10.2.254' )
        h6 = self.addHost( 'h6', ip='10.10.2.6/24', defaultRoute='via 10.10.2.254' )
        g1 = self.addHost( 'g1', ip='10.10.2.254/24')

        s1 = self.addSwitch( 's1', dpid='0000000000000001',protocols='OpenFlow13' )
        s2 = self.addSwitch( 's2', dpid='0000000000000002',protocols='OpenFlow13' )
        s3 = self.addSwitch( 's3', dpid='0000000000000003',protocols='OpenFlow13' )
        s4 = self.addSwitch( 's4', dpid='0000000000000004',protocols='OpenFlow10' )
        s5 = self.addSwitch( 's5', dpid='0000000000000005',protocols='OpenFlow13' )
        s6 = self.addSwitch( 's6', dpid='0000000000000006',protocols='OpenFlow13' )

        #core
        self.addLink ( s1, s2 )

        #distribution
        self.addLink ( s1, s3 )
        self.addLink ( s1, s4 )
        self.addLink ( s1, s5 )
        self.addLink ( s1, s6 )

        self.addLink ( s2, s3 )
        self.addLink ( s2, s4 )
        self.addLink ( s2, s5 )
        self.addLink ( s2, s6 )

        #acccess
        self.addLink( s3, h1 )
        self.addLink( s3, h2 )
        self.addLink( s4, h3 )
        self.addLink( s4, h4 )
        self.addLink( s5, h5 )
        self.addLink( s5, h6 )
        self.addLink( s6, g1)

def run():
    topo = NetworkTopo()
    net = Mininet( topo=topo, controller=c0 )
    net.start()

    CLI( net )
    net.stop()

if __name__ == '__main__':
    setLogLevel( 'info' )
    run()
NOTE: If you are playing with mininet and experiment with different topologies, after each attempt always clean the mininet by issuing the mn -c command.
Step 1) Checking your HP SDN VAN controller running your LAB
In this step, we will check that you can access the controller and we see the mininet topology and more importantly we will disable the controller running in hybrid mode as that will create a loop/broadcast storm in our mininet by default if we do not disable this (explanation below).
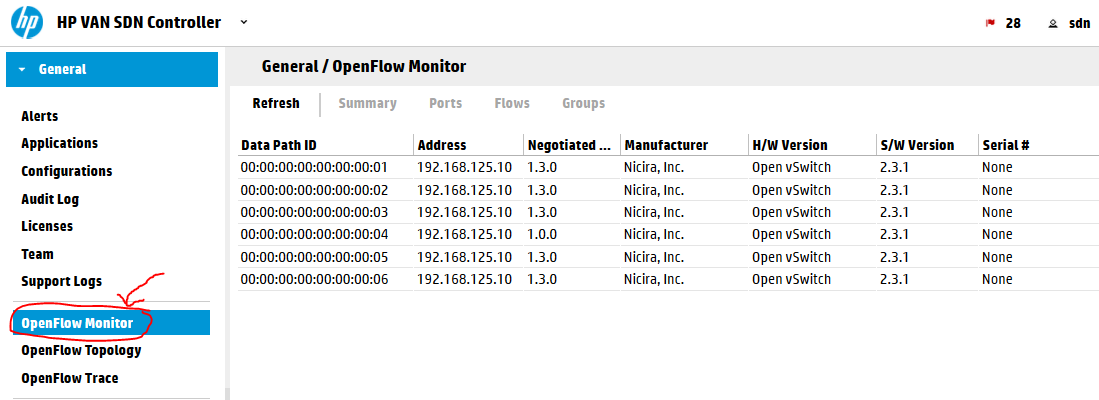
Login to your SDN controller in your lab is simply going to https://192.168.125.9:8443/sdn/ui/ (accept the self-signed certificate warning)
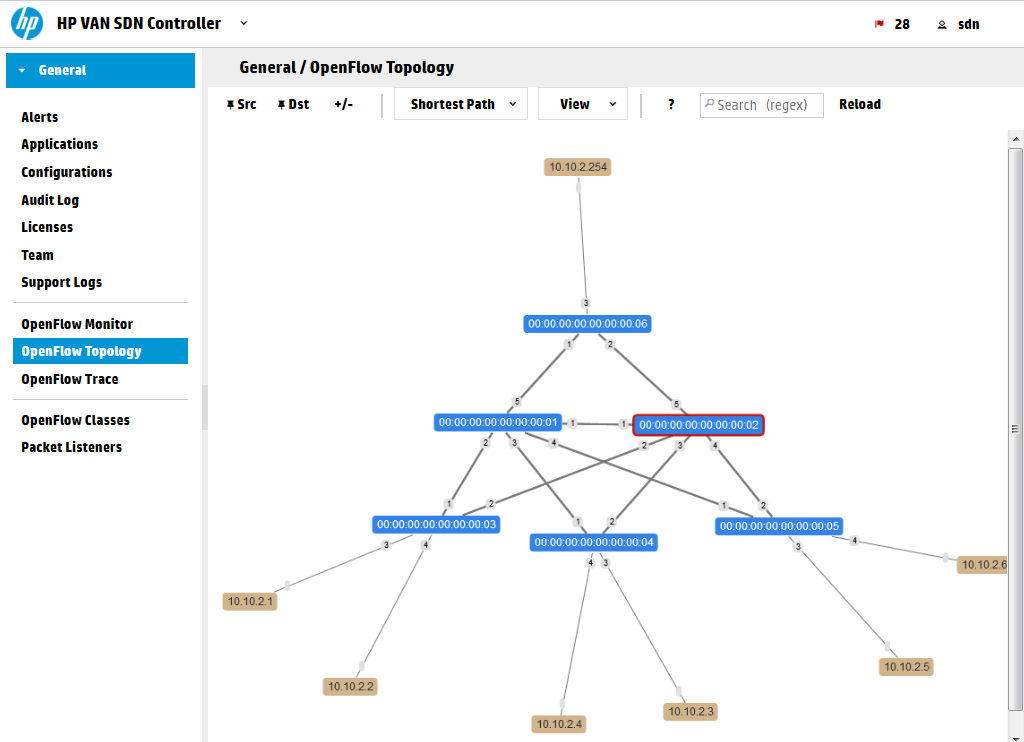
Inside, check if all six switches are in the in the OpenFlow Monitor and the topology is visible inside the OpenFlow Topology:
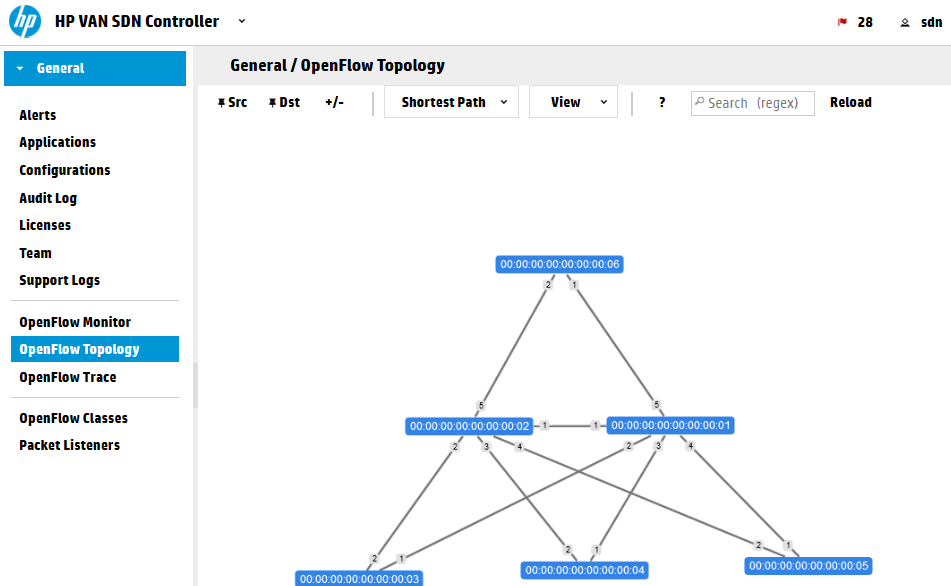
TIP: To stop the topology “elastic” behavior press “X” on your keyboard. And to show port numbers press “P” on your keyboard. This view is using keyboard shortcuts for control. Full list you can view if you click on the “?” button in above to topology map.
Next lets disable the hybrid mode on the controller.
Explanation: Hybrid mode is a mode where the controller will leave the forwarding logic on the switches and will only care on extra features (like QoS or security). It is a great trick if you want to remain using your traditional fowrarding (including spanning-tree) and only focus on new SDN features, but it has a drawback. In this mode the controller will push a simple “Forward ANY: NORMAL” command to all switches which will tell them that by default all traffic should be simply forwarded by traditional means … this is conflict with the fact that tha Open vSwitch we are running doesn’t have spanning-tree protocol and our topology has many loops. … so yes, it is a broadcast storm prone … The fact is that HP is selling this technology and by default expecting HP switches that can also run in hybrid mode, which means that you would have SDN for all special features, but will still run spanning tree to avoid loops. It is actually very effective with MSTP and IRF technology that HP has that will not really block any port and will lower the processing of the SDN controller in production network, but it is not a pure SDN forwarding that we want to play with in our LAB now. So we will disable hybrid mode and force the SDN controller to take full responsibility on ALL forwarding decisions. You can check any switch Flow table before and after this change to see that the default rule pushed to the switches will change from default “forward: NORMAL” to “forward: Controller”. The forward: Controller means that if there is new packet that is not matching any existing rule, send this packet to controller for analysis.
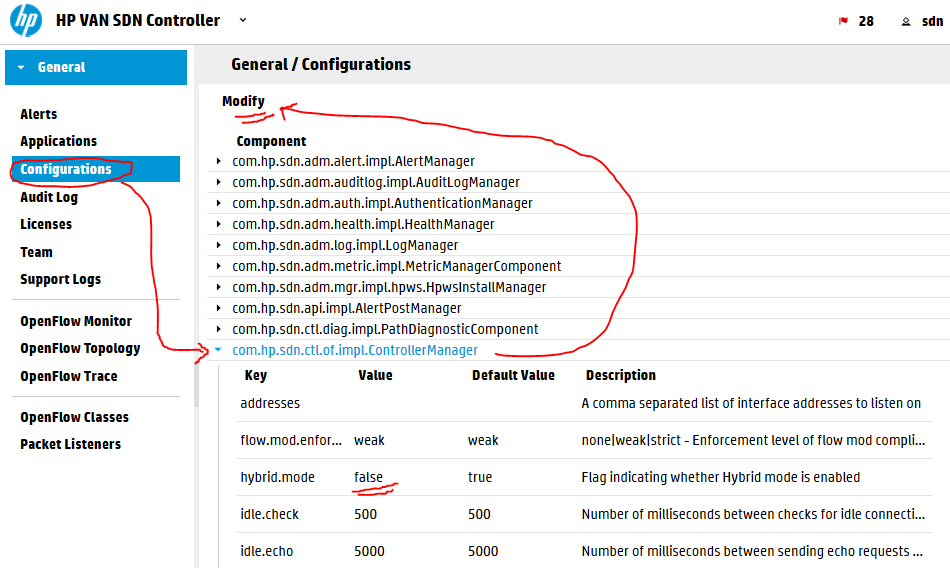
To disable this mode, go to Configurations -> ControllerManager and modify the hybrid.mode flag to false via the Modify button at the top. All switches will disconnect and reconnect once you apply this.
Following getting rid of the hybrid mode, let’s check the forwarding, mininet has one great command called “pingall” that will check connectivity between all the hosts created in the mininet topology, run it in the mininet> commandline, sucessfull output looks like this:
mininet> pingall
*** Ping: testing ping reachability
g1 -> h1 h2 h3 h4 h5 h6
h1 -> g1 h2 h3 h4 h5 h6
h2 -> g1 h1 h3 h4 h5 h6
h3 -> g1 h1 h2 h4 h5 h6
h4 -> g1 h1 h2 h3 h5 h6
h5 -> g1 h1 h2 h3 h4 h6
h6 -> g1 h1 h2 h3 h4 h5
*** Results: 0% dropped (42/42 received)
Now look at the topology view again and all the hosts that appeared:
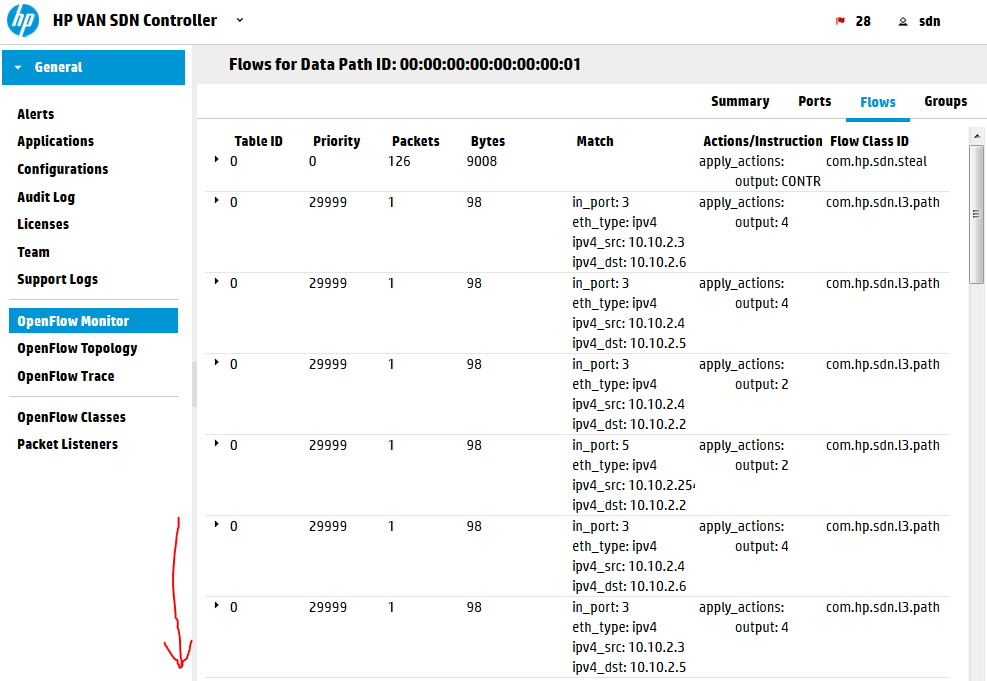
And also if you now go to OpenFlow monitor, select a switch and view its flow tables, there is going to be a lot of rules there now all doing point-to-point IP rules to guide the ICMP packets to their destinations.
Last thing to learn before we continue is to know the OpenFlow topology view ability to show you a patch for a specific packet. Wait for a few seconds for the ICMP flows to timeout from the tables before continuing. Open this view and at the top change “SPF” to “Follow Flow”, now we are going to see how at this moment the switches would forward a traffic from H1 (10.10.2.1) to G1 (10.10.2.254). Enter into the table “Abstract Packet” the source and destination IPs of these hosts, or click on them and select them as SRC/DST with the buttons above. This is what will happen, note that the red lines are not showing any path at this moment! This is because this function is not asking the controller, but it is asking the switches and checking their flow tables, but because the icmp flows already timeout.

Lets do something more interesting now compared to ping. Mininet has a small HTTP server available, so we will make G1 a server and H1 will to to G1 with HTTP request. These are the two commands to do this simply and verify the controller can also forward TCP traffic and not only pings.
mininet> g1 python -m SimpleHTTPServer 80 &
mininet> h1 wget 10.10.2.254
--2015-05-19 06:18:11--  http://10.10.2.254/
Connecting to 10.10.2.254:80... connected.
HTTP request sent, awaiting response... 200 OK
Length: 942 [text/html]
Saving to: index.html

100%[======================================>] 942         --.-K/s   in 0.03s

2015-05-19 06:18:11 (36.0 KB/s) - index.html saved [942/942]
Now have a look again in the topology view:
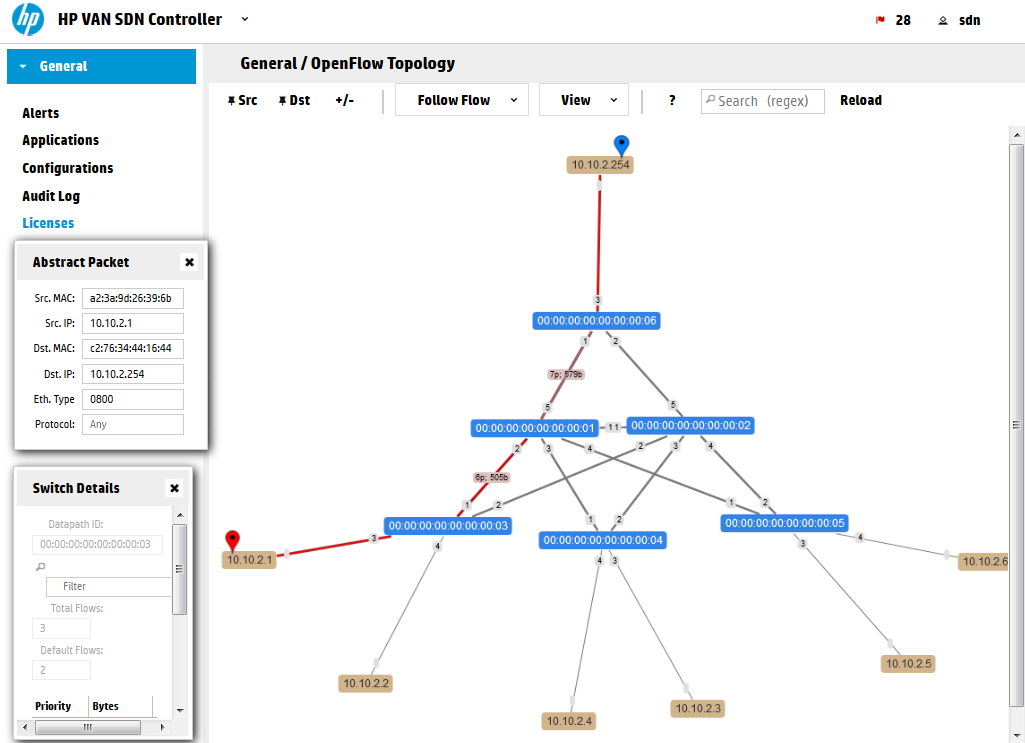
Remember this approach because we are going to use this soon below to see how we will manipulate this path with a few curl calls.
Step 2) Intruduction to the REST API
Ok, we have a working topology, working controller, now lets see what is the REST API I mentioned….
Open your browser and go to your controller REST API interface, you should see something like this and feel free to click around:
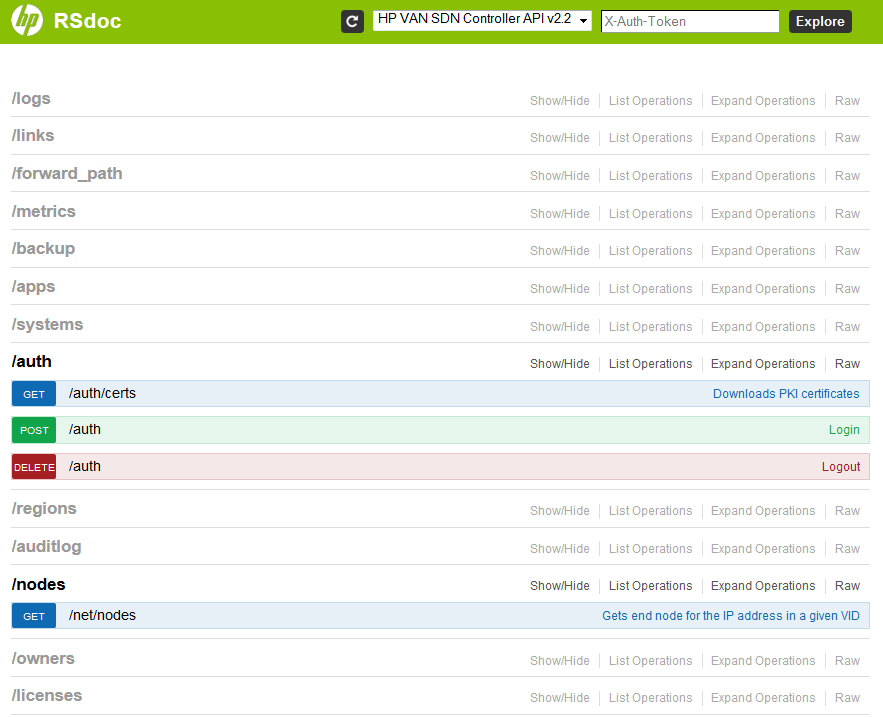
What you see is the REST API way to self-document itself a little. These sections are both trying to explain you what they can do for you and also give you a way to try them directly in this web interface without writing any app (this also help the development process very much!).
But first we need to authenticate ourselves to this interface! This is how to do it:
- Open the /auth section
- Opent the POST method /auth, these methods are HTTP “POST” methods for entering data via REST API
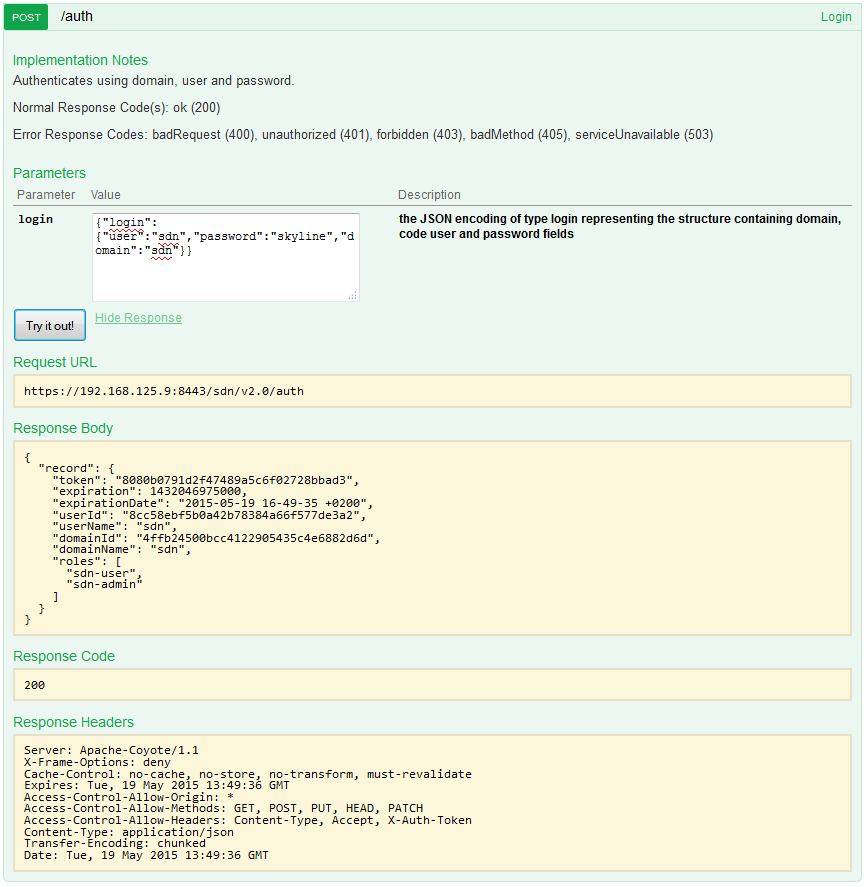
- And write this text to the field (update the “sdn” username and “skyline” password if you are not using the defaults) and hit “Try it out!” button:
{"login":{"user":"sdn","password":"skyline","domain":"sdn"}}
NOTE: The format we have entered is called JSON and it is a structured key/value list that I believe will become very familiar to you very soon once you see it in a structured way.
This should be the result, note the Response Code should be 200 and in the Response Body we are looking for the “token” value:
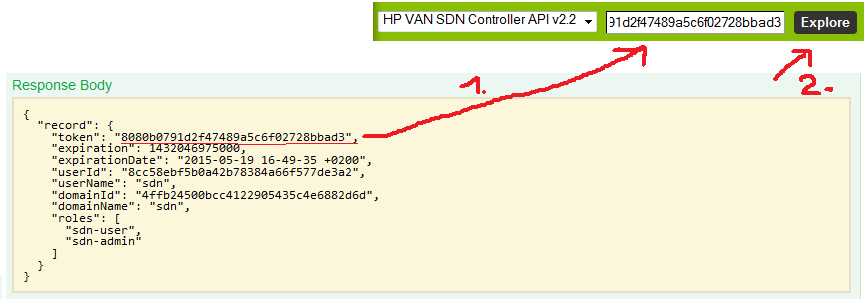
Now, take the token and enter it to the top formular on this REST API page and hit “Explore” to have your full session authorized for all the other REST APIs we are going to check next:
Step 3)
Getting list of switches, list of end-nodes and flow tables via REST API
With this token now included, I encourage you to explore yourself at least these three sections:
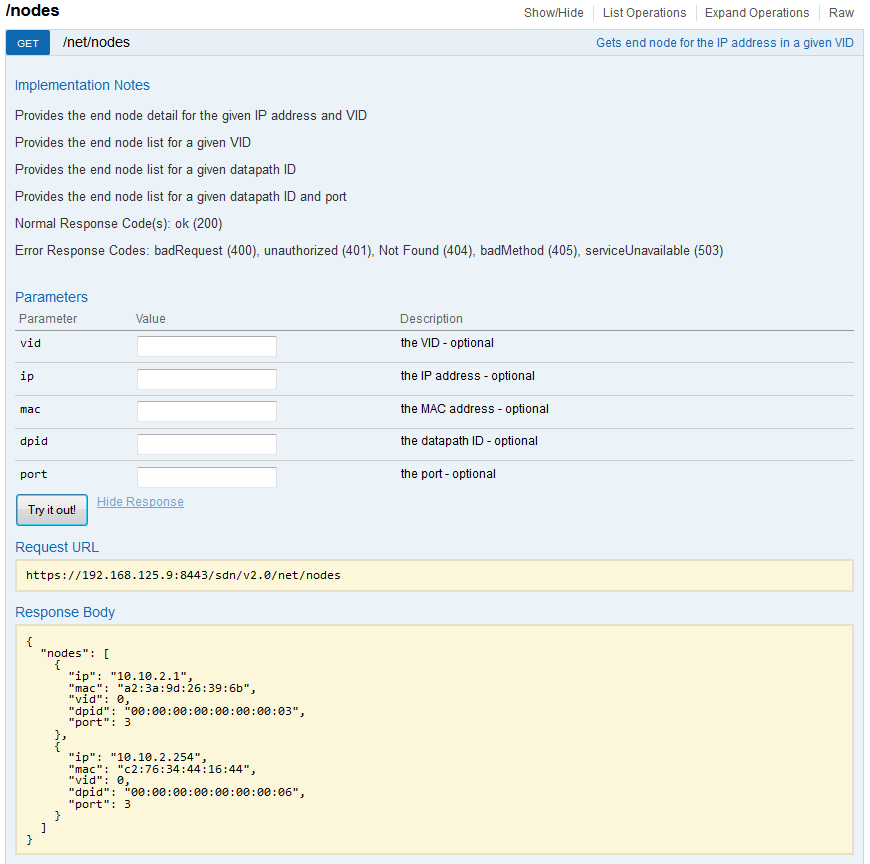
/nodes
/nodes – gives you a JSON list of all the end hosts that were recently active in the network. So in this example only the H1 and G1 hosts are shown:
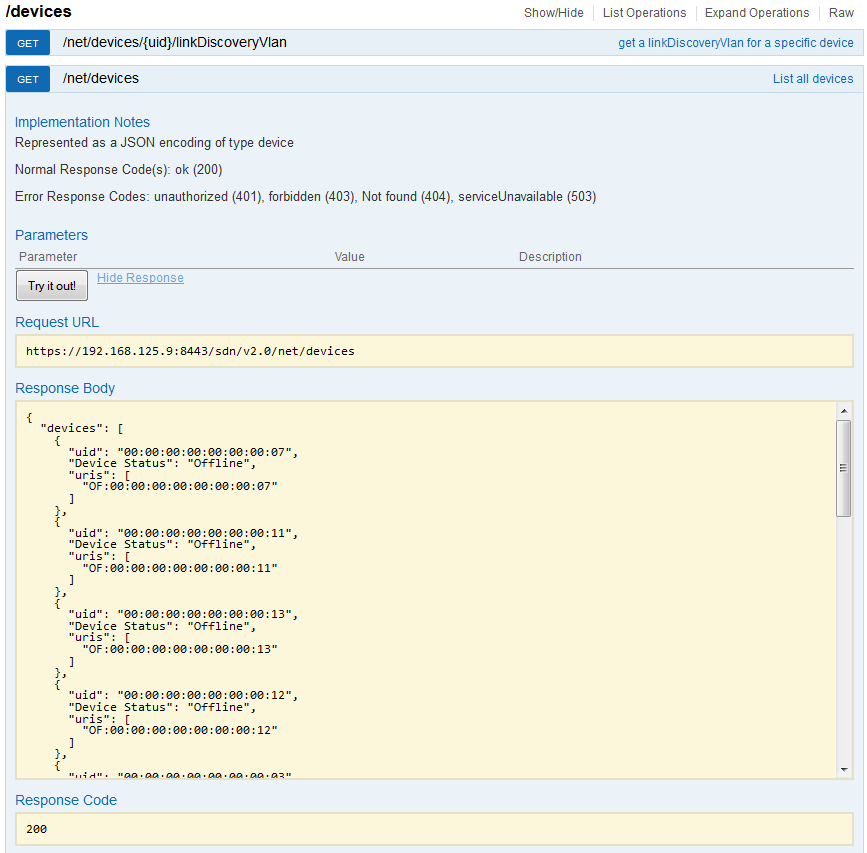
/devices
/devices – gives you a list of all switches that are currently active (those with “Online”) but also switches that were historically used and are no longer registered (controller remembers them as Offline even across reboots). The most important attribute there is the uid identification that we will be using in the flow table next.
/of/datapath/{dpid}/flows
/of/datapath – holds the flow forwarding information, the basic flow table can be retrieved here by asking for a flow table of individual switch via the {dpid} (or uid from the previous /devices). Here is an example how we exported flow table from the switch s3, that has dpid of “00:00:00:00:00:00:00:03”.

END of Part 1/3 – LAB creation and REST API introduction
In this part, we have a running HP SDN controller, Mininet lab and basic access to REST API and troubleshooting forwarding via the controller gui. In the next part. We will be moving to some basic commands to retrieve the JSON data via REST API directly from linux scripts using the curl commands.
Index:
This is really good as a starting point for learning SDN kudo’s to you Peter
I hope one of these days you could write the same for Opendaylight 🙂 specially on the API part.