


Tutorial for creating first external SDN application for HP SDN VAN controller – Part 3/3: “Node Cutter” SDN application in perl with web interface
In this tutorial series, I will show you by example, how to build your first external REST API based SDN application for HP SDN VAN controller, with web interface for the user control. Target will be to learn how to use REST API, curl and perl scripting to generate some basic and useful code to view and also manipulate network traffic.
This article is part of “Tutorial for creating first external SDN application for HP SDN VAN controller” series consisting these articles:
- Part 1/3 – LAB creation and REST API introduction
- Part 2/3 – Influencing Flows via cURL commands
- Part 3/3 – “Node Cutter” perl application with web interface
In this Part 3/3, I will show you my first example SDN application that I have written just to demonstrate the combination of REST API interface with perl and the ability to have a web based interface for the user to this interface. Please note that this application is purely demonstrative on the REST API interface and basic principles, it is by no means a template for larger project because of complete lack of application based design as it was created in a “quick&dirty” way.
Prerequisites: Have the LAB from previous parts still running, we are going to use the same Mininet topology and the HP SDN VAN Controller 2.4.6
Contents of Article
- Step 1) Install/activate Apache2 and mod_perl on it (perl CGI “Hello World”)
- Step 2) Download and first run of NodeCutter
- Step 2) Logging to the SDN Controller and understanding index.cgi
- Step 3) Main menu and main.cgi structure
- Step 4) Switches and Interfaces view
- Step 5) Nodes to Cut – first look
- Step 6) Block node “H1” communication
- Step 7) Unblocking node H1 communication
- END of Part 2/3 – “Node Cutter ” perl application with web interface
- In conclusion to the whole series
Step 1)
Install/activate Apache2 and mod_perl on it (perl CGI “Hello World”)
Both the SDNHub.org and Mininet.org VM images that I pointed you to do not by default have apache2 installed, but lucky both are ubuntu based so installing apache2 should not be a problem by simply running:
# apt-get install apache2 libapache2-mod-perl
After you have this, lets modify the default webpage apache config to enable perl files execution, open /etc/apache/sites-available/000-default.conf and add the following lines:
<VirtualHost *:80>
        ServerAdmin webmaster@localhost
        DocumentRoot /var/www/html

        <Directory  /var/www/html/>
                Options ExecCGI Indexes FollowSymLinks
                AllowOverride None
                Require all granted
                AddHandler cgi-script .cgi
        </Directory>

        <Files ~ "\.(pl|cgi)$">
                SetHandler perl-script
                PerlResponseHandler ModPerl::PerlRun
                Options +ExecCGI
                PerlSendHeader On
        </Files>
        AddHandler cgi-script .cgi

        ErrorLog ${APACHE_LOG_DIR}/error.log
        CustomLog ${APACHE_LOG_DIR}/access.log combined

</VirtualHost>
And restart apache with
# service apache2 restart
Now you should be able to run perl scripts that generate a web interface using the CGI interface of apache and mod_perl. So lets test this with a simple test file.
Create a new file inside your /var/www/html directory called “hello.cgi” and add this content to the file:
#!/usr/bin/perl

print "Content-type:text/html\r\n\r\n";
print '<html>';
print '<head>';
print '<title>Hello Word - Your first CGI/Perl Program</title>';
print '</head>';
print '<body>';
print '<h2>Hello Word! This is your first CGI program!</h2>';
print 'You should only see the printed text, not the print commands!';
print "<font size=+1>Environment</font>\n";
foreach (sort keys %ENV)
{
  print "<b>$_</b>: $ENV{$_}<br>\n";
}
print '</body>';
print '</html>';

1;
Step 2) Download and first run of NodeCutter
First point, this NodeCutter is provided as educational application with the following license:
#*
#* -------------------------------------------------------------------------------
#* "THE BEER-WARE LICENSE" (Revision 42):
#* Peter.Havrila@hp.com or phavrila@gmail.com wrote this file.
#* As long as you retain this notice you can do whatever you want with this stuff.
#* If we meet some day, and you think this stuff is worth it, you can buy me a
#* beer in return.
#*                                                            Peter Havrila, 2015
#* -------------------------------------------------------------------------------
#*/
Which means that I have no other requirements than that you keep my name as the author on any derivatives and hopefully I will get a beer from random stranger in the future. However, also there is no Warranty or Liability if you use this in production environment, this is purely for LAB/study purposes.
INSTALLATION:
Inside the ZIP file, you will see that it starts with index.html and directory with several perl scripts. Simply copy all this to you apache rood directory (if you used our defaults, it should be /var/www/html ) so that the index.html is directly in the document root. E.g like this /var/www/html/index.html
FIRST RUN:
If you think you have everything now, simply open your browser of choice and go to your apache server root, if you are following my lab, it should be http://192.168.125.10/ and you should see something like this:
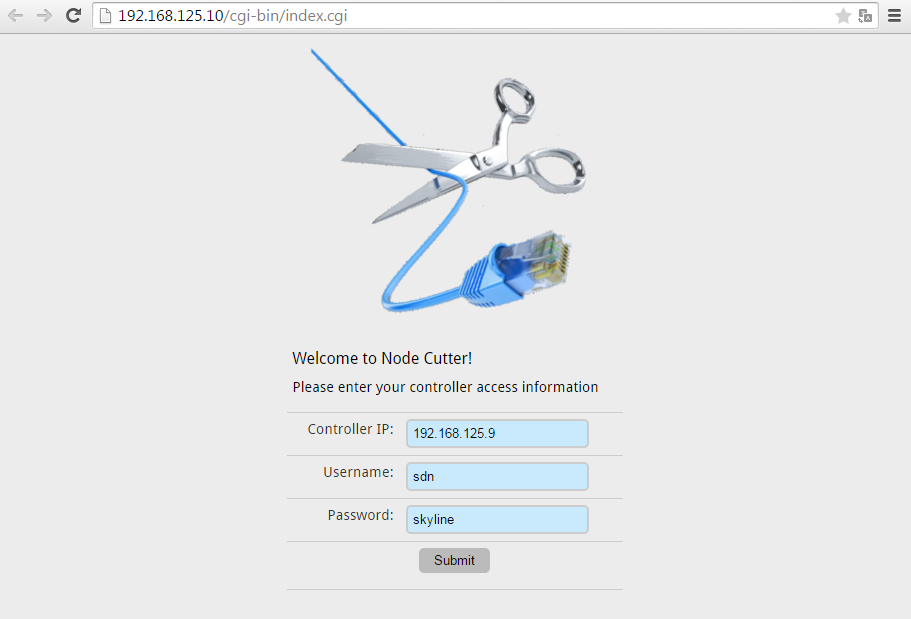
Step 2) Logging to the SDN Controller and understanding index.cgi
You might have noticed, there are some default parameters already in the login page, that is only because this program is used here as part of my LAB, if you lab is different, simply change the IP/username/password to reflect your environment.
After you have the data, click the “Submit” button. The index.cgi is a smaller of the two program perl scripts and the only role of index.cgi is to to a simple REST API call with GET to /auth and submit via JSON structure the username/password (domain is the default “sdn” hidden in the code).
If everything works, you will see a notification and also the X-Auth-Token received from the controller like this:

If you click on the “Continue to main menu …” button, you will be redirected will all the data (including token) to the main.cgi, but before we go there, let’s have a deeper look on index.cgi. This is the high level pseudo-code summary of how index.cgi works.
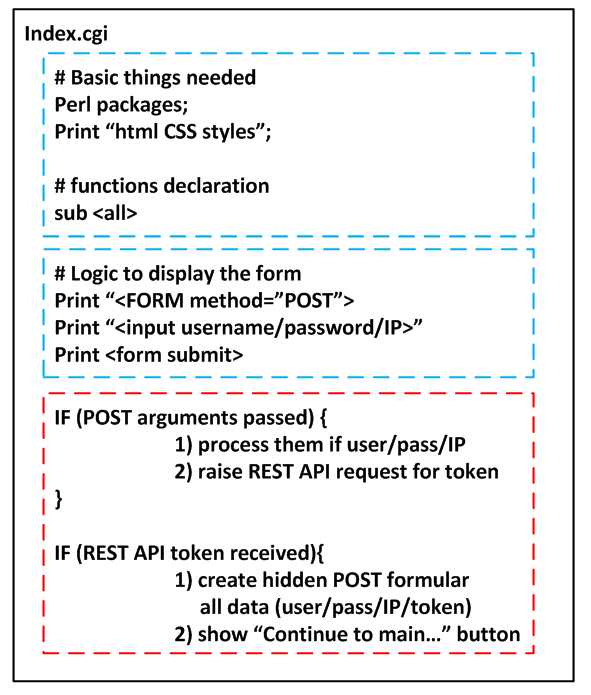
As you can notice, the blue parts are those that you see at the begininning when you are entering username/password/IP and send them via POST method back to index.cgi. The red parts are executed only if any POST data are recieved.
The red parts check the POST arguments in standard perl-cgi processing that creates a hash %FORM from them. If this form contains all the required fields, a second IF will initiate REST API call to the controller and attempts to recover the X-Auth-Token.
For completeness of this article, this is the whole index.cgi code, I enabled line numbering to help me point to interesting parts that you should look at like:
- Lines #35-66 is the fucntion that is generating REST API and contacts the controller for token, this is the main portion you should look at here!
NOTE to help you read the code: Do NOT forget you have the option to open the code in a separate window using the “Open Code In New Window” button in the code toolbar menu. Alternatively just read the pseudo-codes I will be showing and consider this a user-guide to the application GUI only if you are not interested in the code that much.
#!/usr/bin/perl
#*
#* -------------------------------------------------------------------------------
#* "THE BEER-WARE LICENSE" (Revision 42):
#* Peter.Havrila@hp.com or phavrila@gmail.com wrote this file.
#* As long as you retain this notice you can do whatever you want with this stuff.
#* If we meet some day, and you think this stuff is worth it, you can buy me a
#* beer in return.
#*                                                            Peter Havrila, 2015
#* -------------------------------------------------------------------------------
#*/

# DEBUG PRINT ENABLING VARIABLE, MAKE THIS 1 to see much mode debug lines
$bDebug=0;

# USED PACKAGES
use NetSNMP::agent (':all');
use NetSNMP::ASN qw(ASN_OCTET_STR ASN_INTEGER ASN_GAUGE ASN_TIMETICKS ASN_COUNTER ASN_OBJECT_ID ASN_COUNTER64 ASN_IPADDRESS);
use Net::SNMP;
use Data::Dumper qw(Dumper);
use LWP::UserAgent;
use JSON;

##################
# SOME FUNCTIONS #
##################

sub dprint {
	my ($to_print) = @_;
	if (bDebug==1){
		print "$to_print";
	}
}

sub get_token { #one time check of interfaces

	my (%FORM) = @_;
	dprint "<h4>GET_TOKEN SUBROUTINE</h4>";
	#foreach my $key ( keys %FORM )
	#{
	#	my $value = $FORM{$key};
	#	print "$key : $value<br>";
	#}
	#print "<br>";


	if ( exists ($FORM{'username'}) && exists ($FORM{'controller_ip'}) && exists ($FORM{'password'}) )
	{
		my $url = 'https://' . $FORM{'controller_ip'} . ':8443/sdn/v2.0/auth';
		my $ua = LWP::UserAgent->new( ssl_opts => {
						verify_hostname => 0,
						SSL_verify_mode => 'SSL_VERIFY_NONE'
						} );
		my $response = $ua->post($url, 'Content' => '{"login":{"user":"' . $FORM{'username'} . '","password":"' . $FORM{'password'} . '","domain":"sdn"}}', 'Content-Type' => 'application/json');
		my $token;
		if ($response->is_success) {
                	my $json = $response->decoded_content;
	                $token = from_json ($json);
        	        $token = $token->{'record'}->{'token'};
			#print "<h2>TOKEN recieved: $token</h2>";
			return $token;
        	} else {
                	print "<h2>ERROR getting token :(, check IP or password</h2>";
        	}
	}
}

## this function I use to stransfer the whole FORM between pages

sub generate_hidden_form_lines_from_hash {
	my (%hash) = @_;
        #print "<h4>GET_TOKEN SUBROUTINE</h4>";
        foreach my $key ( keys %hash )
        {
               my $value = $hash{$key};
               print "<input type=\"hidden\" name=\"$key\" value=\"$value\">";
        }
        #print "<br>";
}

## Forumar LINK to 02_get_devices.cgi

sub get_devices {
	my (%hash) = @_;
	print "<FORM action=\"02_get_devices.cgi\" method=\"POST\">";
	generate_hidden_form_lines_from_hash(%hash);
	print "<input type=\"submit\" value=\"02_GET_ALL_DEVICES_AND_INTERFACES\"></FORM>";
}

## Forumar LINK to 03_get_nodes_and_kill_switch.cgi

sub get_nodes {
        my (%hash) = @_;
        print "<FORM action=\"03_get_nodes_and_kill.cgi\" method=\"POST\">";
        generate_hidden_form_lines_from_hash(%hash);
        print "<input type=\"submit\" value=\"03_GET_NODES_AND_KILL_SWITCH\"></FORM>";
}

sub main_menu {
        my (%hash) = @_;
        print "<FORM action=\"main.cgi\" method=\"POST\">";
        generate_hidden_form_lines_from_hash(%hash);
        print "<input type=\"submit\" value=\"Continue to main menu ...\"></FORM>";
}


###################################
# MAIN PART #######################
###################################
print "Content-type:text/html\r\n\r\n";
print '<html>';
print '<head>';
print '<title>Node Cutter - Controller Login Page</title>';
print '<link href=\'http://fonts.googleapis.com/css?family=Droid+Sans:400,700\' rel=\'stylesheet\' type=\'text/css\' />';
print '<link href=\'css/screen.css\' media=\'screen\' rel=\'stylesheet\' type=\'text/css\' />';
print '<link href=\'css/style.css\' rel=\'stylesheet\' type=\'text/css\' />';
# http://jsfiddle.net/vfUvZ/
print '</head>';
print '<body>';

# Main structure table
print '<p align=center>';
print '<table><tr><td colspan=2><p align="center">';
print '<img src="images/node-cutter-logo-smaller.png">';
print '<h3> Welcome to Node Cutter!</h3>';
print 'Please enter your controller access information';
print '</p></td></tr>';

# Example FORM to enter data

print '<FORM method="POST">';
print '<tr><td><p align="right">Controller IP:</p></td><td><input type="text" name="controller_ip" value="192.168.125.9"></td></tr>';
print '<tr><td><p align="right">Username:</p></td><td><input type="text" name="username" value="sdn"></td></tr>';
print '<tr><td><p align="right">Password:</p></td><td><input type="text" name="password" value="skyline"></td></tr>';
print '<tr><td colspan=2><p align="center"><input type="submit" value="Submit"></p></td></tr>';
print '</FORM>';


# Example POST method processing

local ($buffer, @pairs, $pair, $name, $value, %FORM);
# Read in text
$ENV{'REQUEST_METHOD'} =~ tr/a-z/A-Z/;
if ($ENV{'REQUEST_METHOD'} eq "POST")
{
       read(STDIN, $buffer, $ENV{'CONTENT_LENGTH'});
     }else {
       $buffer = $ENV{'QUERY_STRING'};
}

# Split information into name/value pairs to change it to a nice perl hash perl variable %FORM
@pairs = split(/&/, $buffer);
foreach $pair (@pairs)
{
   ($name, $value) = split(/=/, $pair);
   $value =~ tr/+/ /;
   $value =~ s/%(..)/pack("C", hex($1))/eg;
   $FORM{$name} = $value;
}

@keys = keys %FORM;
$form_size = @keys;

# Messages from the login process also go into last line of the table
print '<tr><td colspan=2><p align="center">';


# now show/do something if something arrived from the formular
if ($form_size > 0)
{
	dprint ("<h3>Your form input: $form_size</h3>");
	foreach my $key (keys %FORM)
	{
		dprint "$key: $FORM{$key}<br>";
	}

	# NOW THE ACTUAL REST API part
	if ( exists ($FORM{'username'}) && exists ($FORM{'controller_ip'}) && exists ($FORM{'password'}) )
	{
		dprint "Recieved username/controller_ip/password, continueing...";
		my $token = get_token(%FORM);
		if ($token == 1)
		{
			goto END;
		}
		print "<h3>X-Auth-Token successfully recieved:<br><font color=green> $token</font></h3>";

		$FORM{'token'} = $token;

		#get_devices(%FORM);
		#get_nodes(%FORM);
		main_menu(%FORM);


	}

}

#$first_name = $FORM{first_name};
#$last_name  = $FORM{last_name};

goto SUCCESS;
END:
	printf "<h3><font color=red>X-Auth-Token NOT recieved! Check credentials or the controller status.</font></h3>";


SUCCESS:
#end of last line of table
print '</p></td></tr>';


# Main structure table END
print "</table>";
print "</p>";


print '</body>';
print '</html>';

1;
OK, if you are not yet fed-up by the index.cgi code, let me show you the main menu. When you arrived, this is what you should see.
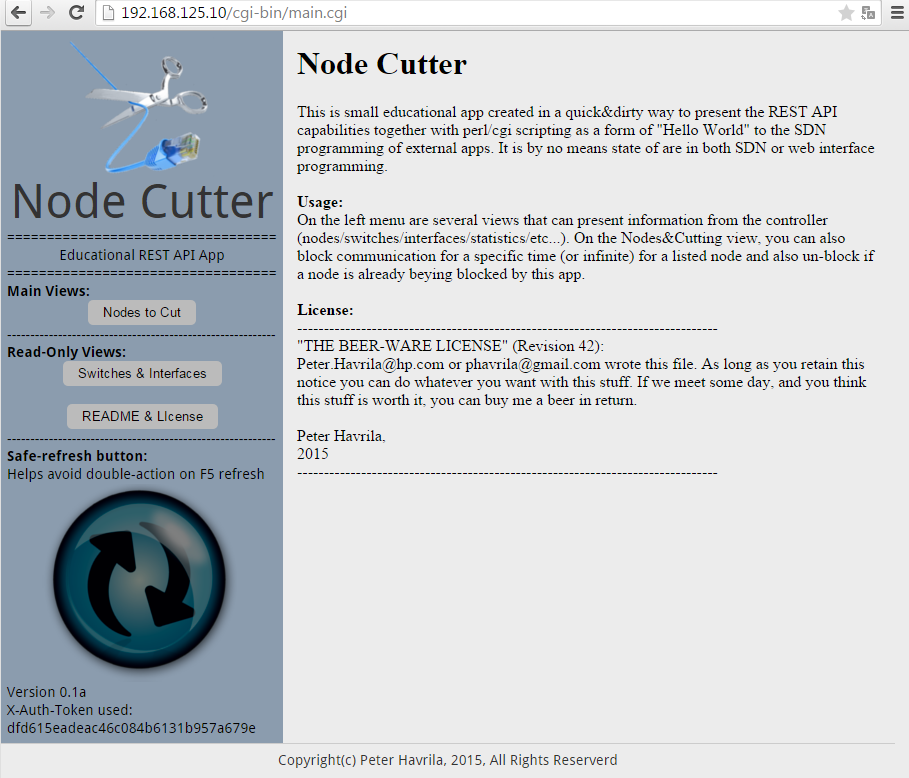
There are only a few buttons in the menu, this is what they do:
- Nodes to Cut – this is the main function this application is doing, when you enter here, you will get a list of Nodes that are currently known to the controller and the option to block their traffic (this is the main point of this app here).
- Switches & Interfaces – this is a read-only function to demonstrate how to extract information from multiple parts of REST API and combine it. This one gets /net/devices for switches, net/devices/{dpdi}/ports for interfaces and also /of/stats for interface statistics and presents it as a combined overview!
- README & License – this is a return button back this introduction page
- Sage-refresh button – this is a BIG button to help you refresh the pages during experiments in a safe way, because sometimes if you use only F5, you can re-submit the POST command to block some node repeatedly and we wan to avoid this. So please use this one:
If you are code hungry, this is a quick representation of the main.cgi code. Technically all the buttons are POST methods and this way I am keeping the token and other usefull state data like which page to display and what action to take in a loop (yes, in real application this should be a cookie!, but POST is much more easy to understand reading the code, so after I started early with this I didn’t bothered to repair this architecture flaw as this is purely educational app!).

First, there are three parameters that you can configure if you want directly as a static variables at the beginning of the code.
- $bDebug (Default value “0”) controls my dprint function that is a filtering mechanism for debug text control. If you change this value to 1, you will see much more troubleshooting and debug text appearing everywhere, but maybe inspire yourself using this dprint function instead of pure print if you are going to experiment with the code.
- $COOKIE (Default value “0x2031987”) is an artificial value that Node Cutter is entering to all the flows it creates and it helps later identify all these rules to know if the found blocking rule was created by Node Cutter or by someone else. FYI right now this number is my birth date 😉
- $PRIORITY (Default value “30000”), to override the controller SPF algorithm that creates rules with priority 29999, we are setting our rules at least to increment +1. NOTE: There is some problem here in going to values 30001+ for some reason, so if you are going to experiment and mange to insert value larger than 30000, let me know.
Again, the logic of the file structure is also that blue parts are executed always, but the red parts are those that are executed depending on what arrives to them via POST method (always track the %FORM hash in the code). We only have two main chooses to do in terms of view and that is selected based on %FORM{‘view’} and only two actions of “block” and “unblock” that is selected via the %FORM{‘action’}.
Also note that for error handling, I choose to use a very simple, but ugly if this program would to become large way of using “goto” pointers. If any REST API function fails, it will print error messages and then jump at the end and stop the execution with only finishing the HTML body parts.
For main.cgi I will not show code in one view (if you want that please download the zip and open main.cgi that way) as it has ~800lines of perl and would definitely kill most of readers here. So lets have a quick view first how the Node Cutter works and then I will show the most important code snippets.
Step 4) Switches and Interfaces view
This is a read-only function, that if you click here with active network and controller you should get a fairly large table with all known SDN switches registered to the controller, and each switch that is marked as “Online” you will also get list of all its interfaces and Rx/Tx statistics for each port. This is how it looks like:
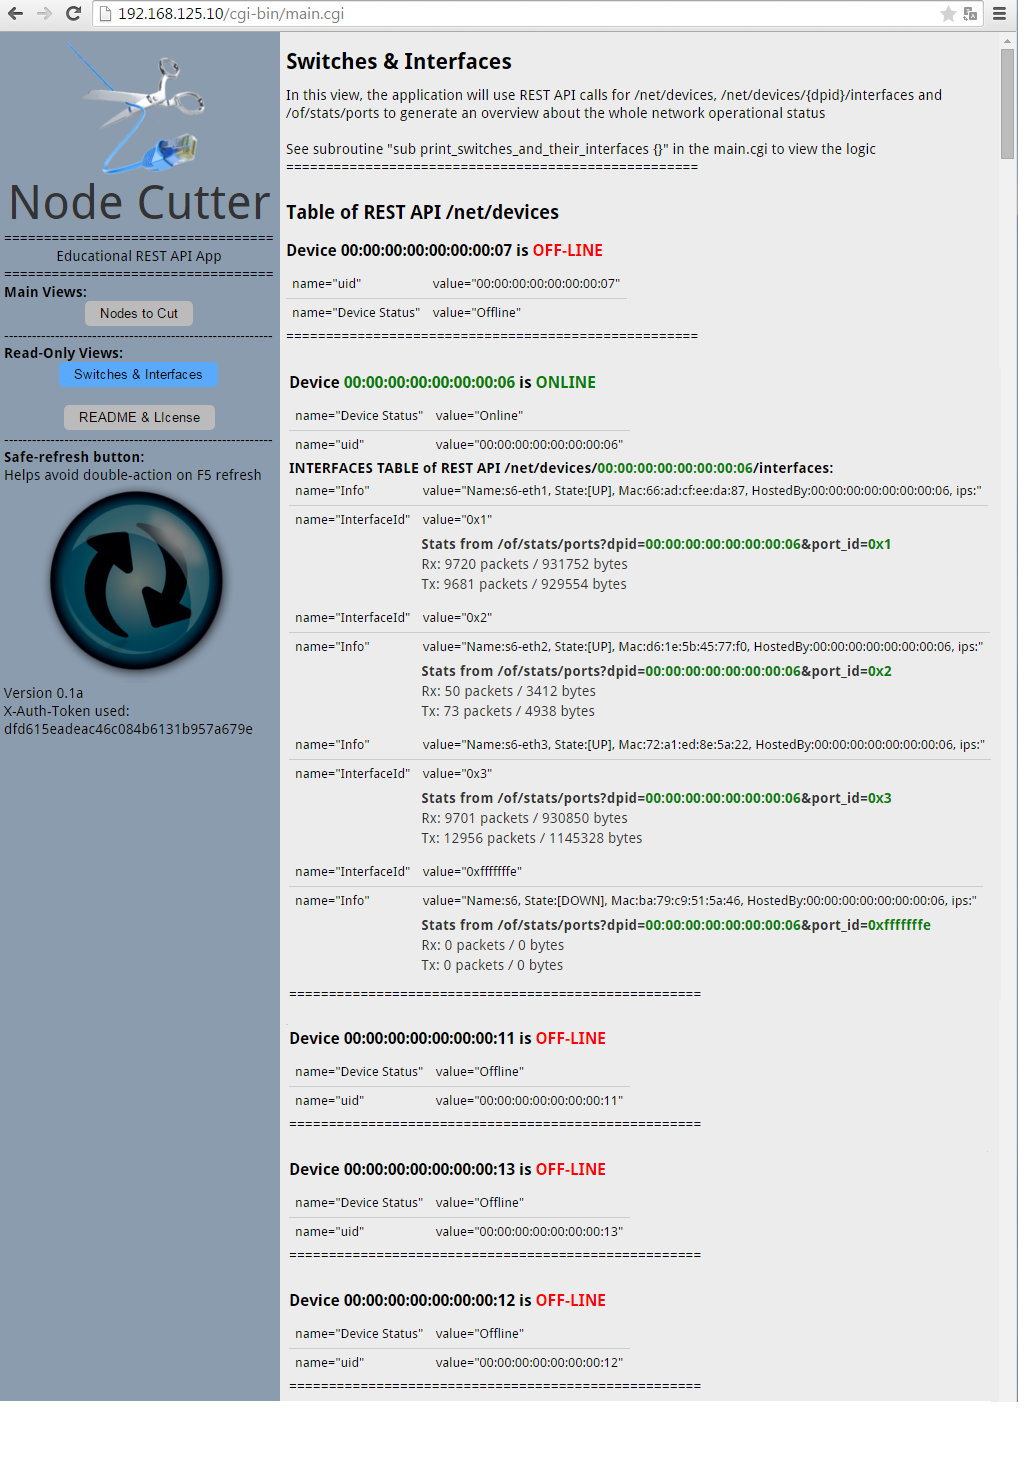
Node cutter achieves this by combining /net/devices with /net/devices/{dpid}/ports and /of/stats calls with various identifiers pushed back. The function to explore here is subrouting print_switches_and_their_interfaces, here is the code. Just have a look how it uses three REST API calls, while iterating via online switches and interfaces with some more REST API calls. In total, for large amount of switches this I expect can be quite a lot of sessions with performance impact possible in very large networks, but for campus it should be OK.
NOTE to help you read the code: Do NOT forget you have the option to open the code in a separate window using the “Open Code In New Window” button in the code toolbar menu.
# Switches and Interfaces
sub print_switches_and_their_interfaces {
        my (%FORM) = @_;
        dprint "Starting \"Switches&Interfaces\" view generation<br>";
        print "<h1>Switches & Interfaces</h1>";
        print   "<h5>In this view, the application will use REST API calls for /net/devices,
                /net/devices/{dpid}/interfaces and /of/stats/ports to generate an overview
                about the whole network operational status</h5>";
        print   "<br>See subroutine \"sub print_switches_and_their_interfaces {}\"
                in the main.cgi to view the logic<br>";
        print "====================================================<br><br>";
        ##################################
        # Retrieve the /net/devices list
        ##################################
        print "<h2><strong>Table of REST API /net/devices</strong></h2>";
        $url = 'https://' . $FORM{'controller_ip'} . ':8443/sdn/v2.0/net/devices';
        dprint "URL constructed: $url";

        # these options are to avoid the self-signed certificate problems
        my $ua = LWP::UserAgent->new( ssl_opts => {
                                verify_hostname => 0,
                                SSL_verify_mode => 'SSL_VERIFY_NONE'
                                } );
        my $req = HTTP::Request->new(GET => $url);
        $req->header('content-type' => 'application/json');
        $req->header('x-auth-token' => $FORM{'token'});
        $response = $ua->request($req);
        my $devices;
        if (!($response->is_success)){
                goto WRONG_OUTPUT;
        }
        else
        {
                dprint "Successfully got $url from controller!<br>";
                my $json = $response->decoded_content;
                $devices = from_json($json);

                #this is to remove the outher most {} from the JSON that only has "devices":{}
                $devices = $devices->{'devices'};
        }
        #####################################
        # We have /net/devices in my $devices
        # lets iterate via it with while(){}
        #####################################
        my $key;
        my $device;
        my $uptime= uptime;
        while (($key, $device) = each $devices) {
                dprint "Iteration key: $key, device: $device->{'uid'}";
                #before we start, I want the device UID and Status to be nicely starting the table:
                if ($device->{'Device Status'} eq "Online"){
                        print "<h3><strong>Device <font color=\"GREEN\">$device->{uid}</font> is <font color=\"GREEN\">ONLINE</font></strong></h3>";
                } else {
                        print "<h3><strong>Device $device->{uid} is <font color=\"RED\">OFF-LINE</font></strong></h3>";
                }

                # I actually do not want to also print the "uris' JSON part because that is dpid duplicate
                delete $device->{'uris'};
                # and print all the remaining in a quick table
                print_hash_in_table(%$device);
                ###################################
                # Now lets for each device that is
                # "ONline" for interfaces list
                ###################################
                if($device->{'Device Status'} eq "Online")
                {
                        print "<h4><strong>INTERFACES TABLE of REST API /net/devices/<font color=\"GREEN\">$device->{uid}</font>/interfaces:</h4></strong>";
                        # Lets get the /net/devices/{dpid}/interfaces in REST API
                        $url = 'https://' . $FORM{'controller_ip'} . ':8443/sdn/v2.0/net/devices/' . $device->{uid} . '/interfaces';
                        my $token = $FORM{'token'};
                        my $req2 = HTTP::Request->new(GET => $url);
                        $req2->header('content-type' => 'application/json');
                        $req2->header('x-auth-token' => $FORM{'token'});
                        $response = $ua->request($req2);
                        if ( !($response->is_success))
                        {
                                goto WRONG_OUTPUT;
                        }
                        else
                        {
                                # We have the /net/devices/{dpid}/interfaces, lets print them
                                my $json = $response->decoded_content;
                                $interfaces = from_json($json);
                                # getting again rid of the outher most {} in JSON
                                $interfaces = $interfaces->{'Interfaces'};
                                while (($key2, $interface) = each $interfaces) {
                                        dprint "Interfaces Iteration Key: $key2, Interface: $interface->{'InterfaceId'}";
                                        print_hash_in_table(%$interface);

                                        ######################################
                                        # In addition, I want port statistics!
                                        # Lets use the /of/stats/ports here
                                        ######################################
                                        print "<p class=\"stats\">";
                                        print "<strong>Stats from /of/stats/ports?dpid=<font color=green>$device->{uid}</font>&port_id=<font color=green>$interface->{'InterfaceId'}</font></strong><br>";
                                        $url = 'https://' . $FORM{'controller_ip'} . ':8443/sdn/v2.0/of/stats/ports?dpid=' . $device->{uid} . '&port_id=' . $interface->{'InterfaceId'};
                                        my $req3 = HTTP::Request->new(GET => $url);
                                        $req3->header('content-type' => 'application/json');
                                        $req3->header('x-auth-token' => $FORM{'token'});
                                        $response = $ua->request($req3);
                                        if ( !($response->is_success))
                                        {
                                                goto WRONG_OUTPUT;
                                        }
                                        else
                                        {
                                                my $json = $response->decoded_content;
                                                $stats = from_json($json);
                                                # getting again rid of the outher most {} in JSON
                                                $stats = $stats->{'port_stats'};
                                                print "Rx: $stats->{'rx_packets'} packets / $stats->{'rx_bytes'} bytes<br>";
                                                print "Tx: $stats->{'tx_packets'} packets / $stats->{'tx_bytes'} bytes<br>";
                                        }
                                        print "</p>";
                                }
                        }
                }
        print "====================================================<br><br>";
        }
}
Step 5) Nodes to Cut – first look
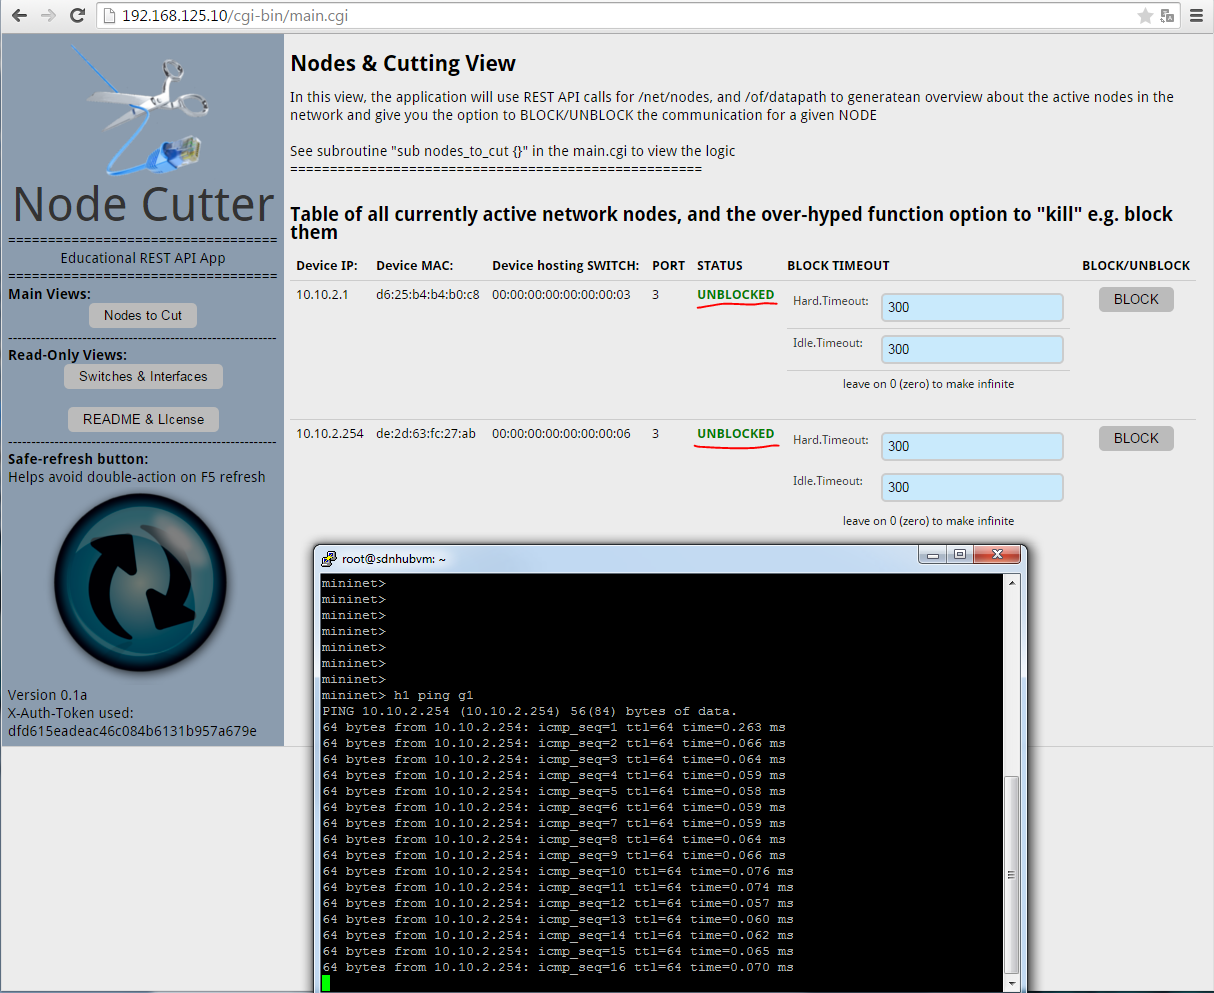
Ok, finally we are here, lets do the following. Open you mininet and ping from H1 (10.10.2.1) to G1 (10.10.2.254) so that there are at least these two hosts active during our next experiment.
mininet> h1 ping g1
PING 10.10.2.254 (10.10.2.254) 56(84) bytes of data.
64 bytes from 10.10.2.254: icmp_seq=1 ttl=64 time=0.359 ms
....
....
Leave the ping running as that will be our experiment for blocking/unblocking.
Now go to the “Nodes to Cut” view in the Node Cutter application and you should see something similar to this:
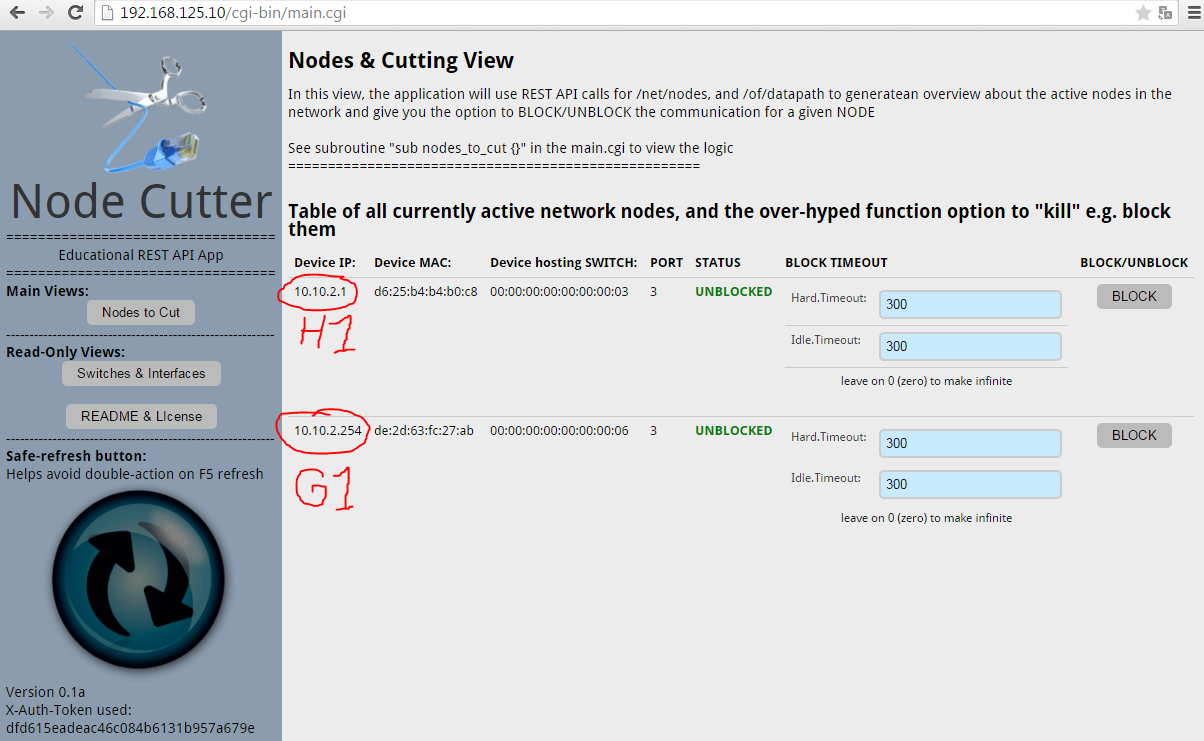
If you have your two nodes there, it is great! Now, make sure that the ping is still running, for me I just had a quick view:
Step 6) Block node “H1” communication
Ok, you probably noticed the big “BLOCK” button in the table, but there are also two Timeout parameters you can play with. This is the explanation:
- Hard.Timeout – is a timeout that invalidates the blocking flow (ergo auto-unblock) after the number of seconds. Independent on activity.
- Idle.Timeout – is also going to invalidate the blocking flow, however this timer is reset with every new packet, so if the node will “try” to communicate continuously, the flow will never be removed, on the other side, if the node will be quit for the amount of time specified, it will help him invalidate the flow.
By default there is a combination of 300seconds on both, which means that the Hard.Timeout is going to win and definitely invalidate the flow after 5minutes. Feel free to experiment.
Let’s leave the default times and click “BLOCK”, something like this should happen:

Verification: Check your running PING between H1 and G1, it should now be blocked. Also feel free to run “pingall” in mininet and you will see that H1 cannot send traffic to any of the other hosts as well.

NOTE: If you start using the safe-refresh button now, you can notice that Node Cutter is also tracking the flow lifetime value in seconds, this might help you determine how long until it is subject to Timeout.
Regarding main.cgi code, the whole functionality is hidden inside the “block” subroutine. This is it and if you have a quick view on it, you can notice that it is only a single JSON construction of flow definition and a single REST API call with HTTP method “POST”.
NOTE: The “flow” definition in JSON was already explained in Part2/3 of this series, so I will not repeat that here.
## Function for blocking a node
sub block {
        my (%FORM) = @_;

        # LETS DOUBLE-CHECK IF WE HAVE a BLOCK ACTION
        if ( exists ($FORM{'action'}) && $FORM{'action'} eq "block" )
        {
                # Lets chack if we have all the data for a successfull BLOCK
                if ( ( exists ($FORM{'ip'}) || exists ($FORM{'mac'}) ) && exists ($FORM{'dpid'}) && exists ($FORM{'token'}))
                {
                        print "<h4><font color=red>WARNING:</font>BLOCKING INSTRUCTION RECIEVED ... ";

                        #Lets create the JSON representation of the block flow
                        my $json = "{\"flow\":{\"cookie\": \"$COOKIE\",\"table_id\": 0,\"priority\": $PRIORITY,\"idle_timeout\": $FORM{'idle'},\"hard_timeout\": $FORM{'hard'},\"match\": [ {\"ipv4_src\": \"$FORM{'ip'}\"},{\"eth_t
                        dprint $json;
                        $url = 'https://' . $FORM{'controller_ip'} . ':8443/sdn/v2.0/of/datapaths/' . $FORM{'dpid'} . '/flows';
                        my $ua = LWP::UserAgent->new( ssl_opts => {
                                        verify_hostname => 0,
                                        SSL_verify_mode => 'SSL_VERIFY_NONE'
                                        } );
                        my $req = HTTP::Request->new(POST => $url);
                        $req->header('content-type' => 'application/json');
                        $req->header('x-auth-token' => $FORM{'token'});
                        $req->content( $json );
                        $response = $ua->request($req);
                        if ($response->is_success) {
                                print "<font color=green>SUCCESS! We are now blocking $FORM{'ip'}/$FORM{'mac'} on SWITCH $FORM{'dpid'} port $FORM{'port'} for $FORM{'hard'}/$FORM{'idle'} S/H Timeout</font>";
                        }else{
                                print "<font color=red>FAILED TO SEND BLOCKING FLOW!</font>";
                        }
                        print "</h4>";
                }
        }


}
Step 7) Unblocking node H1 communication
Because if you experimented with the Timers you can also enter “0” (zero) to make the blocking indefinite, you need a we to remove this block. You can do this after the program detects (by searching for it’s cookie value in the flow table) that a node is blocked, it gives you the “UNBLOCK” button.
Let’s try this now, but first, do you still run the ping between H1 and G1? If yes then by unblocking this communication, you will see the jump in ICMP sequence numbers that were dropped during our experiment. So let’s unblock! Click the “UNBLOCK” button.
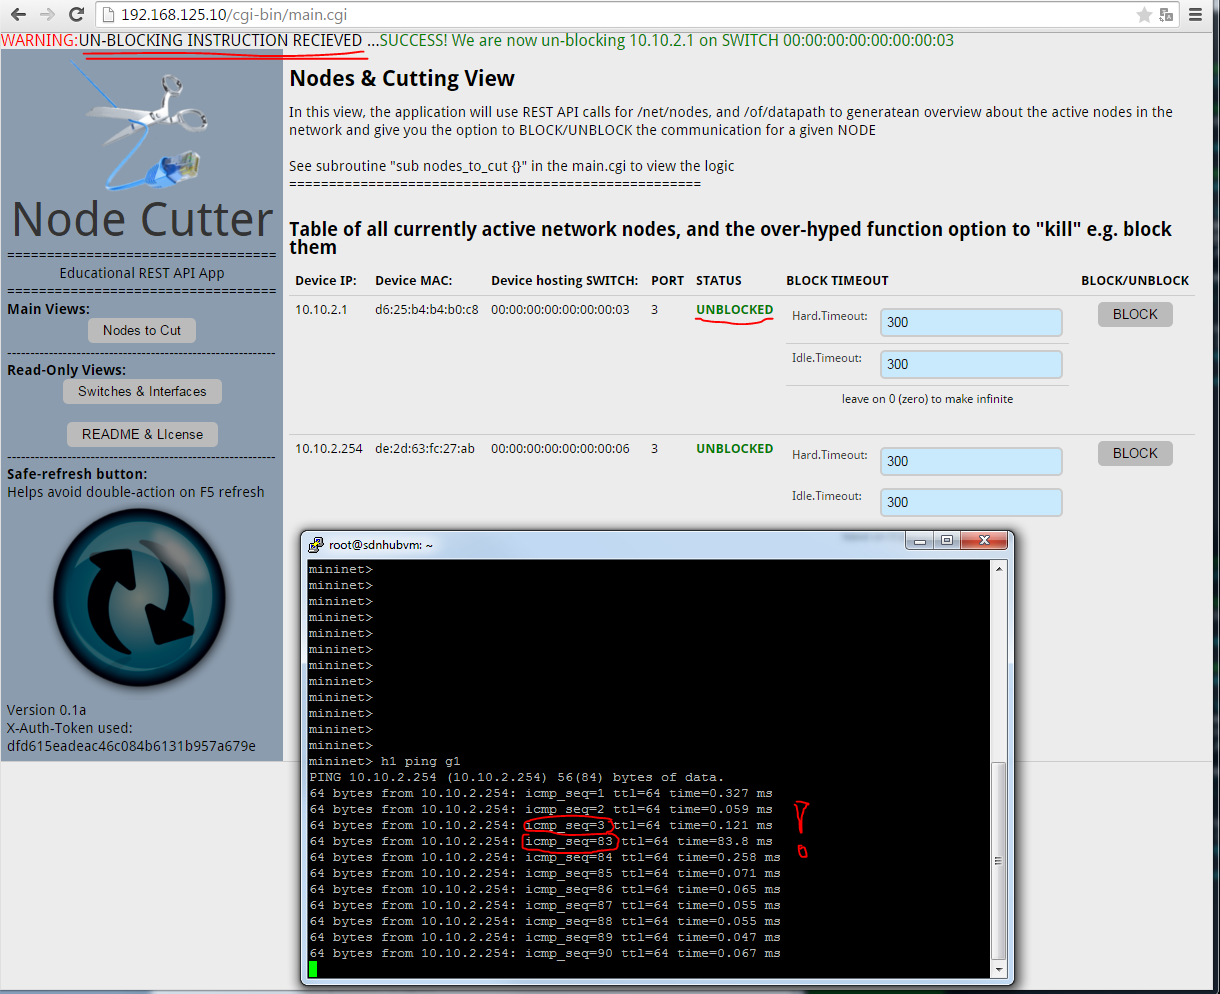
If we look on the unblocking function “sub unblock {}” in main.cgi, you can notice that it is the same as the the block function, the only change is that the HTTP method was changed from POST to DELETE, everything else is identical with the block. Code part here:
my $req = HTTP::Request->new(DELETE => $url);
END of Part 2/3 – “Node Cutter ” perl application with web interface
So in summary, I really hope you liked this one, it took me quite some time to actually program this app for you (well, initial creation was not long, maybe 4 hours, but making it nicer anc code clean was another point!). So I hope there will be at least someone who appreciates it, if nothing else it was a great experience for me that has not motivated me to check the internal application development because the REST API despite being powerful and can help you do a lot, doesn’t give you that many functions to play with. And what was not mentioned here is that there are some “magic limits” in some places. For example natural evolution of “Node Cutter” that I wanted was to enable DSCP field editing for nodes to manipulate their QoS, but the REST API is only permitting certain DSCP values (e.g. it accepted value “12” but refused to accept value “46” and other WTF?! moments I had).
In conclusion to the whole series
This series has given you a COMPLETE introduction to SDN external application creation, even though it assumed you know already something about OpenFlow and perl, it should have been easy to follow on the REST API aspect that we explored for both direct cURL commands and then with a full example application in perl with a nice web interface. ANd the application I share with the world only under the BEER-WARE license as I only want the references and be kept mentioned as author on derivatives (and hopefully get a beer sometime …. ).
In summary, I appreciate your time (especially if someone went through all three parts). Please leave a comment if you liked it! Thanks!
Index:
Thank you very much! It’s a great tutorial!
Thanks on your marvelous posting! I actually enjoyed reading it, you happen to be a great author.I will remember to
bookmark your blog and will eventually come back someday.
I want to encourage one to continue your great posts, have a nice morning!
Superb post.Ne’er knew this, thank you for letting me know.
i can’t run node cutter
have error message
” nternal Server Error
The server encountered an internal error or misconfiguration and was unable to complete your request.
Please contact the server administrator at wampserver@wampserver.invalid to inform them of the time this error occurred, and the actions you performed just before this error.
More information about this error may be available in the server error log.
Apache/2.4.35 (Win64) PHP/7.2.10 Server at localhost Port 80″
need help