Tutorial for small Hadoop cloud cluster LAB using virtual machines and compiling/running first “Hello World” Map-Reduce example project
I had Hadoop experience now for more than a year, thanks to a great series of Cloud Computing courses on Coursera.org, now after ~6 months of running via several cloud systems, I finally have time to put down some of my more practical notes in a form of an article here. I will not go much into theory, my target here would be to help someone construct his first small Hadoop cluster at home and show some of my amateur “HelloWorld” code that will count all words in all works of W. Shakespeare using the MapReduce. This should leave with with both a small cluster and a working compilation project using Maven to expand on your own later …
What I have used for my cluster is a home PC with 32G of RAM to run everything inside using vmWare Workstation. But this guide is applicable even if you run this usingVirtualBox, physical machines, or using virtual machines on some Internet cloud (e.g. AWS/Azure). The point will simply be 4 independent OS linux boxes that are together one a shared LAN to communicate between each other.
Contents
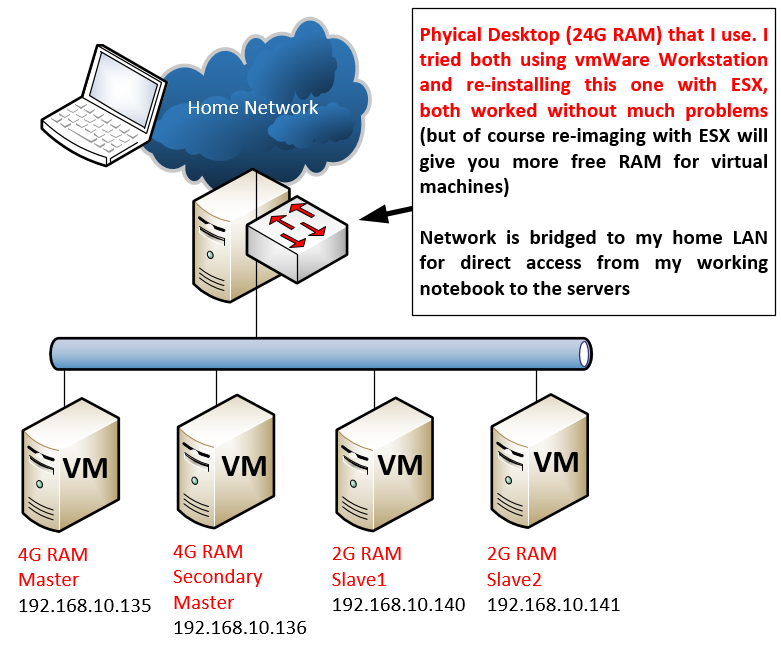
Lab Topology
For this one there is not much to say about topology, I simplified everything on network level to a single logical segment by bridging the virtual network to my real home LAN to make my own access simple. However in any real deployment with more systems you should consider both your logical network (ergo splitting to VLANs/subnets based on function) and also your rack structure as Hadoop and other cloud systems are very much delay sensitive) and physical network.
Versions of software used
This is a combination that I found stable in the last 6 months, of course you can try the latest versions of everything, just a friendly note that with these cloud systems library and versions compatibility troubleshooting can take days (I am not kidding). So if you are new to Hadoop, rather take recommendations before getting angry on weird dependency troubles (which you will sooner or later yourself).
Step 1) Preparing the environment on Ubuntu Server 14.04
There are several per-requisites that you need to do in order to have Hadoop working correctly. In a nutshell you need to:
- Make the cluster nodes resolvable either via DNS or via local /etc/hosts file
- Create password-less SSH login between the cluster nodes
- Install Java
- Setup environmental variables for Hadoop and Java
A. Update /etc/hosts
For my Lab and the IPs shown in the LAB topology, I needed to add this to the /etc/hosts file on all cluster nodes:
@on ALL nodes add this to /etc/hosts:
#master
192.168.10.135 master
#secondary name node
192.168.10.136 secondarymaster
#slave 1
192.168.10.140 slave1
#slave 2
192.168.10.141 slave2
B. Create password-less SSH login between nodes
This is essentially about generating privat/public DSA keypair and redistribute to all nodes as trusted, you can do this with the following steps:
@on MASTER node:
# GENERATE DSA KEY-PAIR
ssh-keygen -t dsa -f ~/.ssh/id_dsa

# MAKE THE KEYPAIR TRUSTED
cat ~/.ssh/id_dsa.pub >> ~/.ssh/authorized_keys

# COPY THIS KEY TO ALL OTHER NODES:
scp -r ~/.ssh  ubuntu@secondarymaster:~/
scp -r ~/.ssh  ubuntu@slave1:~/
scp -r ~/.ssh  ubuntu@slave2:~/
scp -r ~/.ssh  ubuntu@cassandra1:~/
Test no with ssh if you can login to each server without password, for example from master node open ssh with “ssh ubuntu@slave1” to jump to slave1 console without being prompted for password, this i needed by hadoop to operate so should work!
NOTE: In production, you should always only move only the public part of the key id_dsa.pub, not the private key that should be unique for each server. Ergo the previous key generation procedure should be done on each server and then only the public keys should be exchanged between all the servers, what I am doing here is very unsecure that all servers use the same private key! If this one is compromised, all servers are compromised.
C. Install Java
We will simply install java and test we have correct version for Hadoop 2.7.1:
@on ALL nodes:
sudo add-apt-repository ppa:webupd8team/java
sudo apt-get update && sudo apt-get -y install oracle-jdk7-installer
Afterwards you should test if you have correct java version with command “java -version” or that your path to it is “/usr/lib/jvm/java-7-oracle/bin/java -version”
D. Setup environmental variables
Add this to your ~/.bashrc file, we are preparing also here already some variables for the hadoop installation folder :
@on ALL nodes:
echo '
#HADOOP VARIABLES START
export HADOOP_PREFIX=/home/ubuntu/hadoop
export HADOOP_HOME=/home/ubuntu/hadoop
export HADOOP_CONF_DIR=${HADOOP_HOME}/etc/hadoop
export JAVA_HOME=/usr/lib/jvm/java-7-oracle
export PATH=$PATH:$HADOOP_PREFIX/bin
export PATH=$PATH:$HADOOP_PREFIX/sbin
export HADOOP_MAPRED_HOME=${HADOOP_HOME}
export HADOOP_COMMON_HOME=${HADOOP_HOME}
export HADOOP_HDFS_HOME=${HADOOP_HOME}
export YARN_HOME=${HADOOP_HOME}
export HADOOP_COMMON_LIB_NATIVE_DIR=${HADOOP_PREFIX}/lib/native
export HADOOP_OPTS="-Djava.library.path=${HADOOP_PREFIX}/lib/native"
export HADOOP_CLASSPATH=$JAVA_HOME/lib/tools.jar
#HADOOP VARIABLES END
' >> ~/.bashrc
Step 2) Downloading and extracting Hadoop 2.7.1
Simply download Hadoop 2.7.1 from repository and extract.
@on ALL nodes:
#Download
wget http://apache.mirror.gtcomm.net/hadoop/common/hadoop-2.7.1/hadoop-2.7.1.tar.gz

#Extract
tar -xzvf ./hadoop-2.7.1.tar.gz

#Rename to target directory of /home/ubuntu/hadoop
mv hadoop-2.7.1 hadoop

#Create directory for HDFS filesystem
mkdir ~/hdfstmp
Step 3) Configuring Hadoop for first run
Actually out-of-the-box Hadoop is configured for pseudo-cluster mode, which means you will be able to execute it all inside one server, but this is not why we are here and as such our target here is to configure it for a real cluster. Here are the high level steps.
@on ALL nodes:
edit $HADOOP_CONF_DIR/core-site.xml
change from:
<configuration>
</configuration>
change to:
<configuration>

<property>
<name>hadoop.tmp.dir</name>
  <value>/home/ubuntu/hdfstmp</value>
</property>

<property>
  <name>fs.default.name</name>
  <value>hdfs://master:8020</value>
</property>

<property>
    <name>fs.defaultFS</name>
    <value>hdfs://master:8020</value>
</property>

</configuration>
@on ALL nodes:
edit $HADOOP_CONF_DIR/hdfs-site.xml
change from:
<configuration>
</configuration>
change to:
<configuration>
<property>
  <name>dfs.replication</name>
  <value>2</value>
</property>

<property>
  <name>dfs.permissions</name>
  <value>false</value>
</property>

<property>
  <name>dfs.namenode.secondary.http-address</name>
  <value>secondarymaster:50090</value>
</property>

<property>
  <name>fs.default.name</name>
  <value>hdfs://master:8020</value>
</property>

<property>
  <name>dfs.data.dir</name>
  <value>/home/ubuntu/hdfstmp/dfs/name/data</value>
  <final>true</final>
</property>
<property>
  <name>dfs.name.dir</name>
  <value>/home/ubuntu/hdfstmp/dfs/name</value>
  <final>true</final>
</property>

</configuration>
@on ALL nodes:
edit (or create since missing) $HADOOP_CONF_DIR/mapred-site.xml
change to:
<configuration>
<property>
  <name>mapred.job.tracker</name>
  <value>hdfs://hadoopmaster:8021</value>
</property>
<property>
  <name>mapreduce.framework.name</name>
  <value>yarn</value>
</property>
</configuration>
@on ALL nodes:
edit $HADOOP_CONF_DIR/yarn-site.xml
change from:
<configuration>
</configuration>
# change to:
<configuration>

  <property>
    <name>yarn.resourcemanager.hostname</name>
    <value>master</value>
  </property>

  <property>
    <name>yarn.nodemanager.aux-services</name>
    <value>mapreduce_shuffle</value>
  </property>

  <property>
    <name>yarn.nodemanager.aux-services.mapreduce_shuffle.class</name>
    <value>org.apache.hadoop.mapred.ShuffleHandler</value>
  </property>

</configuration>
@on ALL nodes:
edit $HADOOP_CONF_DIR/hadoop-env.sh
change from:
export JAVA_HOME=${JAVA_HOME}
change to:
export JAVA_HOME=/usr/lib/jvm/java-7-oracle
@on MASTER
Remove “yarn.resourcemanager.hostname” property from yarn-site.xml ONLY ON MASTER node otherwise your master ResourceManager will listen only on localhost and other nodes will not be able to connect to it!
@on SECONDARYMASTER
Remove “dfs.namenode.secondary.http-address” from hdfs-site.xml ONLY ON SECONDARYMASTER node Remove “dfs.namenode.secondary.http-address” from hdfs-site.xml ONLY ON SECONDARYMASTER node
@on MASTER and SECONDARYMASTER
edit $HADOOP_CONF_DIR/slaves
change from:
localhost
change to:
slave1
slave2
Step 4) Format HDFS and first run of Hadoop
Since we now have Hadoop fully configured, we can format the HDFS on all nodes and try to run it from Master.
@on ALL nodes:
hadoop namenode -format
@on MASTER
First we start the HDFS filesystem cluster with:
start-dfs.sh
Here is an example how a successful start looks like:
    ubuntu@master:~$ start-dfs.sh
    Starting namenodes on [master]
    master: starting namenode, logging to /home/ubuntu/hadoop/logs/hadoop-ubuntu-namenode-master.out
    slave1: starting datanode, logging to /home/ubuntu/hadoop/logs/hadoop-ubuntu-datanode-slave1.out
    slave2: starting datanode, logging to /home/ubuntu/hadoop/logs/hadoop-ubuntu-datanode-slave2.out
    Starting secondary namenodes [secondarymaster]
    secondarymaster: starting secondarynamenode, logging to /home/ubuntu/hadoop/logs/hadoop-ubuntu-secondarynamenode-secondarymaster.out
Test if you want can be that from this point, your “hadoop fs” interaction with the HDFS filesystem is possible, so you can for example
#create directories
hadoop fs -mkdir /test_directory

#add a file to the HDFS (random)
hadoop fs -put /etc/hosts /test_directory/

#read files
hadoop fs -cat /test_directory/hosts
@on MASTER
Second we have to start the YARN scheduled (that will in background start also datanodes on slaves)
start-yarn.sh
Successful start looks like this:
    ubuntu@master:~$ start-yarn.sh
    starting yarn daemons
    starting resourcemanager, logging to /home/ubuntu/hadoop/logs/yarn-ubuntu-resourcemanager-master.out
    slave1: starting nodemanager, logging to /home/ubuntu/hadoop/logs/yarn-ubuntu-nodemanager-slave1.out
    slave2: starting nodemanager, logging to /home/ubuntu/hadoop/logs/yarn-ubuntu-nodemanager-slave2.out
Step 5) Verification of start
The basic test is to check what services are running in the java with the “jps” command. This is how it should look like on each node:
@MASTER:
    ubuntu@master:~$ jps
    4525 NameNode
    5048 Jps
    4791 ResourceManager
@SECONDARY MASTER
    ubuntu@secondarymaster:~$ jps
    4088 SecondaryNameNode
    4140 Jps
@SLAVE1
    ubuntu@slave1:~$ jps
    3406 DataNode
    3645 Jps
    3547 NodeManager
@SLAVE2
    ubuntu@slave2:~$ jps
    3536 NodeManager
    3395 DataNode
    3634 Jps
Explanation is that ResourceManager is YARN master component, while NodeManager is YARN components on slaves. The HDFS composes of NameNode and SecondaryNamenode, while DataNode is HDFS component on slaves. All these components have to exist (And be able to communicate with each other via LAN) for the Hadoop cluster to work.
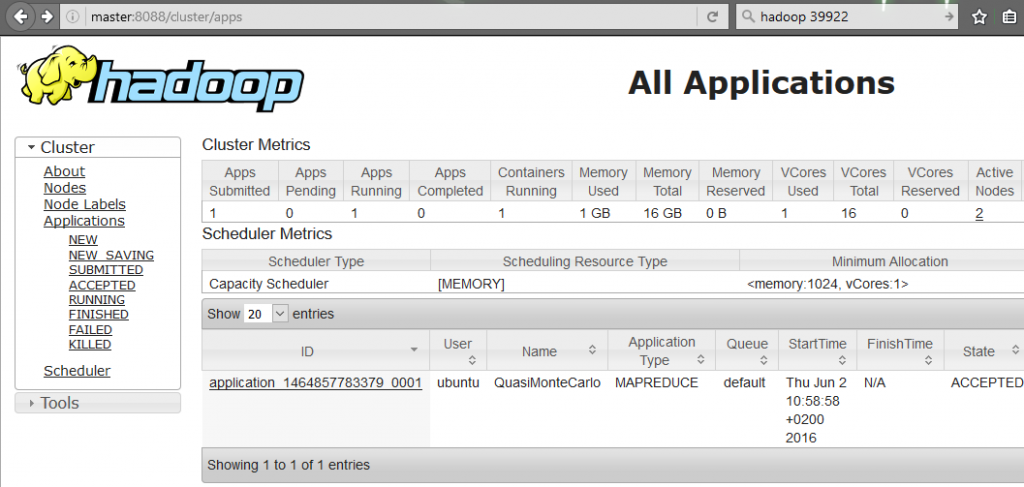
Additional verification can be done by checking the WEB interfaces, most importantly (which you should bookmark for checking also status of applicaitons) is to open your browser and to to “https://master:8088”. This 8088 is a web interface of the YARN scheduler. Here are some example what you can see there, the most important for you is that:
- You are able to actually visit 8088 on master (means RsourceManager is running)
- Check the number of DataNodes visible to YARN (picture below), if you have this it means that the slaves have managed to register to the ResourceManager as available resources.
Step 6) Running your first “HelloWorld” Hadoop application
Ok, there two paths here.
- Use Hadoop provided Pi program example, but this might have high RAM requirements that my 2G slaves had trouble to run
- Use super-small Hadoop Java program that I provide step-by-step below to build your own application and run it to count all words in all the plays of W. Shakespeare.
Option #1:
There is already a pre-compiled example program to do Pi calculations (ergo extrapolating Pi number with very high amount of decimal places). You can immediately run this with the following command using pre-compiled examples JAR that came with Hadoop installation:
yarn jar /home/ubuntu/hadoop/share/hadoop/mapreduce/hadoop-mapreduce-examples-2.7.1.jar pi 10 1000000
However, for me this didn’t worked by default because Pi example asked for 8G of Ram in the YARN scheduler that my 2G slaves were not able to allocate, which resulted in the application to be “ACCEPTED”, but never scheduled for execution by YARN. To solve this, check below extra references on RAM management that you can optionally use here.
Option #2:
What I recommend is to already go for compiling your own super-small Hadoop application that I provided. You can download NetworkGeekStuff_WordCount_HelloWorld_Hadoop_Java_Program.tar.bz2 here or directly here is a list of commends to get both the program code, and also all the necessary packages to compile it:
@on MASTER:
# Get Maven compilation tools
sudo apt-get install maven

# Download Hadoop example project
wget http://networkgeekstuff.com/article_upload/maven_wordcount_example_networkgeekstuff.tar.bz2

# Extract the project and enter the main directory
tar xvf ./maven_wordcount_example_networkgeekstuff.tar.bz2
cd maven_wordcount_example_networkgeekstuff
So right now you should be inside the project directory where I provided the following files:
ubuntu@master:~/maven_wordcount_example_networkgeekstuff$ ls -l
total 32
drwxrwxr-x 2 ubuntu ubuntu 4096 Jun  2 09:53 input
-rw-r--r-- 1 ubuntu ubuntu 4030 Jun  2 09:53 pom.xml
drwxrwxr-x 3 ubuntu ubuntu 4096 Jun  2 09:53 src
-rwxr--r-- 1 ubuntu ubuntu  197 Jun  2 09:53 step0_prepare_HDFS_input
-rwxr--r-- 1 ubuntu ubuntu   87 Jun  2 09:53 step1_compile
-rwxr--r-- 1 ubuntu ubuntu  476 Jun  2 09:53 step2_execute
-rwxr--r-- 1 ubuntu ubuntu  102 Jun  2 09:53 step3_read_output
drwxrwxr-x 2 ubuntu ubuntu 4096 Jun  2 09:53 target
To make this SIMPLE FOR YOU, you can notice I have provided these 4 super small scripts:
- step0_prepare_HDFS_input
- step1_compile
- step2_execute
- step3_read_output
So you can simply start executing these one by one and you will manage to get at the end a result of counting all the works of William Shakespeare (provided as txt inside “./input” directory from the download).
But lets go via these files one by one for explanation:
@step0_prepare_HDFS_input
Simply uses HDFS manipulation commands to create input and output directories in HDFS and upload a local file with Shakespeare texts into the input folder.
#!/bin/bash

echo "putting shakespear into HDFS";
hadoop fs -mkdir /networkgeekstuff_input
hadoop fs -mkdir /networkgeekstuff_output
hadoop fs -put ./input/shakespear.txt /networkgeekstuff_input/
@step1_compile
This one is more interesting, it uses Maven framework to download all the java library dependencies (these are described in pom.xml file together with compilation parameters, names and other build details for the target JAR).
#!/bin/bash
echo "==========="
echo "Compilation"
echo "==========="
mvn clean package
The result of this simple command will be that there appears a new Java JAR file inside the “target” directory that we can later use with Hadoop, please take good look on the compilation process. To save space in this article I didn’t provide the whole output, but at the very end you should get a message like this:
ubuntu@master:~/maven_wordcount_example_networkgeekstuff$ ./step1_compile
===========
Compilation
===========
[INFO] Scanning for projects...

<< OMITTED BY AUTHOR >>

[INFO] BUILD SUCCESS
[INFO] ------------------------------------------------------------------------
[INFO] Total time: 21.041s
[INFO] Finished at: Thu Jun 02 14:19:15 UTC 2016
[INFO] Final Memory: 26M/99M
[INFO] ------------------------------------------------------------------------
@step2_execute
Next step after we have all the Java JARs compiled is to load them to Hadoop using the YARN scheduled, in the script provided it is done with these commands:
#!/bin/bash

echo "============================================================";
echo "Executing wordcount on shakespear in /networkgeekstuff_input";
echo "and results will be in HDFS /networkgeekstuff_output";
echo "============================================================";
hadoop fs -rm -R -f /networkgeekstuff_output
hadoop jar ./target/hadoop_wordcount_project-0.0.1-jar-with-dependencies.jar \
com.examples.WordCount /networkgeekstuff_input /networkgeekstuff_output
NOTE: As first part I am always removing the output folder, the point is that the Java JAR is not checking if the output files already exist and if there is a collision the execution would fail, therefore ALWAYS delete all output files before attempting to re-run your programs with HDFS.
The “hadoop jar” command takes the following arguments:
- ./target/hadoop_wordcount_project-0.0.1-jar-with-dependencies.jar -> JAR file to run
- com.examples.WordCount – Java Class that is to be executed by YARN scheduler on slaves
- /networkgeekstuff_input – This is first argument that is passed to the Java class, the Java code is processing this as folder as INPUT
- /networkgeekstuff_output – This is second argument that is passed to the Java class, the Java code is processing any second argument as forlder for OUTPUT to store results
This is how a successful run of the Hadoop program should look like, notice that here since this is a very small program it very quickly jumped to “map 100% reduce 100%”, in larger programs you would see many many lines showing status of progress on both map and recude parts:
ubuntu@master:~/maven_wordcount_example_networkgeekstuff$ ./step2_execute
============================================================
Executing wordcount on shakespear in /networkgeekstuff_input
and results will be in HDFS /networkgeekstuff_output
============================================================
16/06/02 14:36:26 INFO fs.TrashPolicyDefault: Namenode trash configuration: Deletion interval = 0 minutes, Emptier interval = 0 minutes.
Deleted /networkgeekstuff_output
16/06/02 14:36:32 INFO client.RMProxy: Connecting to ResourceManager at hadoopmaster/172.31.27.101:8032
16/06/02 14:36:33 WARN mapreduce.JobResourceUploader: Hadoop command-line option parsing not performed. Implement the Tool interface and execute your application with ToolRunner to remedy this.
16/06/02 14:36:34 INFO input.FileInputFormat: Total input paths to process : 1
16/06/02 14:36:34 INFO mapreduce.JobSubmitter: number of splits:1
16/06/02 14:36:34 INFO mapreduce.JobSubmitter: Submitting tokens for job: job_1464859507107_0002
16/06/02 14:36:34 INFO impl.YarnClientImpl: Submitted application application_1464859507107_0002
16/06/02 14:36:34 INFO mapreduce.Job: The url to track the job: http://hadoopmaster:8088/proxy/application_1464859507107_0002/
16/06/02 14:36:34 INFO mapreduce.Job: Running job: job_1464859507107_0002
16/06/02 14:36:43 INFO mapreduce.Job: Job job_1464859507107_0002 running in uber mode : false
16/06/02 14:36:43 INFO mapreduce.Job:  map 0% reduce 0%
16/06/02 14:36:52 INFO mapreduce.Job:  map 100% reduce 0%
16/06/02 14:37:02 INFO mapreduce.Job:  map 100% reduce 100%
16/06/02 14:37:03 INFO mapreduce.Job: Job job_1464859507107_0002 completed successfully
16/06/02 14:37:03 INFO mapreduce.Job: Counters: 49
        File System Counters
                FILE: Number of bytes read=10349090
                FILE: Number of bytes written=20928299
                FILE: Number of read operations=0
                FILE: Number of large read operations=0
                FILE: Number of write operations=0
                HDFS: Number of bytes read=5458326
                HDFS: Number of bytes written=717768
                HDFS: Number of read operations=6
                HDFS: Number of large read operations=0
                HDFS: Number of write operations=2
        Job Counters
                Launched map tasks=1
                Launched reduce tasks=1
                Data-local map tasks=1
                Total time spent by all maps in occupied slots (ms)=6794
                Total time spent by all reduces in occupied slots (ms)=6654
                Total time spent by all map tasks (ms)=6794
                Total time spent by all reduce tasks (ms)=6654
                Total vcore-seconds taken by all map tasks=6794
                Total vcore-seconds taken by all reduce tasks=6654
                Total megabyte-seconds taken by all map tasks=6957056
                Total megabyte-seconds taken by all reduce tasks=6813696
        Map-Reduce Framework
                Map input records=124456
                Map output records=901325
                Map output bytes=8546434
                Map output materialized bytes=10349090
                Input split bytes=127
                Combine input records=0
                Combine output records=0
                Reduce input groups=67505
                Reduce shuffle bytes=10349090
                Reduce input records=901325
                Reduce output records=67505
                Spilled Records=1802650
                Shuffled Maps =1
                Failed Shuffles=0
                Merged Map outputs=1
                GC time elapsed (ms)=220
                CPU time spent (ms)=5600
                Physical memory (bytes) snapshot=327389184
                Virtual memory (bytes) snapshot=1329098752
                Total committed heap usage (bytes)=146931712
        Shuffle Errors
                BAD_ID=0
                CONNECTION=0
                IO_ERROR=0
                WRONG_LENGTH=0
                WRONG_MAP=0
                WRONG_REDUCE=0
        File Input Format Counters
                Bytes Read=5458199
        File Output Format Counters
                Bytes Written=717768
NOTE: you can see that you can get a WEB url in this output (in the example above it was : http://hadoopmaster:8088/proxy/application_1464859507107_0002/) to track the application progress (very useful in large computations that take many hours)
@step3_read_output
The last simple step is simple to read the results of the Hadoop code by reading all the TXT files in the OUTPUT folder.
#!/bin/bash
echo "This is result of our wordcount example";
hadoop fs -cat /networkgeekstuff_output/*
The output will be really long, because this very simple program is not removing special characters and as such the results are not very clean, I challenge you that for a homework you can work on the Java code to clear special characters from the counting and then second interesting problem to solve is sorting, which is very different in the Hadoop MapReduce logic.
Step 7) MapReduce Java code from the HelloWorld example we just run?
Now that we run this code successfully, lets have a look on it, if you open the single .java file in the src directory, it will look like this:
package com.examples;

import java.io.IOException;
import java.util.*;

import org.apache.hadoop.conf.Configuration;
import org.apache.hadoop.fs.Path;
import org.apache.hadoop.io.IntWritable;
import org.apache.hadoop.io.Text;
import org.apache.hadoop.mapreduce.Job;
import org.apache.hadoop.mapreduce.Mapper;
import org.apache.hadoop.mapreduce.Reducer;
import org.apache.hadoop.mapreduce.lib.input.FileInputFormat;
import org.apache.hadoop.mapreduce.lib.output.FileOutputFormat;


public class WordCount {
    public static class WordCountMap extends Mapper<Object, Text, Text, IntWritable> {
        @Override
                public void map(Object key, Text value, Context context) throws IOException, InterruptedException {
                        String line = value.toString();
                        StringTokenizer tokenizer = new StringTokenizer(line);
                        while (tokenizer.hasMoreTokens()) {
                                String nextToken = tokenizer.nextToken();
                                context.write(new Text(nextToken), new IntWritable(1));
                        }
                }
        }

    public static class WordCountReduce extends Reducer<Text, IntWritable, Text, IntWritable> {
                @Override
        public void reduce(Text key, Iterable<IntWritable> values, Context context) throws IOException, InterruptedException {
                        int sum = 0;
                        for (IntWritable val : values) {
                                sum += val.get();
                        }
                        context.write(key, new IntWritable(sum));
                }
        }

        public static void main(String[] args) throws Exception {

        Job job = Job.getInstance(new Configuration(), "wordcount");
        job.setOutputKeyClass(Text.class);
        job.setOutputValueClass(IntWritable.class);

        job.setMapperClass(WordCountMap.class);
        job.setReducerClass(WordCountReduce.class);

        FileInputFormat.setInputPaths(job, new Path(args[0]));
        FileOutputFormat.setOutputPath(job, new Path(args[1]));

        job.setJarByClass(WordCount.class);
                System.exit(job.waitForCompletion(true) ? 0 : 1);
        }
Now I will only tell you here that the Hadoop is using a programming methodology called MapReduce, where you first have to divide inputs based on defined key (here simply any word is a key) in the Mapping phase and then group them together while counting the number of instances of a given key during Reduce phase.
I do not want to go into explaining this in detail if you are new, and would very much like to recommend a free online course that you can take based on which I have learned how to program in Hadoop. With high recommendation visit here: https://www.coursera.org/specializations/cloud-computing
(optional) Step 8) RAM management for YARN cluster
One thing that you might have noticed here is the fact by default, the YARN is not setting much limits on the so called “containers” in which applications can run, this means that application can request 15G of RAM and YARN will accept this, but if he doesn’t find this resources available, it will block the execution and your application will be accepted by the YARN, but never scheduled. One way how to help these situations is to configure YARN to have much more real RAM expectations on small VM nodes like we used here (you remember we have here slaves with 2G RAM each).
Before showing you my solution to push RAM utilization down to 1G of RAM per slave, the underlining logic how to calculate these numbers for your cluster can be found in these two best resources:
http://hortonworks.com/blog/how-to-plan-and-configure-yarn-in-hdp-2-0/
Please consider mandatory reading because you WILL have RAM related problems very soon yourself, if not with low RAM, then also alternatively if you are using slaves with more than 8G of ram, by default Hadoop will not use it so you have to do these configurations to also avoid under-utilization on large clusters.
In my own cluster, at the end I pushed the RAM use to use 512M RAM per application container, while maximim of 4096MB (because 2G RAM + 2G SWAP might be able to handle this on my slaves). Additionally you have to also consider the Java JVM machine overhead on each process, so you run all Java code with optional arguments to lower java to 450m of RAM (recommended 80% of total ram so this is my best guess from 512MB)
Here is the configuration that needs to be added to yarn-site.xml between the <configuration> tags:
<property>
    <name>yarn.scheduler.minimum-allocation-mb</name>
    <value>512</value>
</property>
<property>
    <name>yarn.scheduler.maximum-allocation-mb</name>
    <value>4096</value>
</property>
<property>
    <name>yarn.nodemanager.resource.memory-mb</name>
    <value>4096</value>
</property>
And here configuration for mapred-site.xml also to be added between the <configuration> tages:
<property>
    <name>yarn.app.mapreduce.am.resource.mb</name>
    <value>512</value>
</property>
<property>
    <name>yarn.app.mapreduce.am.command-opts</name>
    <value>-Xmx450m</value>
</property>
<property>
    <name>mapreduce.map.memory.mb</name>
    <value>512</value>
</property>
<property>
    <name>mapreduce.reduce.memory.mb</name>
    <value>512</value>
</property>
<property>
    <name>mapreduce.map.java.opts</name>
    <value>-Xmx450m</value>
</property>
<property>
    <name>mapreduce.reduce.java.opts</name>
    <value>-Xmx450m</value>
</property>
Summary and where to go next …
So on this point you should have your own small home Hadoop cluster and you have successfully compiled your first HelloWorld “Word Couting” application written to use the MapReduce approach to count all the words in all works of W. Shakespeare and store results in a HDFS cluster.
Your next steps from here should be to explor my example Java code of this Word Couting example (because there is bazzilion explanations on WordCouting in Hadoop on the net, I didn’t put one here) and if you want to truly understand the principles and also go further to writing more usefull applications, I cannot recommend anouth the free coursera.org Cloud Computing specialization courses (which are free) and I spent on them last year lot of time learning not only Hadoop, but also Cassandra DB, Spark, Kafka and other trendy names and how to write usefull code for them.
My next step here is that I will try to write simipar quick LAB example with expanding this LAB also with Spark (as it also uses YARN in the background) which is a representative system for stream processing. Stream processin is very interesting alternative to MapReduce approach that has its own set of problems where it can be more usefull than basic MapReduce.
Final NOTE: Hadoop and the whole ecosystem is very much a live project that is constantly changing, for example before using Hadoop 2.7.1 I have literally spent hours and hours troubleshooting other versions until I find out that they are not compatible with some libraries on ubuntu 14.04, or for example spent another hours when integrating Cassandra DB and Java API for cassandra (called Datalex) until I realized that these simply cannot be compinded inside one server as each demands different Java and some libraries, as such my warning when going into OpenSource BigData is that you will definitelly get tired/angry/mad until you have a working cluster if you run into a wrong combination of versions. Just be ready for it and accept it as a fact.








Dear brother,
How can run Mapreduce program concurrently? For one map task, how many cpu cores are needed? My currently problem is Mapreduce based Neural Network training time is so long!
Peter, thank you for this excellent Hadoop homelab guide.
Hi very good information about Hadoop installation. Thanks for your article. I have one doubt.
I have a system with 16 GB RAM. Can I install 4 VMs in my sytem ?
Then can I run my hadoop program on all 4 VMS and one master ?
Kindly give me reply.
Thanks
RAM