Redundant Cisco ACE Load-Balancer Design Configuration Example
In previous article about Load-Balancers, we saw the three basic scenarios you can encounter. In this tutorial, let me show you a real life example of Cisco Application Control Engine (ACE) implementation, that is powerful enough to provide leveraged (multiple customers virtualized) load-balancing services with redundancy possibilities scalable to be used in sister data center pairs.
Cisco ACE is a powerful Load-Balancer module for Cisco Catalyst 6500 switches or Cisco 7600 routers. If you have already seen or had the privilege to work with a Cisco ACE, you know that it is a powerful little beast that costs a lot of money.
Most of us know the basic concepts of Load-Balancers by now from my previous article here. In summary you have the one-arm, two-arm and direct server response architectures. In this example, I will show you how to configure an One-Arm scenario on Cisco ACE with support of customer virtualization and also redundancy between two separate Cisco catalyst 6500 (ACE module in each) by using injection of virtual load-balanced IPs to IGP protocol with different metrics.
Contents
Target Example One-Arm Topology
The configuration example I would like to present to you here is aiming at larger data centers. I personally know about one sister data center pair that definitively uses this solution. The nicest thing about this solution is that the components can be physically very distant without the need of creating L2 broadcast domain between for example two distant data centers. All the load-balanced IPs and physical servers can be several L3 hops away thanks to the fact that the “Primary Load-Balancer” is the one that redistributes the load-balanced IP as /32 network to the any routing protocol you like (IGP or BGP). To be exact, both primary and backup Load-Balancer announce /32 network, only that the backup announces a worse metric to this /32 network. Additionally, both Load-Balancers have “probes” configured that are periodically verifying connectivity to all the physical server and if all the servers will stop responding to probes, /32 route is withdrawn. This critical feature to have because if only the connectivity between primary Load-Balancer and the servers would fail, the primary Load-Balancer has to stop sending the /32 route to the load-balanced IP so that the backup Load-Balancer route can win the election process in the routing protocol.
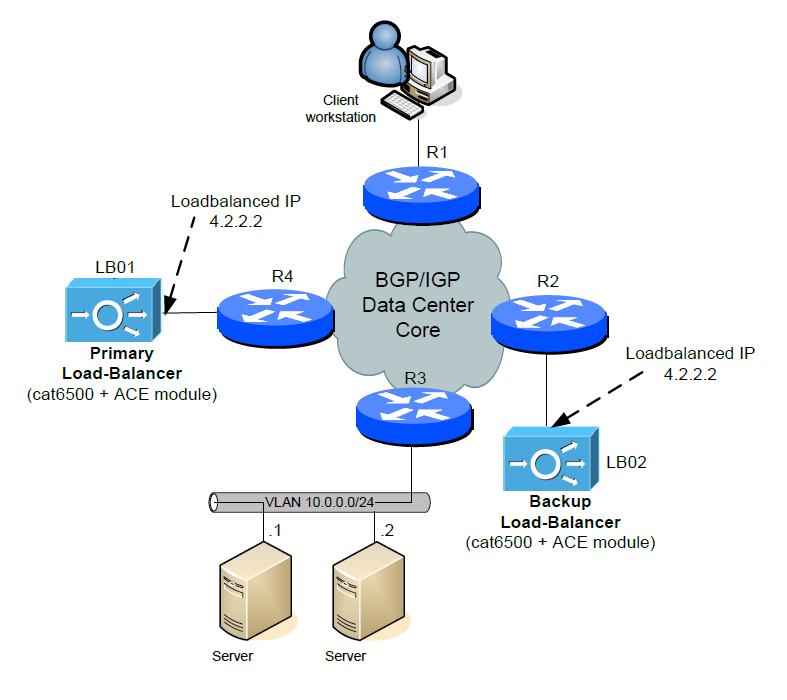
If you had a look at the topology I am showing you above, you can notice that we have a full data center core shown in the diagram. This is simply to represent the fact that you can use this configuration examples here if you have the two Load-Balancers separated by many L3 hops away. Of course nobody is preventing you to connected them to the same switch in one rack, it does not matter to the configuration of the Load-Balancer much. However, this design is aimed to allow you elegant physical redundancy your Load-Balancers in two physical locations. Many big data centers exist in pairs. This is to provide redundancy if one data center either loose power, or is for some reason destoryed (fire, or other catastrophe), its sister data center takes over. With Load-Balancers design allowing you to have L3 hop distance and cooperation with routing protocols between Load-Balancers, the connection between two data centers do not need L2 broadcast domain spanning all the way through the data center to connect two Load-Balancers.
Overall, this design is very clean, easy to understand and powerful enough to be deployed in data center sister pair without any special modifications to the existing network as long as there is any routing protocol connecting the two sister data centers.
ACE DataSheets
Now that I hopefully motivated you to learn this design, lets start with some ACE module quick overview:
- Load-Balancer module for Cisco Catalyst 6500 or Cisco 7600 router
- Enables high availability of services as a load-balancer for a redundant server-farm
- Enables high availability of load-balancing service with transparent redundant module options in one chassis
- Has full virtualization capabilities (simillar like Cisco ASA which uses contexts)
- Can also act as application layer firewall, if needed
- Enables routes injection into IGP protocols for virtual load-balanced IPs based on probing physical servers!
For some quick DataSheet overview I present a quick summary of two ACE module models named ACE20 and ACE30:
ACE20 DataSheet summary:
- 16Gbps Throughput
- 325.000 L4 CPS (Connections per second)
- N/A L7 CPS metric
- 4M Max Concurrent Connections
- 15.000 SSL offloaded connections
- 3,3Gbps SSL Bulk Throughput
AC30 DataSheet summary:
- 16Gbps Throughput
- 500.000 L4 CPS (Connections per second)
- 200.000 L7 CPS
- 4M Max Concurrent Connections
- 30.000 SSL offloaded connections
- 6Gbps SSL Bulk Throughput
Cisco ACE comes with limitations based on bought license. Without extra cost license, you are for example limited to 5 virtualization contexts and 8Gbps throughput. But licenses are beyond the scope of this article.
Configuration overview
To configure the ACE load-balancers and the catalyst 6500 switches, all these steps must be completed.
- Basic supervisor configuration
- Logging into the ACE module and doing first-time configuration
- ACE customer virtual context creation
- ACE context basic configuration
- ACE context load-balancing configuration
- Load-Balancer redundancy cooperating with routing protocol
Basic supervisor configuration
You must understand this configuration, let me first present you the “logical” connectivity between the catalyst 6500 supervisor backplane and the ACE module.
The ACE module is locally a stand-alone device and you must explicitly create access to the VLANs that you require on the catalyst 6500 supervisor. If you look at the following picture, you can see the two logical VLAN connections that we have to create in our configuration.
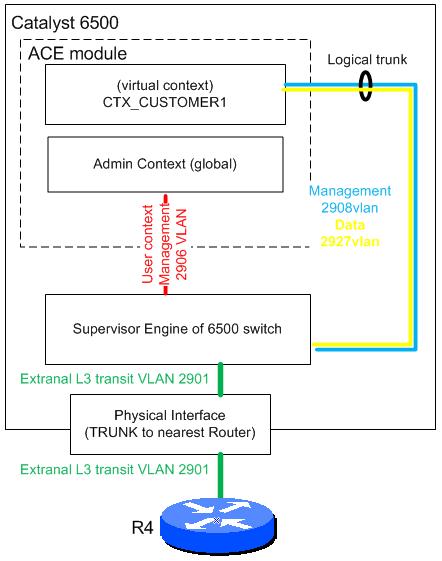
As presented by using the blue and red color, we need to create access for the direct management traffic to the ACE (you can omit this step if you always want to access the ACE console via the 6500 switch console) and as this is a One-Arm configuration, we need at least one additional VLAN that we will use for user traffic to the virtual context we create on the ACE module.
IP configuration overview
VLAN 2901 – Transit external L3 VLAN between the catalyst 6500 and the core R4 router
192.168.25.32/30
R1 – 192.168.25.33
6500 – 192.168.25.34VLAN 2906 – Management VLAN for ACE
192.168.62.160/29
6500 – 192.168.62.162
ACE Admin – 192.168.62.161VLAN 2908 – Management VLAN for our customer ACE virtual context
192.168.62.176/29
6500 – 192.168.62.178
VP_WEB – 192.168.62.177VLAN 2927 – Traffic VLAN for our customer ACE virtual context
192.168.25.40/29
6500 – 192.168.25.42
VP_WEB – 192.168.25.41
In catalyst 6500 supervisor configuration, we will create a vlan-group from two VLANs that already exist on catalyst and assign this group to the ACE module:
svclc vlan-group group_number vlan_range
svclc module slot_number vlan-group group_number_range
svclc multiple-vlan-interfaces
NOTE: To find your ACE module number, you can use “show modules” and you will find your ACE module there with the slot_number. In our topology, this slot_number is 2.
Example:
cat6500# config
cat6500(config)# svclc vlan-group 100 2906, 2908,2927
cat6500(config)# svclc module 2 vlan-group 100
cat6500(config)# svclc multiple-vlan-interfaces
We created vlan-group 100 and assigned all three VLANs to this group. We also specified the command “svclc multiple-vlan-interfaces” that enables our ACE to create SVI interfaces for every VLAN we want to have access to in the ACE.
Logging into the ACE module and doing first-time configuration
Now we need to get into the ACE console to configure it. As you realize, the ACE doesn’t have an IP by default that we can connect to, nor a separate console connector. Therefore we will jump to the ACE CLI via the catalyst 6500 supervisor CLI.
To jump from catalyst 6500 supervisor CLI directly to the ACE CLI, use this command.
session slot number1 processor number2
Example:
cat6500# session slot 2 processor 0
switch login: admin
Password: admin
You are now successfully inside the ACE configuration CLI and I advise you to change your password and create username/password to use for the ACE and/or other AAA security options that you require that are not part of this design example.
I do not want to go into much details at this point, but to have a template to allow telent/ssh/icmp to the management access via VLAN 2906, you can use this configuration with username admin.
access-list ACL_anyone line 10 extended permit ip any any
class-map type management match-any REM_ACCESS
description This allows access for telnet, ssh and icmp
2 match protocol telnet any
3 match protocol ssh any
4 match protocol icmp anypolicy-map type management first-match REM_ACCESS_POLICY
class REM_ACCESS
permitinterface vlan 2906
description Management on VLAN 2906
ip address 192.168.62.163 255.255.255.248
service-policy input REM_ACCESS_POLICY
access-group input ACL_anyone
access-group output ACL_anyone
no shutdownip route 0.0.0.0 0.0.0.0 192.168.62.162
username admin password 5 $1$JwBOOUEt$jihXQiAjF9igwDay1qAvK. role Admin domain
default-domain
ACE customer virtual context creation
At this point you have basic ACE configuration finished and we have VLAN access from the 6500 catalyst backuplane. The last thing to configure in the main ACE configuration is the virtual context creation for our “Customer 1” and his WWW servers.
There are only two parts of configuring ACE context, resource limits and the context itself with vlan assigments.
There is lot of theory behind doing resource limiting to your customers. Below is a fully working example that gives equal access to resources to all the context configured in the future and the one we created today.
resource-class RSRC_CUSTOMER1_LIMITS
limit-resource all minimum 0.00 maximum unlimited
limit-resource buffer syslog minimum 5.00 maximum equal-to-min
limit-resource sticky minimum 10.00 maximum equal-to-min
For purposes of this example, only basic resource limiting configuration is shown. The shown configuration is in general “all” giving no minimum or maximum limits. For buffers and stickiness* there are minimum resources allocated to this context of 5 and 10 percent and maximum limit is giving equal access to resources compared to all other context that might exist on this ACE.
Second part is creating the context that we called CTX_CUSTOMER1, allocated both 2908 and 2927 vlans and assigns our RSRC_CUSTOMER1_LIMITS resource-class.
context CTX_CUSTOMER1
description Context for CUSTOMER 1 WWW servers
allocate-interface vlan 2908
allocate-interface vlan 2927
member RSRC_CUSTOMER1_LIMITS
ACE context basic configuration
Now that we have the context created, we can change to this context with the “changeto” command.
changeto context
Example:
ACE/Admin# changeto CTX_CUSTOMER1
ACE/CTX_CUSTOMER1#
Configuring the CTX_CUSTOMER1 will start first with creating the management access exactly the same way as for the ACE itself and interfaces on the VLAN 2908 and 2927.
access-list ACL_anyone line 10 extended permit ip any any
class-map type management match-any REM_ACCESS
description This allows access for telnet, ssh and icmp
2 match protocol telnet any
3 match protocol ssh any
4 match protocol icmp anypolicy-map type management first-match REM_ACCESS_POLICY
class REM_ACCESS
permitinterface vlan 2908
description vlan for CTX_CUSTOMER1 mgmt
ip address 192.168.62.179 255.255.255.248
access-group input ACL_anyone
access-group output ACL_anyone
service-policy input REM_ACCESS_POLICY
no shutdown
interface vlan 2927
description lan for CTX_CUSTOMER1 traffic
ip address 192.168.25.43 255.255.255.248
access-group input ACL_anyone
access-group output ACL_anyone
no shutdownip route 0.0.0.0 0.0.0.0 192.168.25.42
username customer1admin password 5 $1$JwBOOUEt$jihXQiAjF9igwDay1qAvK. role Admin domain
default-domain
ACE context load-balancing configuration
Finally we can get to the main dish of this article and that is the load-balancing itself. This configuration can be devided to:
- Probes configuration
- Physical server configuration
- Server-farm configuration
- Load-Balancing policies configuration
- One-Arm scenario source NAT
Probes configuration
We are going to have two WWW servers in our load-balancing configuration that we want to constatntly track if they are reachable. Reachability testing is done with probes that we configure to verify http and icmp protocol at the same time.
probe http PROB_HTTP
interval 10 !<—————– probe periodic every 10 seconds
faildetect 2 !<—————- two failures of probe and the server is considered down
passdetect interval 20
passdetect count 2
request method get url /cs/images/ACE.html !<— YOU CAN SPECIFY THE URL!
expect status 200 200 !<-expected return http code range limited to 200 only
probe icmp PROB_ICMP
interval 10
faildetect 2
passdetect interval 20
passdetect count 2
NOTE: passdetect interval and passdetect count is used after your server has already failed and this is the probe interval and number of retries that will be sent to a failed server to see if the server is back online by any chance.
The HTTP probe is build in capability of the ACE that you can directly verify HTTP service by creating HTTP request for the WWW servers and expect success http code 200 as a response. Both probes are testing reachability every 10 seconds and if the probes fail two consecutive tests, the server is considered down.
Physical server configuration
To configure physical servers defined by their IPs, we use this configuration shown. The “inservice” command is used to indicate it the server should be used (a bit like “no shutdown” for interfaces). If you ever need to remove one physical server temporary, you can just go to this configuration and remove the “inservice” command. This is useful then a physical server is going over maintenance period and you do not want to have many failures detected by the probes and small outages for the clients.
rserver host WWW_S1
ip address 10.0.0.1
inservice
rserver host WWW_S2
ip address 10.0.0.2
inservice
Server-farm configuration
Now we need to bind the physical servers to a server-farm. Server-farm reference will be later used by the load-balancing configuration. The rule is that physical server can be included in multiple server-farms! This flexibility can be used if you have different services running on different bunch of server. For example if you have three servers S1,S2 and S3 while S1 and S2 run WWW service and at the same time S2 and S3 run FTP service. Then you can add S1 and S2 into one server-farm and S2 and S3 include into another server-farm.
For our simple WWW example, create simple Active/Active server-farm:
serverfarm host WWW_SERVICE
predictor leastconns
probe PROB_HTTP
rserver WWW_S1
inservice
rserver WWW_S2
inservice
NOTE: if you ever want to change this to Active/Backup server-farm with WWW_S2 being only backup server, you can change the configuration with “backup-server” command and indicate that the WWW_S2 is standby server only with the “inservice standby” as shown:
serverfarm host SFARM_WWW_SERVICE
predictor leastconns
probe PROB_HTTP
rserver WWW_S1
backup-rserver WWW_S2
inservice
rserver WWW_S2
inservice standby
Load-Balancing policies configuration
To give you super-quick configuration example of the Load-Balancing configuration, I will leave most of the configuration options on default and only show you the self-explanatory configuration that binds together the L7 class map CMAP_CUST1_WWW, with default L4 class-map “class-default” into the policy maps for loadbalancing “type loadbalance” and finally to the policy-map SLB_CUST1_LB that we can apply to the interface.
class-map match-any CMAP_CUST1_WWW
10 match virtual-address 4.2.2.2 tcp eq wwwpolicy-map type loadbalance first-match SPOLICY_CUST1_WWW
class class-default
serverfarm SFARM_WWW_SERVICEpolicy-map multi-match SLB_CUST1_LB
class CMAP_CUST1_WWW
loadbalance vip inservice
loadbalance policy SPOLICY_CUST1_WWW
loadbalance vip icmp-replyinterface vlan 2927
service-policy input PM_MULTI_MATCH
After this configuration is done, the load-balancing starts to work, probes will detect physical server operational and the first test www request to the 4.2.2.2 will ….. fail! Yes, there are still things missing 🙂
One-Arm scenario source NAT
As you hopefully remember from previous blogpost, for One-Arm configuration, you need to do source NAT as well. The destination NAT is happening already nativelly from the load-balancer configuration, but the source NAT we need to add two commands.
policy-map multi-match SLB_CUST1_LB
class CMAP_CUST1_WWW
nat dynamic 1 vlan 2927interface vlan 2927
nat-pool 1 4.2.2.2 4.2.2.2 netmask 255.255.255.255 pat
With this configuration, all the request will go to the physical servers from source IP of 4.2.2.2 (you can configure different if you like).
NOTE: If your Primary Load-Balancer, physical servers and clients are on one switch, or you have some form of routing already created to the 4.2.2.2 virtual IP, then after this point, your service to the clients can already be functional.
Load-Balancer redundancy cooperating with routing protocol
Now we have complete example of configuration of the Primary Load-Balancer behind us. Now comes the part where we will communicate the /32 virtual load-balanced IPs networks from both Primary and Backup Load-Balancers into the catalyst 6500 supervisor and then into the routing-protocol.
To advertise virtual IP /32 network from the ACE load-balancer into the catalyst 6500 supervisor, we simply can use the “loadbalance vip advertise” commands in the policy-map of the ACE configuration as shown below:
policy-map multi-match SLB_CUST1_LB
class CMAP_CUST1_WWW
loadbalance vip inservice
loadbalance policy SPOLICY_CUST1_WWW
loadbalance vip icmp-reply
loadbalance vip advertise active
nat dynamic 1 vlan 2927
The “active” is optional keyword that tells the ACE to only propagate this vip (virtual IP) /32 route only if at least one of the physical servers in the server-farm is considered operational (probes successful and server “inservice”).
If we look at the catalyst 6500 routing table, we can see the route to the 4.2.2.2 now.
cat6500# show ip route | i 4.2.2.2
S 4.2.2.2/32 [1/0] via 192.168.24.43, Vlan2927
The route is noted in the routing table as “S” that means static route, however, this static route is special and you cannot find it in the running-config:
cat6500# show running-config | i ip route
cat6500#
Now that we have the route “pseudo-dynamically” in the catalyst 6500 routing table, we can communicate this route into the routing protocol.
You can choose any other routing protocol, but I personally used BGP in this whole topology as this is also the one routing protocol that we use in our real data center 😉
The whole point in using BGP with is that we have quite a nice control over the parameters so we can make sure the Primary Load-Balancer wins the selection.
In our example, we configure custom BGP AS numbers for both Load-Balancers so that the connection from the catalyst 6500s to the core routers will be eBGP session.
Primary Load-Balancer
router bgp 64512
redistribute static
Backup Load-Balancer
router bgp 64513
redistribute static route-map StaticToBGP
!
route-map StaticToBGP permit 10
set as-path prepend 64513
As I hope you understand the basics of BGP at this point. The next diagram shows how the user traffic will be routed to the Primary Load-Balancer.
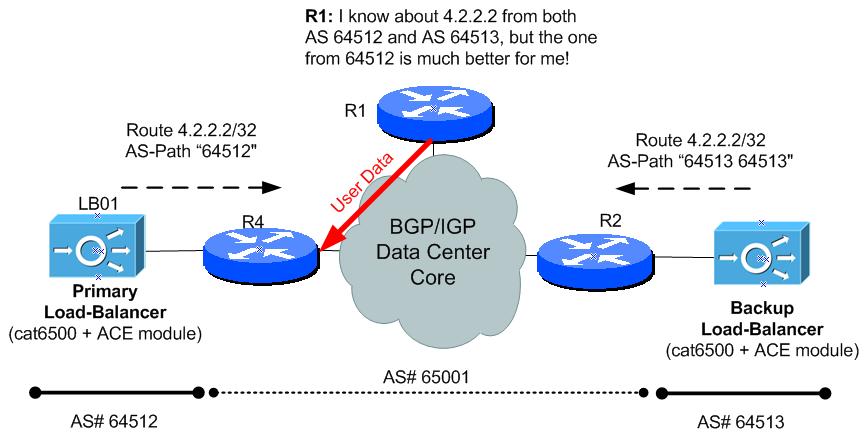
The two 4.2.2.2/32 routes are distributed to the core routers, all the core routers will see this in their BGP table:
R1# show ip bgp
BGP table version is 5, local router ID is 10.0.33.34
Status codes: s suppressed, d damped, h history, * valid, > best, i – internal
Origin codes: i – IGP, e – EGP, ? – incompleteNetwork Next Hop Metric LocPrf Weight Path
* 4.2.2.2/32 <Backup LB> 0 64513 64513 ?
*> <Primary LB> 0 64512 ?
Therefore until Primary Load-Balancer is operational and at least one of the probes to the physical servers is successfull, the whole core will choose the route to the 4.2.2.2/32 load-balanced IP using the Primary Load-Balancer.
NOTE: Alternative solution can be to have both load-balancers in the same BGP AS as the core routers (bacause the 6500 is probably in your core AS anyway). Then you can use only “redistribute static” in both Primary and Backup Load-Balancers and the core routers will choose based on the IGP costs to the next-hop IP to select the nearest Load-Balancer.
Summary
The design presented here is redundant because it uses a full combination of redundancy on both Load-Balancers and the inherited redundancy by using multiple physical servers.
I personally consider this topology easy to use, clean and you also have a lot of space to expand details in both probes, load-balancing configuration and you can also play with the static route redistribution as well.
I hope this article was informative for you. And as always, feel free to comment.
Peter








Great post! This is extremely helpful as I’m trying to configure a redundant ACE 4710 from a Cisco 3945 router. How can I determine my config was successful?
Hello Reg,
In the case presented there, the best check was from the ACE where you can verify
1) your probes are in OK state by examining show probe
2) followed by show serverfarm to see your servers are considered reachable
3) and lastly see if you have sessions in the load-balancer operations by looking at show service policy that you have two sessions (before/after nat) for each incoming user session.
This is sweet. Simply the best real time stuff. This is what people expect from experienced people like you.If someone writes an article or a book, one should be able to implement that into their real time production environment after reading the article/book with no difficulty and only then the author is believed to be a top class.Very few can explain the difficult tops better and i believe you are one of them.No information is missing from this completely implementation cycle.Well written. Thank you somuch for your top contribution.
regards
red
I am not expert in this area, but I can appreciate this article as very comprehensive. Thanks for the effort.
Great Post and useful info.
Do you have a configuration to do the same vip injection in IGP, if you have two sites serving exact contents and each site has its own ace and real servers (different vlan/subnet)?
In our production, the serverfarm was identical for both load-balancers just as shown on the first picture. The design presented in this articled doesn’t really care if both the load-balancers are serving the same or separated servers. So if you want separate server groups behind each load-balancers, I do not see a problem doing it that way.
Regarding the same configuration with IGP protocol, I do not have something like that prepared, but it shouldn’t be complicated to modify/invent it youself. The VIP is “announced” by ACE as a static route to the local routing table of ACE/catalyst, so you can to similar metric manipulation in other non-BGP protocols behind the “redistribute static” command when putting the VIP route to IGP like OSPF/EIGRP. So you should be able to get similar functionality to my presented BGP scenario if you raise the metric on backup load-balancer during redistribution of VIP route to IGP.
Why the Pictures are not visible in any of the documents? I have tried different browsers