[minipost] Mikrotik/RouterBoard port-knocking example for firewall/NAT openings
The situation is very simple, you are away from home (imagine visiting a friend or being at work), but you desperately would like to access your internal LAN FTP/Samba/etc… , but you do not have with you your own notebook or any device with a VPN capability to tunnel to your home securely. So what to do ? You do not really want to open your home firewall and NAT whole internet to the internal PC or server on your LAN. Lucky for you, there exists a trick under a name of “port-knocking” where you can send to your home firewall a sequence of TCP or UDP packets with specific ports (the ports act as a password) and your home system can temporarily open the firewall and NAT to only your source IP from which these packets arrived. In this quick example I will show you how to do this on Mikrotik (where I do this for several years now) and I will point you to generic linux tutorial for the same using iptables in links below.
Main Example
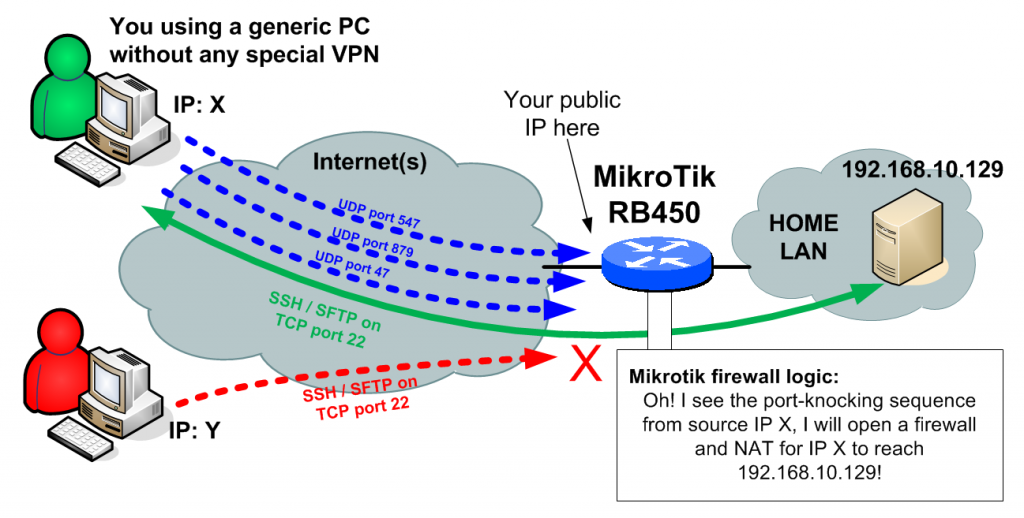
Target: I want to access my home linux server for SSH and more importantly SFTP, which is running on LAN with IP 192.168.10.129. Port-Knocking sequence I want: 547, 879 and 47 in TCP packets will open the access.
Extra restriction: After successful port-knocking, only allow access for new SSH/SFTP sessions for 15min, but do not break established session until it disconnects itself normally.
To put this down to a diagram, this is what I want:
Implementation, is quite simple and I will split it to few steps.
Pre-requisites: I assume you already have you Mikrotik router configured with basic routing and firewall logic and that you already have your public IP on the internet where you can capture the port-knocking sequence. In my example, my public IP will be 89.173.230.17. You can get yours from the /ip address print command as visible below:
[zerxen_lord@Arachnid] /> /ip address print
Flags: X - disabled, I - invalid, D - dynamic
 #   ADDRESS            NETWORK         INTERFACE
 0   192.168.10.130/26  192.168.10.128  GameBridge
 1 D 89.173.230.17/21    89.173.224.0   ether1
Step 1, create the firewall rule and NAT rule
/ip firewall nat add chain=dstnat action=dst-nat to-addresses=192.168.10.129 to-ports=22 protocol=tcp src-address-list=PORTKNOCK_ALLOWED in-interface=ether1 dst-port=2222
/ip firewall filter add chain=input action=accept connection-state=new protocol=tcp src-address-list=PORTKNOCK_ALLOWED in-interface=ether1 dst-port=2222
/ip firewall filter add chain=input action=accept connection-state=established
Explanation is that this NAT rule and firewall rule only works for source IPs (the IP X in our example) that are part of the PORTKNOCK_ALLOWED list. Also note that I moved the NAT to allow TCP 2222 as an alternative to using the native 22 which is reserved for the router itself, so when I will connect to the internal server from internet, I will use the port 2222.
Step 2, create a group of firewall rules that generate a temporary PORTKNOCK_ALLOWED list
/ip firewall filter add chain=input action=add-src-to-address-list connection-state=new protocol=udp \
     src-address-list=PORTKNOCK_STAGE_2 address-list=PORTKNOCK_ALLOWED address-list-timeout=15m \
     in-interface=ether1 dst-port=47

/ip firewall filter add chain=input action=add-src-to-address-list connection-state=new protocol=udp \
     src-address-list=PORTKNOCK_STAGE_1 address-list=PORTKNOCK_STAGE_2 address-list-timeout=20s \
     in-interface=ether1 dst-port=879

/ip firewall filter add chain=input action=add-src-to-address-list connection-state=new protocol=udp \
     address-list=PORTKNOCK_STAGE_1 address-list-timeout=20s in-interface=ether1 dst-port=547 \
Explanation is that you need three rules in a reverse order adding the IP X to a list. When the first UDP 547 arrives, the 3rd rule will put it to PORTKNOCK_STAGE_1. When the next UDP 879 arrives and it is already in PORTKNOCK_STAGE_1, it will be put also to PORTKNOCK_2. WHen the last UDP 47 arrives and the IP X is already in PORTKNOCK_2, it is added to PORTKNOCK_ALLOWED for 15minutes (you can notice the previous stages only have 20seconds timeout).
Step 3, port-knock wither with portknock client, or telnet command
So we are finished, not only you need to test it. Technically the only thing you need to do now is to open windows command console (Start->type “cmd” and enter). In this console use the command “telnet” to one by one send the packets as needed by portknocking like this:
telnet 89.173.230.17 547
telnet 89.173.230.17 879
telnet 89.173.230.17 47
NOTE: if you are using windows 7, you have to manually activate telnet in the windows components, just google this part, there are just too many guides for this out there.
Then we can have a look to see if the source IP is inside all the source-lists with /
[zerxen_lord@Arachnid] > /ip firewall address-list print
Flags: X - disabled, D - dynamic
 #   LIST                                                                      ADDRESS
 0 D PORTKNOCK_STAGE_1                                                   176.56.236.140
 1 D PORTKNOCK_STAGE_2                                                   176.56.236.140
 2 D PORTKNOCK_ALLOWED                                                   176.56.236.140
Now there are alternatives to the telnet command of course, but knowing telnet is a good backup. I personally use on linux the basic NetCat command nc, which you can put down to a quick script to do your port-knocking for you like here:
nc -u -z 89.173.230.17 547 -w 1
nc -u -z 89.173.230.17 879 -w 1
nc -u -z 89.173.230.17 47 -w 1
There also exist port-knockers for windows with identical functions, but I will leave to you to find one that suits your needs. I also use a port-knocker on my iPhone called KnockOnD, so you can imagine how relatively easy and wide-spread the port-knocking is.
PS: The public IPs used in this example are random IPs, I didn’t published here my real IPs 😉 Just FYI.

