


Tutorial: Email server for a small company – including IMAP for mobiles, SPF and DKIM
![]() A few months back my wife started a small business. Of course I was the one to build the “IT stuff” here that included a website, some reservation system on it for customers (php programming here), local network in the office and customer area and other things. Most of that was all pretty common tasks for me with the exception of one, building an email system for a company emails. So I built it and since it was new and interesting experience for me, I will share here a quick tutorial (or better call this a cookbook?) to replicate the very minimum system.
A few months back my wife started a small business. Of course I was the one to build the “IT stuff” here that included a website, some reservation system on it for customers (php programming here), local network in the office and customer area and other things. Most of that was all pretty common tasks for me with the exception of one, building an email system for a company emails. So I built it and since it was new and interesting experience for me, I will share here a quick tutorial (or better call this a cookbook?) to replicate the very minimum system.
Now also let me state here that I really missed somehow in my life running a real email system so far. And it was a little challenge to setup it properly for the first time. I always thought in the past that installing SMTP daemon in linux and activating it for all local users was all that I will ever need (because up to this point my needs were only to receive monitoring and alarm emails to my gmail, nothing else). Now that my needs has moved to a much more “representative” role the approach had to be changed a lot.
Contents of Article
Prerequisites
1) A Linux server, preferably debian to follow this tutorial step by step, on other distributions the software packages and file paths can be different
2) Public IP address preferably directly on the server (+ if you are not directly owning the IP in RIPE database, the provider of this IP address to you should be able and willing to set reverse DNS entry on this IP address later in this tutorial, so if you are just looking for provider check this with him before ordering a service from him).
3) A publicly registered domain name either with some DNS hosting company (like I used here for convenience) or you can do yourself a small DNS server (but this is outside of this tutorial). If you will have a DNS provider, just make sure he allows you to enter TXT records for your domain record.
My example users and domain used in this tutorial
In this tutorial, I will be using one of my public domains “pingonyou.com” that I am personally owning, but which I am not really using at this moment for anything usefull. Please change all pingonyou.com text in this tutorial to your own domain when following this tutorial. At the point of writing this tutorial this pingonyou.com was pointing to public IP of 31.186.250.195, which is one small VM server I was renting at the time, this is also no longer in my possession.
Also the demouser account I will be using is a fake, so do not bother sending email to demouser@pingonyou.com.
The target what we will have at the end of this tutorial
- We would like to have an email system with email in the form of @pingonyou.com
- We would like to have IMAP secured with SSL for access to your emails (test is to access emails from your smartphone)
- We would like all standard protection mechanisms on our emails so that other email systems do not classify our emails as SPAM, this includes SPF, DKIM, rDNS and SpamAssassin header.
The implementation Step-by-Step
Step 1: Configure local hostname and domain on linux server
In this step, we have to first realize how we will call our systems. As I mentioned earlier, I will use “pingonyou.com” as example of domain and our server you are free to designate as you wish with a hostname, as example here I will use “pingonyouserver“. The last point is that if I will need to use a public IP address for your mail server or DNS, I will use 8.8.8.8 example (this is a gmail DNS system FYI).
# echo pingonyouserver> /etc/hostname
# hostname -F /etc/hostname
# echo “8.8.8.8   pingonyouserver.pingonyou.com pingonyouserver” >> /etc/hosts
Verification is easy, just use these commands and you should get the answers visible.
# hostname --short
pingonyouserver

# hostname --domain
pingonyou.com

# hostname --fqdn
pingonyouserver.pingonyou.com

# hostname --ip-address
8.8.8.8
Step 2: Install email system exim4 and supporting packages
To get all the software in debian for our little tutorial, we need three main pieces of software:
- Exim4 – the SMTP daemon
- Courier – communication extension for Exim4 to have IMAP and POP access to emails
- Swaks – Swiss army knife for SMTP troubleshooting
- SSL-cert packages – for easy work with generating certificates in later parts of the tutorial
If you are using debian like I am, then you can simply follow these commands :
# apt-get update
# apt-get install exim4-daemon-heavy courier-authdaemon courier-imap \
courier-imap-ssl courier-pop courier-pop-ssl swaks libnet-ssleay-perl \
ssl-cert
===============================================
Note/Warning: The courier will by default use a self-signed certificates, these are OK if you are going to be the only user of the mail system, but if you plan to invite many people like for a public system (and you do not plan to distribute your own certification authority to them), then you need a signed-certificate. But for our use-case we will not go into replacing these for our small IMAP usage which is OK for a small company, but definitely not OK for a public or larger one! This is also the warning installation will give you about this fact:
 ===============================================
Verification of the installation can be afterwards done by checking the running ports with a netstat command if all the pop3, imap, smtp, pop3s and imaps ports are present like visible like in the example below:
# netstat –utal
-- omitted --
tcp6       0      0 [::]:pop3               [::]:*                  LISTEN
tcp6       0      0 [::]:imap2              [::]:*                  LISTEN
tcp6       0      0 [::]:ssh                [::]:*                  LISTEN
tcp6       0      0 localhost:smtp          [::]:*                  LISTEN
tcp6       0      0 [::]:imaps              [::]:*                  LISTEN
tcp6       0      0 [::]:pop3s              [::]:*                  LISTEN
Step 3: Preparing local users for mail system (Maildir)
In this example, I will prefer each user having his email inside his home directory under ~/Maildir. For the new users, add this directory to the skeleton so that it is automatically created for new users like this:
# maildirmake /etc/skel/Maildir
For existing users, you have to do this manually (or do a script for this). For example for my test user “testuser” like this:
# maildirmake ~demouser/Maildir
# chown –R demouser.demouser ~demouser/Maildir
Step 4: Create new user to test the mail system
# adduser demouser
Give this user a password when prompted. Always choose a good password here because this UNIX passwords will also be user by the IMAP/POP3 access to your emails!
Step 5: Configure exim4
Now, first step here is to use the debian built-in configuration package to configure the “main” exim4 points with:
dpkg-reconfigure exim4-config
It will give you several options in a wizard, this is how I configured my answers for a small and independent server:
- General type of mail configuration: internet site; mail is sent and received directly using SMTP
- System mail name: pingonyou.com
- IP-addresses to listen on for incoming SMTP connections: leave this field empty!!!
- Other destinations for which mail is accepted: leave this field empty!!!
- Domains to relay mail for: leave this field empty!!!
- Machines to relay mail for: leave this field empty!!!
- Keep number of DNS-queries minimal (Dial-on-Demand)?:NO
- Delivery method for local mail: Maildir format in home directory
- Split configuration into small files?: NO
- Root and postmaster mail recipient: demouser (or your real administrator name, but non-root account)
Step 6: X.509 certificate for exim4 TLS support
First run this small command to generate a certificate based on example from exim.
# /usr/share/doc/exim4-base/examples/exim-gencert
[*] Creating a self signed SSL certificate for Exim!
    This may be sufficient to establish encrypted connections but for
    secure identification you need to buy a real certificate!

    Please enter the hostname of your MTA at the Common Name (CN) prompt!

Generating a 1024 bit RSA private key
...........................................++++++
....................................................................++++++
writing new private key to '/etc/exim4/exim.key'
-----
You are about to be asked to enter information that will be incorporated
into your certificate request.
What you are about to enter is what is called a Distinguished Name or a DN.
There are quite a few fields but you can leave some blank
For some fields there will be a default value,
If you enter '.', the field will be left blank.
-----
Country Code (2 letters) [US]:SK
State or Province Name (full name) []:Slovakia
Locality Name (eg, city) []:Bratislava
Organization Name (eg, company; recommended) []:pingonyou.com
Organizational Unit Name (eg, section) []:pingonyou.com
Server name (eg. ssl.domain.tld; required!!!) []:pingonyouserver.pingonyou.com
Email Address []:demouser
[*] Done generating self signed certificates for exim!
    Refer to the documentation and example configuration files
    over at /usr/share/doc/exim4-base/ for an idea on how to enable TLS
    support in your mail transfer agent.
Next, based on the documentation you find in /usr/share/doc/exim4-base/ , you should create a file /etc/exim4/exim4.conf.localmacros to and insert these lines to enable TLS support on port 465.
echo "MAIN_TLS_ENABLE = true" > /etc/exim4/exim4.conf.localmacros
echo "tls_on_connect_ports = 465" >> /etc/exim4/exim4.conf.localmacros
Inside /etc/default/exim4 change this line:
SMTPLISTENEROPTIONS=''
To this:
SMTPLISTENEROPTIONS='-oX 465:25:587 -oP /var/run/exim4/exim.pid'
Ok, now restart exim4 again with the service command
# service exim4 restart
And check if the exim4 is listening on port 465:
# netstat -atupln | grep 465
tcp        0      0 0.0.0.0:465    0.0.0.0:*    LISTEN      16020/exim4
tcp6       0      0 :::465         :::*         LISTEN      16020/exim4
Step 7: Verification of emails delivery
Ok, so the basic email system should now be running, lets test it with the most basic test and that is sending an email locally (either between two users of the local system or to yourself).
For my test, I will send email to testuser from testuser.
echo “test message content” | mail –s “test subject” demouser@pingonyou.com
You can either check the inbox of demouser, or more simply check logs inside /var/log/exim4/mainlog
cat /var/log/exim4/mainlog
2014-12-23 16:56:42 1Y3XRa-0004B4-Sj <= root@pingonyou.com U=root P=local S=391
2014-12-23 16:56:42 1Y3XRa-0004B4-Sj => demouser <demouser@pingonyou.com> R=local_user T=maildir_home
2014-12-23 16:56:42 1Y3XRa-0004B4-Sj Completed
Ok, all looks good, now lets try sending to external source like gmail (replace the xxxx with your real email).
echo “test message content” | mail –s “test subject” xxxxx@gmail.com
Now the good and the bad part, the email arrived, but it ended most probably in spam folder because technically this is a “rogue” system with unknown domain and no basic signatures in the email headers.
Step 8-9: First problem with PAM not enabled in courier
As immediate step after my emails got working was that Thunderbird was unable to connect to the courier with IMAPS (with TLS enabled) despite the basic certificates existed from the installation (during apt-get install a default set was generated).
To verify what is going one, this is the best test to see the problem, we will use SWAKS to troubleshoot like this:
# swaks -a -tls -q AUTH -s localhost -au demouser
Password: playingwithexim4
=== Trying localhost:25...
=== Connected to localhost.
<-  220 pingonyouserver.pingonyou.com ESMTP Exim 4.80 Tue, 23 Dec 2014 20:10:29 -0500
 -> EHLO pingonyouserver.pingonyou.com
<-  250-pingonyouserver.pingonyou.com Hello localhost [127.0.0.1]
<-  250-SIZE 52428800
<-  250-8BITMIME
<-  250-PIPELINING
<-  250-STARTTLS
<-  250 HELP
 -> STARTTLS
<-  220 TLS go ahead
=== TLS started w/ cipher DHE-RSA-AES256-SHA256
=== TLS peer subject DN="/C=SK/ST=Slovakia/L=Bratislava/O=pingonyou.com/OU=pingonyou.com/CN=pingonyouserver.pingonyou.com/emailAddress=demouser"
 ~> EHLO pingonyouserver.pingonyou.com
<~  250-pingonyouserver.pingonyou.com Hello localhost [127.0.0.1]
<~ 250-SIZE 52428800
<~ 250-8BITMIME
<~ 250-PIPELINING
<~ 250-CHUNKING
<~ 250-PRDR
<~ 250 HELP
*** Host did not advertise authentication
~> QUIT
<~ 221 networkgeekstuff.com closing connection
=== Connection closed with remote host.
As you noticed, the TLS layer is there successfully, the problem is more with the authentication not working.
- Add these lines to /etc/exim4/exim4.conf.template
MAIN_TLS_ENABLE = yes
tls_on_connect_ports=465
rfc1413_query_timeout = 0s
- Install SASLAUTH daemon that will do the authentication for us against local unix usernames.
NOTE: If you want some other method of authentication, check the exim4 wiki.# apt-get install sasl2-bin
- Edit /etc/default/saslauthd to enable saslauth with this line change:
START=yes
- Restart the SASLAUTH daemon:
# /etc/init.d/saslauthd start
- Add exim to sasl group
# adduser Debian-exim sasl
Adding user `Debian-exim' to group `sasl' ...
Adding user Debian-exim to group sasl
Done.
- Inside /etc/exim4/exim4.conf.template uncomment these lines to enable PAM authentication (in the below all lines below and including the “plain_saslauthd_server”):
# Authenticate against local passwords using sasl2-bin # Requires exim_uid to be a member of sasl group, see README.Debian.gz # plain_saslauthd_server: # driver = plaintext # public_name = PLAIN # server_condition = ${if saslauthd{{$auth2}{$auth3}}{1}{0}} # server_set_id = $auth2 # server_prompts = : # .ifndef AUTH_SERVER_ALLOW_NOTLS_PASSWORDS # server_advertise_condition = ${if eq{$tls_cipher}{}{}{*}} # .endif - Do a restart of both exim4 and saslauth
# update-exim4.conf
# service exim4 restart
# service saslauthd restart
VERIFICATION is again with swaks the same command, but now you should get this (note “235 Authentication succeeded” below):
swaks -a -tls -q AUTH -s localhost -au demouser
Password: kreten
=== Trying localhost:25...
=== Connected to localhost.
<-  220 pingonyouserver.pingonyou.com ESMTP Exim 4.80 Tue, 23 Dec 2014 20:58:57 -0500
 -> EHLO pingonyouserver.pingonyou.com
<-  250-pingonyouserver.pingonyou.com Hello localhost [127.0.0.1]
<-  250-SIZE 52428800
<-  250-8BITMIME
<-  250-PIPELINING
<-  250-STARTTLS
<-  250 HELP
 -> STARTTLS
<-  220 TLS go ahead
=== TLS started w/ cipher DHE-RSA-AES256-SHA256
=== TLS peer subject DN="/C=SK/ST=Slovakia/L=Bratislava/O=pingonyou.com/OU=pingonyou.com/CN=pingonyouserver.pingonyou.com/emailAddress=demouser"
 ~> EHLO pingonyouserver.pingonyou.com
<~  250-pingonyouserver.pingonyou.com Hello localhost [127.0.0.1]
<~  250-SIZE 52428800
<~  250-8BITMIME
<~  250-PIPELINING
<~  250-AUTH PLAIN
<~  250 HELP
 ~> AUTH PLAIN AGRlbW91c2VyAGtyZXRlbg==
<~  235 Authentication succeeded
 ~> QUIT
<~  221 pingonyouserver.pingonyou.com closing connection
=== Connection closed with remote host.
Step 10: Configure courier for IMAP
You want this because it is most useful for your smartphone access that is definitely supporting mainly IMAP. Just follow these basic commands:
# rm -rf /etc/courier/*.pem
# make-ssl-cert /usr/share/ssl-cert/ssleay.cnf /etc/courier/imapd.pem
# make-ssl-cert /usr/share/ssl-cert/ssleay.cnf /etc/courier/pop3d.pem

# service courier-imap restart
# service courier-imap-ssl restart
# service courier-authdaemon restart
# service courier-pop restart
# service courier-pop-ssl restart
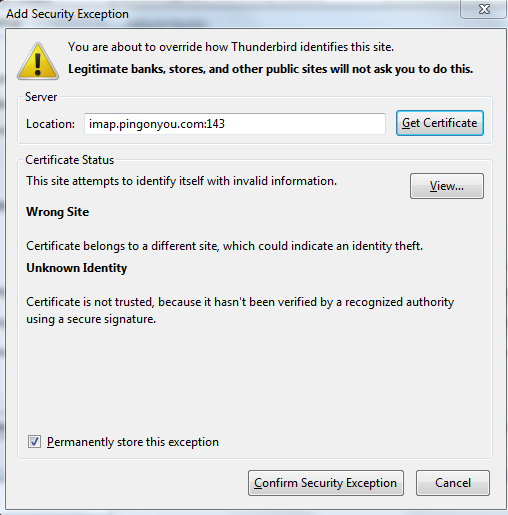
Step 11: Test access with email client (e.g. Thunderbird)
I am personally using Thunderbird for a long time now, but if you have a different preferred client, please feel free to try using it (including smartphone mail clients that support IMAP protocol). These are my Thunderbird settings that worked for this example configuration.
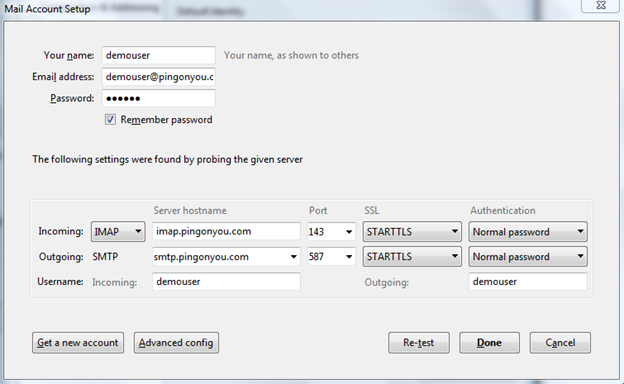
NOTE: Since we are using self-signed certificates here, you are definitely going to get warnings from Thunderbird (or other clients) that the certificates are not officially trusted. If you are doing this for a real company, please go and purchase a real certificates from certification authorities (e.g. verisign…)
If your connection with any client was successful, please try writing a quick email to yourself, for example this is how it looked in my system in Thunderbird.
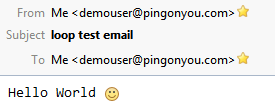
Or here is the raw message code:
Return-path: <demouser@pingonyou.com>
Envelope-to: demouser@pingonyou.com
Delivery-date: Tue, 23 Dec 2014 21:57:21 -0500
Received: from [217.73.23.84] (helo=[192.168.2.115])
	by pingonyouserver.pingonyou.com with esmtpsa (TLS1.2:DHE_RSA_AES_128_CBC_SHA1:128)
	(Exim 4.80)
	(envelope-from <demouser@pingonyou.com>)
	id 1Y3c8X-00055r-CJ
	for demouser@pingonyou.com; Tue, 23 Dec 2014 21:57:21 -0500
Message-ID: <549A1DA1.1030708@pingonyou.com>
Date: Wed, 24 Dec 2014 02:57:53 +0100
From: "Havrila, Peter" <demouser@pingonyou.com>
User-Agent: Mozilla/5.0 (Windows NT 6.1; WOW64; rv:31.0) Gecko/20100101 Thunderbird/31.3.0
MIME-Version: 1.0
To: demouser@pingonyou.com
Subject: loop test email
Content-Type: text/plain; charset=utf-8; format=flowed
Content-Transfer-Encoding: 7bit

Hello World :)
Step 12: Testing towards gmail or other external system
Now simply use Thunderbird, or other client and send an email to external systems, but the point he is that there is a random chance (for example I expect ~50% chance with gmail) that your email will end in spam folder on the destination.
HINT: To check if your email left your system, check all the mail logs in the /var/log/mail*
Step 13: Making the email system appear as a valid domain owner for passing spam filters
There are three basic things every email system should do to get anti-spam protection permitting emails received from your new systems to remote systems inboxes without ending in spam folders.
- rDNS (or reverse DNS) to have reverse DNS lookup on the public IP pointing back to your domain.
- SPF (Sender Policy Framework) that let’s the receiving system know which systems are allowed to send emails for your domain.
- DKIM (DocumentKeys Identified Mails) a public/private key pair that is used for signing emails by the domain owner to avoid spammers being able to send emails “as if” coming from your domain.
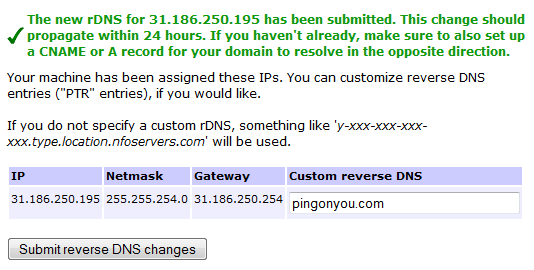
Step 13A: Reverse DNS entry
Now, this part is between you and your provider, but you must ask the owner of the public IP you are using to create a reverse DNS entry for you.
Most providers of servers (ramnode, nfoserver, etc… ) have this option as part of their control panel so the work is a few clicks, but it is imperative to do.
DISCLAIMER: I am going to use in the following example the public IP of 31.186.250.195 which I was on temporary measure using in one rented virtual server from undisclosed provider. I do not own this IP, please consider this IP only as random public IP without any technical meaning and replace in this step with your own public IP used.
A quick view on one such system:
To verify, either use “nslookup -r” command to your own domain, or web tool such as this one http://mxtoolbox.com/SuperTool.aspx
demouser@pingonyouserver:~$ nslookup -r 31.186.250.195
*** Invalid option: r
Server:         8.8.8.8
Address:        8.8.8.8#53

Non-authoritative answer:
195.250.186.31.in-addr.arpa     name = pingonyou.com.
Step 13B: SPF
In summary to what we will be doing here for SPF is basically again that you need to interact either with your own DNS system, or contact your DNS hosting company (or do this via their control panel if they have this) and ask them to enter some special TXT records to your domain. Here are example steps to follow:
- First I absolutely stress that you read this page to understand SFP to avoid generating something incorrectly and hurting you email system from the very beginning!
http://www.open-spf.org/SPF_Record_Syntax - For my example, I simply want to allow my main server “yourmailserver” from my “yourcompany.com” domain to send emails. So the records for my are like this for SPF1 and SPF2 records:
v=spf1 a include:pingonyouserver.pingonyou.com –all
spf2.0/pra a include:pingonyouserver.pingonyou.com -all
Quick legend:
- the “a” allows any of the DNS A records to authorize domains (like basic pingonyou.com) to send emails.
- the “include” allows other domains like the server FQDN to send the email (MAKE SURE YOU ALSO HAVE A DNS A RECORD FOR YOUR SERVER FQDN!)
- “-all” removes all other IPs/Domains from the ability of sending emails.EXAMPLE: My provider (websupport.sk) has a nice GUI to edit these TXT records for my domains, please adjust this step according to your way of DNS providing, I am 99% sure your DNS provider will support this, or if you are self-DNS hosting, adding this to your database shouldn’t be a problem for you. Please note that “yourcompany.com” is a fake, so I will show here as example a picture how I have setup one of my domains pingonyou.com, which is currently not really hosting anything useful.
TXT record editing example in web gui of my provider (websupport.sk) for my pingonyou.com domain
- You can then apply them to the DNS record and test it with an online tool like this:
http://tools.bevhost.com/spf/HINT: At the very end of this guide, we will be sending a test email to a testing service that will verify SPF and other useful things for us, so if you have trouble with this tool, wait with testing for that.
UPDATE 2018: Since moving to new server that includes also IPv6, here is how a SPF records should look like if you are in dual IP4 and IPv6 situation like I am:
    networkgeekstuff.com. 60 IN TXT "spf2.0/pra a mx ip4:185.52.0.187 ip6:2a00:d880:5:75d::d36c include:networkgeekstuff.com -all"
    networkgeekstuff.com. 60 IN TXT "v=spf1 a mx ip4:185.52.0.187 ip6:2a00:d880:5:75d::d36c include:networkgeekstuff.com -all"
Step 13c: DKIM public keypair to sign emails leaving your system
Now this one is a little more tricky as we are again going to play with certificates, but also with exim4 routing of emails. So let’s take it slowly:
- Generate an RSA public and private keys with openssl
# sudo openssl genrsa -out /etc/exim4/private.key 1024
# sudo openssl rsa -in /etc/exim4/private.key -out /etc/exim4/public.pem -pubout -outform PEM
# sudo chown Debian-exim:root /etc/exim4/private.key /etc/exim4/public.pem
- Read your new public key
# cat /etc/exim4/public.pem
-----BEGIN PUBLIC KEY-----
MIGfMA0GCSqGSIb3DQEBAQUAA4GNADCBiQKBgQDA+WiFmhUpuOav+3oB77E0j06p
DAr5cw9NKkcf9tcDbn7nIpBqAIFP8PVTn4tzO3I6LL+o5A9dCGQFPZlzqW8cXPDc
Zd/4+4NEw1OIbbaUJh/giTyI24qbxBFTaW1nvdxE9qlWbNOYlbOVp4BpXdwmawVw
V72GKjSR2+ql8wM4cQIDAQAB
-----END PUBLIC KEY-----
- Construct a DNS TXT record with the public key following this formula :
Domain name: key1._domainkey.<your domain name>
TXT record: v=DKIM1; k=rsa; p=<your public key string>For my domain example pingonyou.com , this is the TXT record I asked my DNS provider to enter into the DNS system.Domain name:key1._domainkey.pingonyou.com.pingonyou.com
TXT record itself:
v=DKIM1;\040k=rsa;\040p=MIGfMA0GCSqGSIb3DQEBAQUAA4GNADCBiQKBgQDA+WiFmhUpuOav+3oB77E0j06pDAr5cw9NKkcf9tcDbn7nIpBqAIFP8PVTn4tzO3I6LL+o5A9dCGQFPZlzqW8cXPDcZd/4+4NEw1OIbbaUJh/giTyI24qbxBFTaW1nvdxE9qlWbNOYlbOVp4BpXdwmawVwV72GKjSR2+ql8wM4cQIDAQAB
Here is how it looked in my DNS provider system:
DNS TXT record with DKIM key in my example DNS provider (websupport.sk) - Create a file dkim_senders to tell exim what source domains the DKIM should be used for:
# echo "*@pingonyou.com: pingonyou.com" > /etc/exim4/dkim_senders
- Edit /etc/exim4.conf.template and in section “router/200_exim4-config_primary” just before “dnslookup_relay_to_domains:” add these new lines:
#NetworkGeekStuff dkim addon rules: dnslookup_dkim: debug_print = "R: dnslookup_dkim for $local_part@$domain" driver = dnslookup domains = ! +local_domains senders = lsearch*@;/etc/exim4/dkim_senders transport = remote_smtp_dkim same_domain_copy_routing = yes # ignore private rfc1918 and APIPA addresses ignore_target_hosts = 0.0.0.0 : 127.0.0.0/8 : 192.168.0.0/16 :\ 172.16.0.0/12 : 10.0.0.0/8 : 169.254.0.0/16 :\ 255.255.255.255 no_more - Again inside the /etc/exim4/exim4.conf.template inside section “transport/30_exim4-config_remote_smt” just before “remote_smtp:” add these new lines:
remote_smtp_dkim: debug_print = "T: remote_smtp_dkim for $local_part@$domain" driver = smtp dkim_domain = ${lookup{$sender_address}lsearch*@{/etc/exim4/dkim_senders}} dkim_selector = key1 dkim_private_key = /etc/exim4/private.key dkim_canon = relaxed dkim_strict = false #dkim_sign_headers = DKIM_SIGN_HEADERS - Restart exim
update-exim4.conf
service exim4 restart
- Now you should have everything very nicely prepared, to get a report about how successfully you were, send a test email here (any content) :
check-auth@verifier.port25.com
You will get back an email with a very nice and complete summary of the SPF/DKIM and some other checks, here is my example with details how the system from this tutorial passed SFP and DKIM test. I think this is a very nice result so far 🙂========================================================== Summary of Results ========================================================== SPF check: pass DomainKeys check: neutral DKIM check: pass Sender-ID check: pass SpamAssassin check: ham ========================================================== Details: ========================================================== HELO hostname: pingonyouserver.pingonyou.com Source IP: 31.186.250.195 mail-from: demouser@pingonyou.com ---------------------------------------------------------- SPF check details: ---------------------------------------------------------- Result: pass ID(s) verified: smtp.mailfrom=demouser@pingonyou.com DNS record(s): pingonyou.com. SPF (no records) pingonyou.com. 600 IN TXT "v=spf1 a include:pingonyouserver.pingonyou.com -all" pingonyou.com. 600 IN TXT "spf2.0/pra a include:pingonyouserver.pingonyou.com -all" pingonyou.com. 600 IN A 31.186.250.195 ---------------------------------------------------------- DKIM check details: ---------------------------------------------------------- Result: pass (matches From: demouser@pingonyou.com) ID(s) verified: header.d=pingonyou.com Canonicalized Headers: content-transfer-encoding:7bit'0D''0A' content-type:text/plain;'20'charset=utf-8;'20'format=flowed'0D''0A' in-reply-to:<549B2103.5080605@pingonyou.com>'0D''0A' references:<549B2103.5080605@pingonyou.com>'0D''0A' subject:test'20'email'20'for'20'DKIM'20'and'20'SPF'0D''0A' to:check-auth@verifier.port25.com'0D''0A' mime-version:1.0'0D''0A' from:"Havrila,'20'Peter"'20'<demouser@pingonyou.com>'0D''0A' date:Wed,'20'24'20'Dec'20'2014'20'23:37:38'20'+0100'0D''0A' message-id:<549B4032.4040201@pingonyou.com>'0D''0A' dkim-signature:v=1;'20'a=rsa-sha256;'20'q=dns/txt;'20'c=relaxed/relaxed;'20'd=pingonyou.com;'20's=key1;'20'h=Content-Transfer-Encoding:Content-Type:In-Reply-To:References:Subject:To:MIME-Version:From:Date:Message-ID;'20'bh=Q22dyZju6AlMzw21jDtbRX5w6L8oTce4upEb75AdLqs=;'20'b=; Canonicalized Body: Test'20'email'20'body'0D''0A' DNS record(s): key1._domainkey.pingonyou.com. 600 IN TXT "v=DKIM1; k=rsa; p=MIGfMA0GCSqGSIb3DQEBAQUAA4GNADCBiQKBgQDA+WiFmhUpuOav+3oB77E0j06pDAr5cw9NKkcf9tcDbn7nIpBqAIFP8PVTn4tzO3I6LL+o5A9dCGQFPZlzqW8cXPDcZd/4+4NEw1OIbbaUJh/giTyI24qbxBFTaW1nvdxE9qlWbNOYlbOVp4BpXdwmawVwV72GKjSR2+ql8wM4cQIDAQAB" Public key used for verification: key1._domainkey.pingonyou.com (1024 bits) NOTE: DKIM checking has been performed based on the latest DKIM specs (RFC 4871 or draft-ietf-dkim-base-10) and verification may fail for older versions. If you are using Port25's PowerMTA, you need to use version 3.2r11 or later to get a compatible version of DKIM.
Step 14: SpamAssassin header attachment
One thing that was missing in the previous step last test was the SpamAssassin check. SpamAssassin is mainly used for incomming emails, but I am leaving that for some follow-up tutorial. Right now we are going to use SpamAssassin to add its header to all emails that our system sends to try to declare we are not spam.
So this is a super quick how-to to enable very basic spam-assassin checks on your emails.
DISCLAIMER: Taken mostly from debian exim documentation: https://wiki.debian.org/Exim, not much credit for me here :apt-get install spamassassin
-
apt-get install spamassassin
- Set “ENABLED=1” inside /etc/default/spamassassin
- Start the spamassassin daemon:
# /etc/init.d/spamassassin start
- Uncomment this line in /etc/exim4/exim4.conf.template
spamd_address = 127.0.0.1 783
- Edit /etc/exim4/exim4.conf.template and inside section “40_exim4-config_check_data change” edit the content inside “acl_check_data:” function
# put headers in all messages (no matter if spam or not) warn spam = nobody:true add_header = X-Spam-Score: $spam_score ($spam_bar) add_header = X-Spam-Report: $spam_report # add second subject line with *SPAM* marker when message # is over threshold warn spam = nobody add_header = Subject: ***SPAM (score:$spam_score)*** $h_Subject: - Rebuild exim config and restart exim
# update-exim4.conf
# service exim4 restart
- Test by either sending again to check-auth@verifier.port25.com or catch the outcomming emails from your system and it should have this header inside:
X-Spam-Score: -1.0 (-)
X-Spam-Report: Spam detection software, running on the system "pingonyouserver.pingonyou.com", has
 identified this incoming email as possible spam.  The original message
 has been attached to this so you can view it (if it isn't spam) or label
 similar future email.  If you have any questions, see
 @@CONTACT_ADDRESS@@ for details.

 Content preview:  Test email body 3 [...]

 Content analysis details:   (-1.0 points, 5.0 required)

  pts rule name              description
 ---- ---------------------- --------------------------------------------------
 -1.0 ALL_TRUSTED            Passed through trusted hosts only via SMTP
Summary
In summary, this is how my very first email system started running (only that the used example pingonyou.com is not the real company email, but my test domain that no longer servers emails, so do not bother sending something to it). And yes, the next step to do after the other systems (like gmail) stopped considering us a spam with SPF/DKIM and other functions satisfied is to filter out all the incomming spam! (oh boy how much we started getting it after 6 months … but solving that is for the next tutorial to come.
I hope you enjoyed this tutorial and it helped you a little. It is not as cool as the cloud/SDN/network topics, but hopefully some basic and practical one is also helpful.