


Checkpoint Firewall CLI tool “dbedit” and quick lab examples
In this article, I am going to give you a quick guide how to run a single checkpoint FW as virtual machine quickly on your notebook and then super-quick introduction to configuring such checkpoint firewall via CLI instead of the much more typical SmartDashboard. This articles is very focused on what I personally needed to do lab for in work and is in no way a comprehensive guide to the “dbedit” tool from Checkpoint or any firewall automation.
Contents
Background
We are using Checkpoint firewalls in our customer networks at work and are heavily using SmartDashboard and other GUI based tools to manage these firewalls in a large datacenter environments (rulebase of 10k+ firewall rules!) because that is simply our internal standard. However recently there came a push to try to automate a certain aspects of configuring these firewalls because several customer wanted to achieve shorter lead-times at least on few aspects of firewall configurations.
And since Checkpoint FWs do not support any real API for managing policies with it, it came down to CLI tools like dbedit, which we will explore here a little for the purpose of learning the practicalities of managing firewall policies with this tool. The firewall automation itself is out of scope of this article, but you should get the idea what needs to be done to achieve it after learning the basics of dbedit.
Topology of our LAB and LAB components
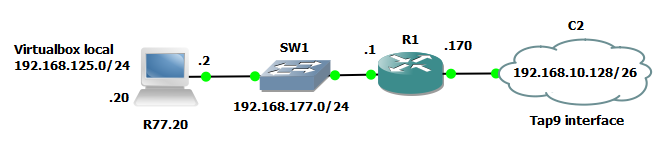
For this lab I was using GNS3 and VirtualBox to create my small topology, but your should be perfectly fine to use vmWare workstation with only logical interfaces from it (the vmnetX interfaces it creates) to simulate the same logic, the focus here is to manipulate the FW rules with dbedit tool, so I am not even going to do FW cluster or install Domain Management Systems (MDS) as a typical Checkpoint production environment should have.
Checkpoint Components used
In regards to Checkpoint software used here, I only used the 15 day trials as these are fully functional for this period and enough for a quick LAB. However even to download these, you need a partners account or any other checkpoint product, so here I need to ask you to check in what way you can download this software as for me it was easy thanks to my employer being a partner with Checkpoint so I have this access.
From the following download page for R77.20 of checkpoint:
https://supportcenter.checkpoint.com/supportcenter/portal?eventSubmit_doGoviewsolutiondetails=&solutionid=sk101208
Step 1. Download
- VMWare Virtual Machine OVF Template
Check_Point_Security_Gateway_R77.20_T124_OVF_Template_Gaia.tgz - SmartDashboard and other GUI management components for Windows
Windows – SmartConsole and SmartDomain Manager [INSTALL EXE package]
Step 2. Unpack & Install R77.20 into VirtualBox VM
Unpack the downloaded Check_Point_Security_Gateway_R77.20_T124_OVF_Template_Gaia.tgz, inside will be an OVF packaged virtual machine files that should be easy to import into VirtualBox or vmWare Workstation. Please do so.
Afterwards run the VM and follow install wizard. On this point you can do this even without GNS3 or other network around, but since in next steps immediately setting the interfaces, I recommend that you already put this VM in middle of your virtual network to test access to the VM interfaces.
Step 3. Basic CLI configuration of Checkpoint FW interfaces
After your new VM firewall is booted, we are going to configure its interfaces with IPs as basic first step. I am going to use:
eth1 – external bridge to GNS3 virtual LAN with 192.168.177.2/24 IP
eth0 – internal “host only” adapter that will simulate our corporate intranet with 192.168.125.20/24 IP
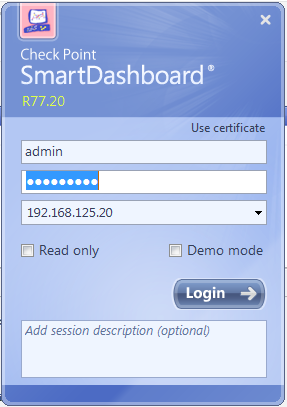
Open the checkpoint CLI console in VirtualBox and login with the default “admin” username and “admin” password.
set interface eth0 ipv4-address 192.168.125.20 subnet-mask 255.255.255.0
set interface eth1 ipv4-address 192.168.177.2 subnet-mask 255.255.255.0
set interface eth0 state on
set interface eth1 state on
Step 4. First time setup via WebGUI
Simply open a browser, and go to https://192.168.125.20/ and complete the first time configuration wizard. It will ask you for very basic things like what packages to install (Select all), if you are installing a Secure Gateway or MDS (here answer that you are installing Secure Gateway) and that this system is either not part or will be part of a VRRP cluster later.
Simply try to push everything to as much stand-alone minimal firewall deployment possible.
Step 5. Setup initial routing, initial sample ruleset and simple NAT
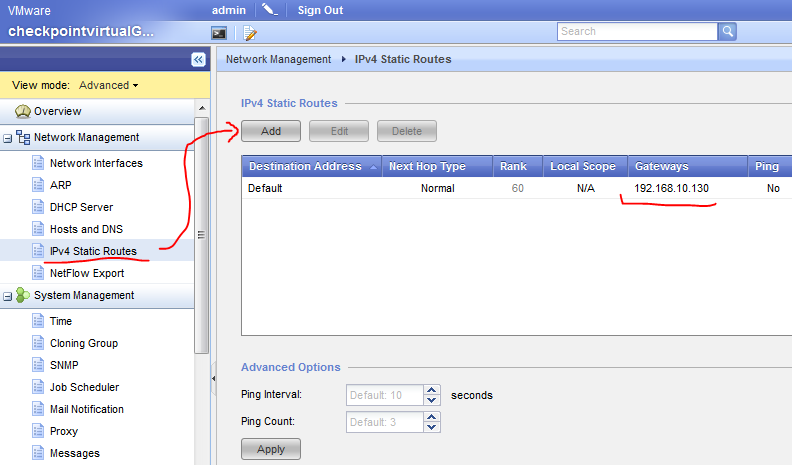
Step 5.1 IPv4 Static Route
Routing is practically not needed here, but if nothing else please setup a default gateway (or default route) towards your external inteface next hope (the router on the other side0. This is simply done via the WebGUI -> Ipv4 Static Routes and add it, example below.
Step 5.2 Simple FW policy
To configure FW policy and/or NAT in the next step, you have to install the SmartDashboard 77.20 client on your windows host, launch it and point to to your virtual checkpoint firewall IP and the new admin username/password you created during your first-time-configuration in step #3 (since the admin/admin might not be valid here anymore).
Inside the SmartDashboard, on the top-left side navigate to the “Policy” section. This GUI is very intuitive, create a few rules with a few new network objects in the background. I am not going to give a full guide here as this is not a Checkpoint FW tutorial for SmartDashboard but simply try to create a few basic rules as I have just to have something to play later with.
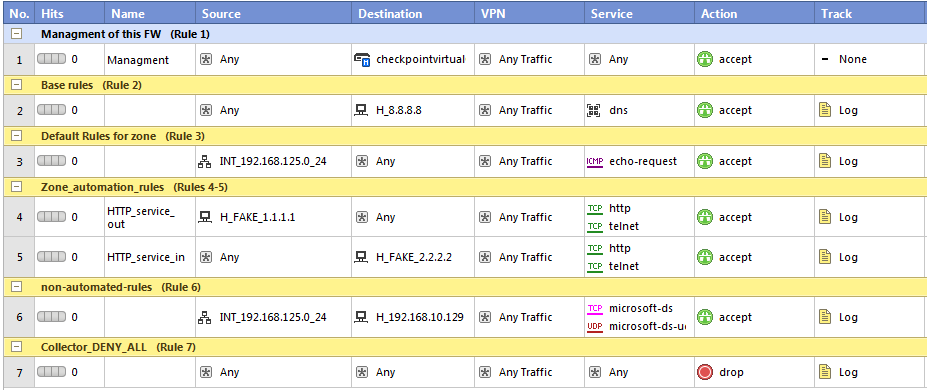
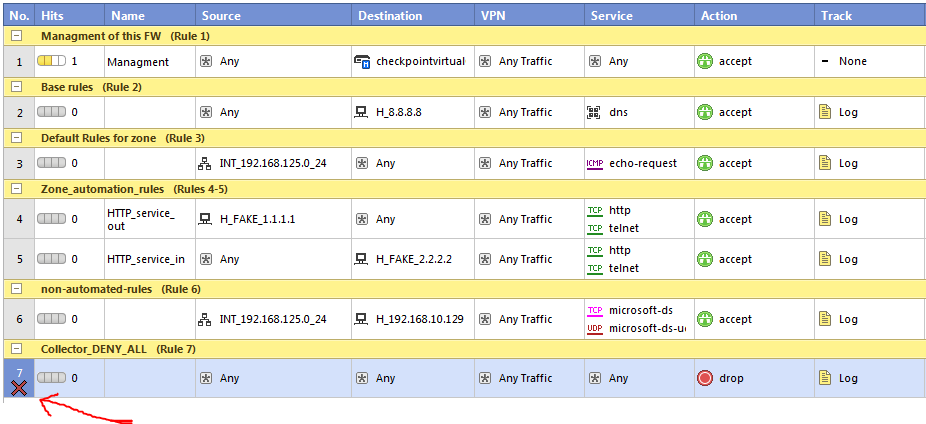
In the above ruleset I have created a sample rule (very primitive really) of what we use in production. We have management rules first, then comes base rules (rules needed for servers to operate like logging), then default rules (used for each security zone like default flat access), then new section of automate rules that we want to later work with using dbedit/CLI. Followed by a section of non-automated rules and DENY ANY collector rule.
#IMPORTANT! See above the rule index numbers, from this vie it looks like rules are numbered from #1 to #7, however in the dbedit and CLI, these rules are practically indexed starting from #0, but allso the comment sections are using an index, which means that there rules will be in CLI later edited using indexes of #0 – #12 (the DENY ANY rule at the end is practically rule #12 in CLI!!). This can confuse very much so remember this from this point.
Step 5-3. Configure basic NAT rule to hide internal network behind external interface IP
This is the same NAT (or in Cisco terminology PAT) that will hide the internal network behind behind this firewall. I used this because in both my LAB networks I didn’t wanted to change the routing for this exercise so everything that transits from internal 192.168.125.0/24 network to external networks is hidden behind the 192.168.177.2 IP of the eth1 interface of the FW.
Configuring this is a single NAT rule, in the SmartDashboard top-left part, select the “NAT” section and create the following rule:
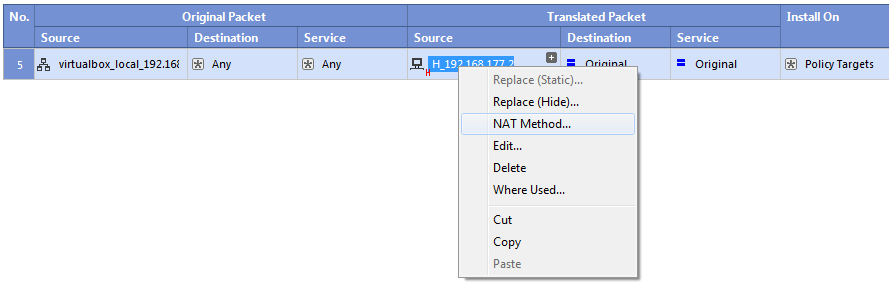
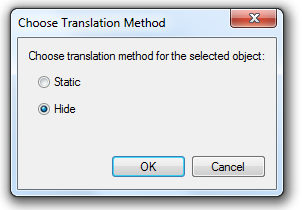
Additionally, as shown above, select the Translated Source with right-click and select the “NAT Method…” and as shown below, switch to “Hide”. Otherwise your policy application will fail because by default Checkpoint wants to do a static one-to-one NAT and here we need to have a one-to-many NAT which is hiding the whole network behind one IP.
After all is done, hit the “Install Policy” button and hope all is accepted.
Step 6. Preparing access to CLI expert mode
dbedit is accessible from expert mode of checkpoint FW, to access this, you first need to configure password access to it with the below command executed in the checkpoint CLI:
set expert-password
The system is going to ask you to enter new password like below screenshot from my system:

and afterwards you can enter the expert mode with the command
expert
in my system then :
checkpointvirtualGW> expert
Enter expert password:

Warning! All configuration should be done through clish
You are in expert mode now.

[Expert@checkpointvirtualGW:0]#
Step 7.Entering dbedit
When you are in expert mode (check that your CLI prompt ends with “#” and you actually have many unix commands available), we can now enter the dbedit,
You can use dbedit in two modes, interactive mode that we will use here, but there is also a batch processing mode where you can store your dbedit commands in a text file and then execute all at once using the “-f” parameter and the text file as argument. However in this guide we are going to use interactive mode (the default one).
Enter dbedit simply by typing dbedit in the CLI, you should get output similar to this:
[Expert@checkpointvirtualGW:0]# dbedit
Enter Server name (ENTER for 'localhost'):

Please enter a command, -h for help or -q to quit:
dbedit>
#IMPORTANT!: I actually recommend that (and it is actually mandatory to edit FW policy) that you close any SmartDashboard sessions that you have with the checkpoint FW as dbedit needs an explicit lock on policy editing to do real work. To make this explicit, I recommend using dbedit always with parameter “-globallock” as in the example below, this will ask dbedit to make explicit lock of the policy editing to dbedit, this will fail if any other SmartDashboad and/or other dbedit sessions are running.
[Expert@checkpointvirtualGW:0]# dbedit -globallock
Enter Server name (ENTER for 'localhost'):

Please enter a command, -h for help or -q to quit:
dbedit>
Step 8. FINAL – dbedit exercises
EXERCISE A – basic print examples
dbedit is definitely not much user friendly when it comes to printing network objects or the fw policies using the CLI, therefore I actually recommend that you open a SmartDashboard, but in “read-only” mode to the FW so that you can search for object definitions and verify your policy changes with it in a much more visually friendly way.
dbedit provides two basic print commands, print and printxml, they do the same only the output is in xml format with the second one. The syntax is roughly:
print <table_name> <object_name>
printxml <table_name> <object_name>
For both however, you will have to learn some basic ways how dbedit calls various objects, when we get to editing in later excercises, you can get back to print commands and use it with the network objects we create later to display them.
For now, the two examples you can try:
dbedit > print H_FAKE_1.1.1.1
note: the H_FAKE_1.1.1.1 is one of the host object definitions I have created during policy creation in previous steps, if you have somethign different, change this to any other object that you have in your policy.
dbedit> print network_objects H_FAKE_1.1.1.1

          Object Name: H_FAKE_1.1.1.1
          Object UID: {30DE66BD-8F54-4B2A-95A5-E59A30B6E2EA}
          Class Name: host_plain
          Table Name: network_objects
          Last Modified by: admin
          Last Modified from: HAVRILA2
          Last Modification time: Fri Feb 26 16:22:01 2016
          Fields Details
          --------------
              DAG: false
              NAT: (
                  <NULL>
              )
              SNMP: (
                  <NULL>
              )
              VPN: (
                  <NULL>
              )
              add_adtr_rule: false
              additional_products: (
                  <NULL>
              )
              addr_type_indication: IPv4
              certificates: (
                  (
                      <NULL>
                  )
              )
              color: black
              comments:
              connectra: false
              connectra_settings: (
                  <NULL>
              )
              cp_products_installed: false
              data_source: not-installed
              data_source_settings: (
                  <NULL>
              )
              edges:
              enforce_gtp_rate_limit: false
              firewall: not-installed
              floodgate: not-installed
              gtp_rate_limit: 2048
              interfaces: (
                  (
                      <NULL>
                  )
              )
              ipaddr: 1.1.1.1
              ipaddr6:
              macAddress:
              os_info:  (
                  osBuildNum:
                  osName: Gaia
                  osSPMajor:
                  osSPMinor:
                  osType: 0
                  osVerMajor:
                  osVerMinor:
                  osVersionLevel:
              )
              type: host
The second example you can try is to display the whole FW policy with:
dbedit> print fw_policies ##Standard
however this output is very long even for the policy shown in, so just for your comparison, this policy SmartDashbord screenshot is represented by this dbedit print output in TXT file.
EXERCISE B – disabling a simple rule from the policy
Our first example of editing a policy we keep simple, I will simply disable the last “DENY ANY” rule in my policy. In SmartDashboard, the last rule is #7, however, as explained above, dbedit is indexing rules starting with 0 and also the section names are considered an indexed output from the policy, so if you count everything from the policy I have, the last rule is actually #12!! You can doublecheck this using the print commands from previous excercise, but there is no index there, so you have to manually count the number of rules printed, what is error prone…. as I said, dbedit was not meant for visual human readability.
The one command that we need to edit the policy and change the rule 12 into disabled state is:
dbedit> modify fw_policies ##Standard rule:12:disabled true
after this command, the sequence of commands that we will use to update the policy and install it into firewalls is:
dbedit> update_all
dbedit> savedb
to install the policy, you need to exit the dbedit using the quit command, and from expert mode launch:
dbedit> quit
[Expert@checkpointvirtualGW:0]# fwm load Standard
Here is a full output of all the messages that follow a successfully update of policy, saving the db and loading the firewall with the new policy.
dbedit> modify fw_policies ##Standard rule:12:disabled true
dbedit> update_all
fw_policies::##Standard Updated Successfully
dbedit> savedb
Database saved successfully
dbedit> quit
[Expert@checkpointvirtualGW:0]# fwm load Standard
Installing policy on R77 compatible targets:
  Warning: Anti-Spoofing is not configured for some interfaces and gateways.
  This will allow address spoofing through these gateways.
 Anti-Spoofing should be configured on the following objects:
 Gateway: checkpointvirtualGW, Interface: eth2
 Gateway: checkpointvirtualGW, Interface: eth1
 Gateway: checkpointvirtualGW, Interface: eth0
 Standard.W: Security Policy Script generated into Standard.pf
 export Standard.Set:
 Compiled OK.
 Standard:
 Compiled OK.
 export Standard.Set:
 Compiled OK.
 Standard:
 Compiled OK.
 Installing Security Gateway policy on: checkpointvirtualGW ...
  Security Gateway policy installed successfully on checkpointvirtualGW...

 Security Gateway policy installation complete
 Security Gateway policy installation succeeded for:
 checkpointvirtualGW
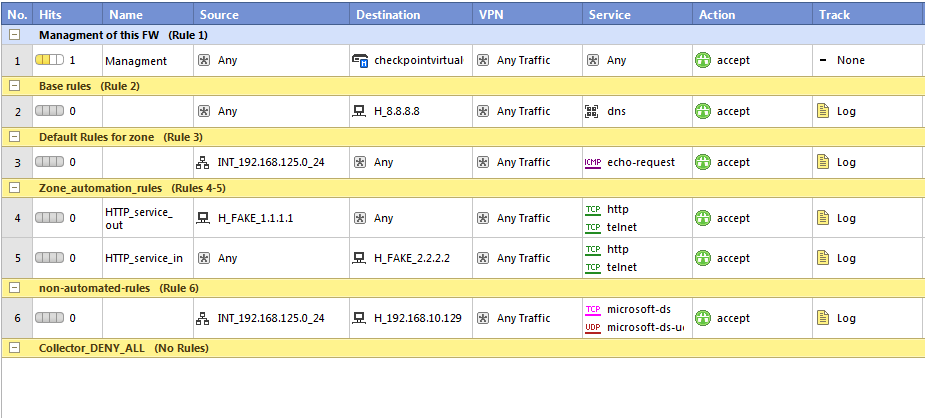
And now the final view, in the SmartDashboard in read-only mode, reload the policy and you should see the last rule disabled:
EXERCISE C – creating a few new network objects
Just to give you a reference point to creating network objects (before we jump into policy editing), here are a few examples of basic operations:
– NEW NETWORK OBJECT
    # Create the object (of type network)
    create network net10-internal
    # Configure the network IP address
    modify network_objects net10-internal ipaddr 10.0.0.0
    # Configure the netmask (in dotted decimal notation) of the network
    modify network_objects net10-internal netmask 255.0.0.0
    # Add a comment to describe what the object is for (optional)
    modify network_objects net10-internal comments "Created by networkgeekstuff with dbedit"
– NEW HOST OBJECT
    # Create the actual object (of type host_plain)
    create host_plain PC1host
    # Modify the host IP address
    modify network_objects PC1host ipaddr 192.168.125.10
    # Add a comment to describe what the object is for (optional)
    modify network_objects PC1host comments "Created by fwadmin with dbedit"
#OPTIONAL NEW HOST#2, just one more time to help the next excercises with grouping multiple objects
    # Create the actual object (of type host_plain)
    create host_plain PC2host
    # Modify the host IP address
    modify network_objects PC2host ipaddr 192.168.125.15
    # Add a comment to describe what the object is for (optional)
    modify network_objects PC2host comments "Created by fwadmin with dbedit"
– NEW ADDRESS RANGE OBJECT
    # Create the actual object (of type address_range)
    create address_range dbedit_IP_range
    # Modify the first IP address in the range
    modify network_objects dbedit_IP_range ipaddr_first 192.168.125.100
    # Modify the last IP address in the range
    modify network_objects dbedit_IP_range ipaddr_last 192.168.125.110
    # Add a comment to describe what the object is for (optional)
    modify network_objects dbedit_IP_range comments "IP range for dbedit"
– RENAME OBJECT
    # Rename the network object addr-range to IPv4-range
    rename network_objects dbedit_IP_range IPv4-range
– DELETE OBJECT
    # Delete the network object addr-range
    delete network_objects IPv4-range
– CREATING NETWORK GROUPS
    # Create a group object
    create network_object_group dbedit_host_group
– Add the individual elements to the group
    addelement network_objects dbedit_host_group '' network_objects:PC1host
    addelement network_objects dbedit_host_group '' network_objects:PC2host
– Remove individual elements from the group
rmelement network_objects dbedit_host_group '' network_objects:PC2host
EXERCISE D – removing a rule, and adding a new rule at the end of policy
We will continue to play with the last deny any rule for a little longer, we are now going to delete it, and then put it back (optionally with PERMIT ANY if you want). Again, return back to the dbedit, to make this quicker I am now going to only show the commands needed and will minimize the text around it :).
Remove the deny any rule with #12
dbedit> rmbyindex fw_policies ##Standard rule 12
in the usual way, do the update_all, savedb commands in dbedit, then exit dbedit and install policy from expert mode using the fwm load Standard. The result will be that in your policy the last rule will be removed.
To put the rule back, e.g. create a new rule, return to dbedit and use these commands that are the minimum commands to describe a new rule with deny any:
#creates empty rule at the end, you have to change the #12 to your rule base!!!
addelement fw_policies ##Standard rule security_rule
modify fw_policies ##Standard rule:12:comments "Deny All RULE - dbedit"
modify fw_policies ##Standard rule:12:disabled false
addelement fw_policies ##Standard rule:12:action drop_action:drop
addelement fw_policies ##Standard rule:12:src:'' globals:Any
addelement fw_policies ##Standard rule:12:dst:'' globals:Any
addelement fw_policies ##Standard rule:12:services:'' globals:Any
OPTIONAL, activate Log tracking on the rule:
rmbyindex fw_policies ##Standard rule:12:track 0
addelement fw_policies ##Standard rule:12:track tracks:Log
OPTIONAL, if you by chance want, change from DROP to PERMIT ANY
rmbyindex fw_policies ##Standard rule:12:action 0
addelement fw_policies ##Standard rule:12:action accept_action:accept
in the usual way, do the update_all, savedb commands in dbedit, then exit dbedit and install policy from expert mode using the fwm load Standard. The result will be similar to the picture below.

EXERCISE E – Editing existing rule
The last exercise here is that we will edit an existing rule by adding more network objects to the source and destination parts.
#IMPORTANT!: If you are asking why were are not adding new rule to the middle of the policy then please note that this is not easily possible. dbedit is only capable of adding a new rule to the end of the policy, this means that if you have a ruleset of five rules (#0-#4) and you want to enter a new rule that will be, lets say, second (#2), you need to delete rules #2-#4, add your rule and then re-create the deleted rules again as new rules #3-#5 behind your newly inserted rule #2.
Let’s now do something like editing an existing rule and I will use the two rules I pre-created for this purpose in my policy #4(7 for dbedit) source and #5(8 for dbedit) and I will add more items to the source and destination parts.
Adding more source objects:
addelement fw_policies ##Standard rule:7:src:'' network_objects:PC1host
addelement fw_policies ##Standard rule:7:src:'' network_objects:PC2host
Adding more destination objects:
addelement fw_policies ##Standard rule:8:dst:'' network_objects:dbedit_host_group
OPTIONAL #1, you can remove the unneeded parts from the rule in a similar way:
rmelement fw_policies ##Standard rule:7:src:'' network_objects:H_FAKE_1.1.1.1
rmelement fw_policies ##Standard rule:8:dst:'' network_objects:H_FAKE_2.2.2.2
OPTIONAL #2, if you need to change the logic of a rule field to a negation (ergo “not containing XY”) you can do so like this:
modify fw_policies ##Standard rule:8:dst:op 'not in'
Summary
What to say, dbedit is the only tool I currently see that at least in a limited way will allow us to automate a portion of the firewall policy, however due to the problematic insertion of new rules I am much more expecting a semi-automated solution where rule templates will exist, while automated script is only adding systems to the source/destination part of pre-existing template rules. We will see, at this point this was just a quick introduction to the dbedit as a summary of my quick LAB I did and maybe will be interesting for someone else.
REFERENCES
Checkpoint Gaia web admin documentation:
https://sc1.checkpoint.com/documents/R76/CP_R76_Gaia_WebAdmin/75697.htm
Checkpoint R77 CLI command reference guide:
https://sc1.checkpoint.com/documents/R77/CP_R77_CLI_ReferenceGuide_WebAdmin/index.html
Wonderful tool, i remember the days where I’m just learning to do networking. I used packet tracer from cisco before and it was very helpful. I wonder how packet tracer look today.
Hi,
I would appreciate if you can help me with the following: We are trying to export the the App& URL Filtering rulebase, we tried to do this with the data web visualization tool but I am not sure if we are querying the right table. (table appfw_misc), is this the right table ?
Results from Data web visualization tool: Message:
Connected to Security Management version 9.9.0.
Querying tables…
Visualization of table appfw_misc is not supported. Only XML file will be printed.
Hello,
Thank you for the examples and the explaination, very useful.
Now with the R80 APIs, it should be easier.
The R80 API is a very much welcomed feature, because FYI the “dbedit” way of doing things turned out to be an ‘unsupported’ path to take in which Checkpoint support can potentially refuse to help you with incident resolution if you are using dbedit.
So officially supported API is great and I am happy to see Checkpoint finally catching with other vendors (FYI I was already in projects where FortiNets were chosen only because API support).
Peter
I created node using dbedit. But i cant see that object in SmartDashboard. With “print network_objects xxxx”, I can see the object. What can be the problem.
Hi,
Thanks for the post.
Is there any way to move the created rule to a specific numbered position.
Or
Is there a way to add a rule with its position in the rulebase rather than inserting at the end.
(via dbedit)
Thanks
Santosh
Hi Santosh,
Honestly I do not know, but also because Checkpoint with R80 finally went for a real API and not this dbedit nonsense, I would recommend you to check the APIs for something like that as then your solution will be more “future-proof”
Very good
https://www.latestwab.in/2019/12/lab-51-configuring-basic-ipv4-firewall.html