


Eycalyptus – cloud introduction and auto-scaling tutorial
In this article, I will show how to do a very simple auto-scaling system on eucalyptus cloud using the wonderful eucalyptus fast start image. Afterwards you will appreciate how easy and configurable the Eucalyptus cloud is in regards to configuring customization scripts on systems that are booted dynamically inside auto-scaling triggers (like low CPU, RAM, etc… ).
A little history, last year (2014), HP has requisitioned a company called Eucalyptus, what I must admit surprised me after spending so much time with OpenStack. So I tried to get an idea why this move has happened and what are the main differences that immediately come to mind to compare these two.
So let me went with you on the first example exposure to Eucalyptus.
Contents of Article
- … demo experience
- Prerequisites:
- The target requirements
- LAB IP setup
- Step 1: installation package from eucalyptus
- Step 2: Install complete
- Step 3: Running the tutorials .. no, really, this thing has tutorials!
- Step3a: Listing tutorial
- Step 3b: Missing more tutorials
- Step 4: With tutorials missing, let’s play independently
- Step 5: Start preparations before auto-scaling (security groups)
- Step 6: Create a load-balancer
- Step 7: Server configuration scripts after booting (in auto-scaling)
- Step 8: Creating the auto-scaling group
- Step 9: Creating scaling-policy for both increase and decrease of instance counts
- Step 10: Creating a termination policy
- Step 11: Verification that auto-scaling is running the first instance
- BONUS Step if not working: Troubleshooting load-balancer if needed.
- Step 12: Verify the auto-scaling work with CPU stress tests
- In summary
 … demo experience
Prerequisites:
- Physical system with Intel-V or AMD-x virtualization on CPU
- Virtual server running in hypervisor that supports nested virtualization (KVM or vmWare)
The target requirements
1) Have a cloud system with capability to deploy a server quickly
2) Test basic systems like load-balancing
3) Check the network forwarding inside the cloud
4) Demonstrate auto-scaling system of Eucalyptus on example server system
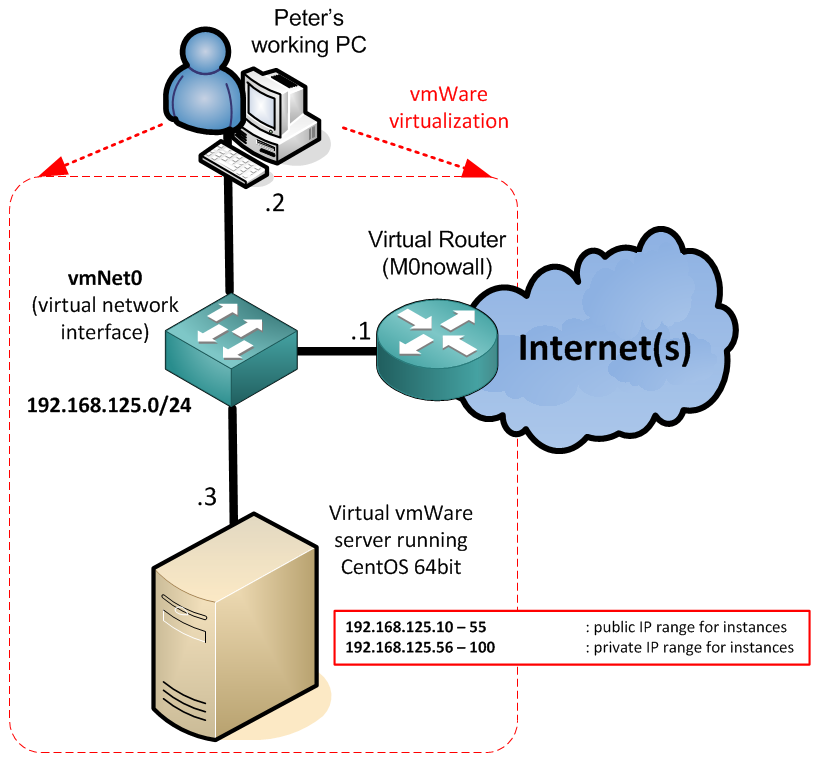
LAB IP setup
Dedicated vlan or switch with 192.168.128.0/24 with IPs as such:
192.168.125.1 – m0n0wall router
192.168.125.2 – My laptop system IP
192.168.125.3 – CentOS used for embedded eucalyptus deployment
192.168.125.10 – 55 : public IP range for instances
192.168.125.56 – 100 : private IP range for instances
My LAB basically is only running virtual using a wmWare workstation with two interfaces
vmnet0 (host-only network) – centOS6 with Eucalyptus
Step 1: installation package from eucalyptus
# mkdir ~root/eucalyptus
# cd ~root/eucalyptus
# bash <(curl -Ls eucalyptus.com/install)
First this is the install log, I do not want to go over the details as there are many interactive notes like this one that are simply too boring to note, but they show nicely.
NOTE: if you're running on a laptop, you might want to make sure that
you have turned off sleep/ACPI in your BIOS.  If the laptop goes to sleep,
virtual machines could terminate.

Continue? [Y/n]
Y
However there are more interesting parts to check:
[Precheck] OK, running a full update of the OS. This could take a bit; please wait.
To see the update in progress, run the following command in another terminal:

tail -f /var/log/euca-install-12.25.2014-18.10.45.log
What will be interesting for us during the wizard is setting the public and private IP ranges, in my lab I used these:
What's the first address of your available IP range?
192.168.125.10
What's the last address of your available IP range?
192.168.125.100
OK, IP range is good
  Public range will be:   192.168.125.10 - 192.168.125.55
  Private range will be   192.168.125.56 - 192.168.125.100
Then off-course on the question if we want the optional load balancers, the answer should always be YES as this is what we are interested in 🙂
Do you wish to install the optional load balancer and image
management services? This add 10-15 minutes to the installation.
Install additional services? [Y/n]
Step 2: Install complete
After the installation is complete, you will get something like this after an hour of looking at coffee:
   ) )
    ( (
  ........
  |      |]
  \      /
   ------


[Config] Enabling web console
EUARE_URL environment variable is deprecated; use AWS_IAM_URL instead
[Config] Adding ssh and http to default security group
GROUP   default
PERMISSION      default ALLOWS  tcp     22      22      FROM    CIDR    0.0.0.0/0
GROUP   default
PERMISSION      default ALLOWS  tcp     80      80      FROM    CIDR    0.0.0.0/0


[SUCCESS] Eucalyptus installation complete!
Time to install: 1:10:11
To log in to the Management Console, go to:
http://192.168.125.3:8888/

User Credentials:
  * Account: eucalyptus
  * Username: admin
  * Password: password

If you are new to Eucalyptus, we strongly recommend that you run
the Eucalyptus tutorial now:

  cd /root/cookbooks/eucalyptus/faststart/tutorials
  ./master-tutorial.sh

Thanks for installing Eucalyptus!
Step 3: Running the tutorials .. no, really, this thing has tutorials!
On this point I am fucking surprised that this thing is actually user friendly!
# cd /root/cookbooks/eucalyptus/faststart/tutorials
# ./master-tutorial.sh
Step3a: Listing tutorial
Gain login to eucalyptus
# source /root/eucarc
Then describe images:
# euca-describe-images
IMAGE   emi-2b9799cb    imaging-worker-v1/eucalyptus-imaging-worker-image.img.manifest.xml121804880595     available       private x86_64  machine                         instance-store     hvm
IMAGE   emi-dc054c35    loadbalancer-v1/eucalyptus-load-balancer-image.img.manifest.xml 121804880595       available       private x86_64  machine                         instance-store     hvm
IMAGE   emi-e70b2b70    default/default.img.manifest.xml        121804880595    available public   x86_64  machine                         instance-store  hvm
Now let’s import additional image of cloud Fedora from internet:
# curl http://mirror.fdcservers.net/fedora/updates/20/Images/x86_64/Fedora-x86_64-20-20140407-sda.raw.xz > fedora.raw.xz
# xz -d fedora.raw.xz
And install the image to the cloud with the following command. To install the image, we will run the following command:
# euca-install-image -n Fedora20 -b tutorial -i fedora.raw -r x86_64 --virtualization-type hvm

  -n Fedora20 specifies the name we're giving the image.
  -b tutorial specifies the bucket we're putting the image into.
  -i fedora.raw specifies the filename of the input image.
  -r x86_64 specifies the architecture of the image.
  --virtualization-type hvm means that we're using a native hvm image.
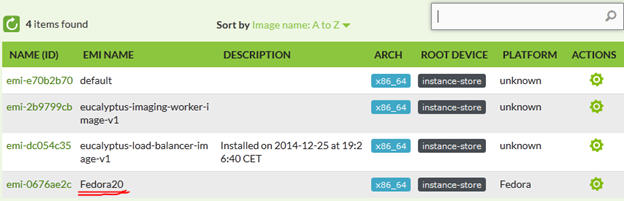
If I check now in the webGUI, there is a new image available called Fedora20.
WebGUI NOTE: Access to the webGUI is running on port 8888, so I will use my http://192.168.125.3:8888/ , the account is “eucalyptus“, username “admin” and password is “password“.
New, the tutorial will show you how to change this image from private to public (so that all cloud users can deploy it) and that can be achieved with this command:
# euca-modify-image-attribute -l -a all emi-0676ae2c
REMARK: There is a bug in the tutorial and the command there was missing the image ID.
You can see again the images also with the euca-describe-images command.
Now the last part is lauching an instance with the image, this can be simply done by this command:
# euca-run-instances -k my-first-keypair emi-0676ae2c
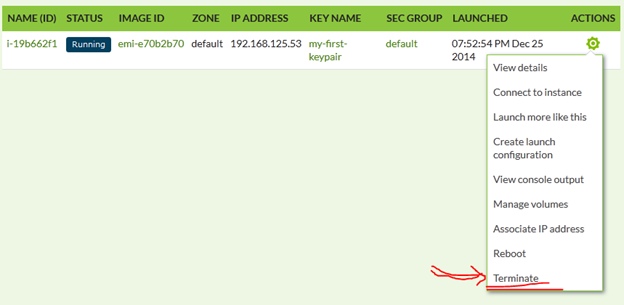
REMARK: By default there is already one instance running since installation that is eating 2GB of RAM. So your second instance may fail with euca-run-instances: error (InsufficientInstanceCapacity): Not enough resources, if this happens, go to the eucalyptus WebGUI and terminate the default instance:
If you are doing this via the tutorial, you will get a nice extra output like this:
# euca-run-instances -k my-first-keypair emi-0676ae2c

RESERVATION     r-77b206f8     121804880595   default
INSTANCE       i-44cb070e     emi-0676ae2c   192.168.125.95 192.168.125.95 pending my-first-keypair   0
m1.small       2014-12-25T22:08:22.122Z       default   monitoring-disabled     192.168.125.95 192.168.125.95
instance-store   hvm                     sg-dca36633                             x86_64

Capturing the instance ID
Capturing the public ip address
Waiting for your instance to start

1
2
3
4
5
6

Use this command to log into your new instance

# ssh -i ~/my-first-keypair.pem fedora@192.168.125.95
Step 3b: Missing more tutorials
The following tutorials are Available Now:
* Viewing available images, and understanding output
* Downloading and installing various cloud images
* Viewing running instances, and understanding output
* Launching an instance from an image

The following tutorials will be Coming Soon:
* Creating and mounting an EBS volume
* Creating a Boot-from-EBS image
* Using cloud-init to run commands automatically on a new instance
* Launching an instance and kicking off an automated application install
* Launching a hybrid install with AWS and Eucalyptus
* Adding a new Node Controller to increase cloud capacity
* ...and many more!
So what to do next ?
Step 4: With tutorials missing, let’s play independently
Now this is where fun starts, we have Eucalyptus, we have an image, but nothing much to do now as the tutorials are not yet really finished (December 2014/January 2015). So let’s try going independently and play around Eucalyptus. But I will not go into API or development of AWS in this tutorial, but I will go for the auto-scaling feature.
But first. lets mess around and get a feeling how to work with Eucalyptus a bit more, so lets list the basic commands for checking the eucalyptus without webGUI:
Prerequisite: Login to eucalyptus, which inside the faststart image you can do via provided source with this command:
source /root/aucarc
euca-describe-images – shows all the system images loaded in the eucalyptus storage
# euca-describe-images
IMAGE   emi-0676ae2c    tutorial/fedora.raw.manifest.xml        121804880595    available       public  x86_64machine                          instance-store  hvm
IMAGE   emi-2b9799cb    imaging-worker-v1/eucalyptus-imaging-worker-image.img.manifest.xml      121804880595  available        private x86_64  machine                         instance-store  hvm
IMAGE   emi-dc054c35    loadbalancer-v1/eucalyptus-load-balancer-image.img.manifest.xml 121804880595    available      private x86_64  machine                         instance-store  hvm
IMAGE   emi-e70b2b70    default/default.img.manifest.xml        121804880595    available       public  x86_64machine                          instance-store  hvm
euca-describe-keypairs – shows all the keypairs that eucalyptus has in storage (to use for the systems after launching the instance)
# euca-describe-keypairs
KEYPAIR my-first-keypair        54:f7:8e:6e:84:fb:bc:78:5e:38:42:f5:79:8e:9c:3a:93:75:23:70
euca-describe-groups – will show the FW rules for specific group, currently on the default one exists
# euca-describe-groups
GROUP   sg-dca36633     121804880595    default default group
PERMISSION      121804880595    default ALLOWS  tcp     22      22      FROM    CIDR    0.0.0.0/0       ingress
PERMISSION      121804880595    default ALLOWS  tcp     80      80      FROM    CIDR    0.0.0.0/0       ingress
PERMISSION      121804880595    default ALLOWS  icmp    -1      -1      FROM    CIDR    0.0.0.0/0       ingress
euca-describe-loadbalancing – will show the configured load-balancer groups
# euca-describe-loadbalancing
LOADBALANCING   API_192.168.125.3       API_192.168.125.3.loadbalancing 192.168.125.3                   ENABLED{}
euscale-describe-launch-configs – describes the configuration scripts for instances
# euscale-describe-launch-configs
LAUNCH-CONFIG   M1-SMALL-FEDORA emi-0676ae2c    m1.small
In addition please keep these commands in mind as these are the best commands to troubleshoot during this tutorial, but currently I give no example output because on this point in our tutorial there these are mostly empty.
euca-describe-instances
euca-describe-instance-status
euscale-describe-auto-scaling-groups
euwatch-describe-alarms
Step 5: Start preparations before auto-scaling (security groups)
Here we will create a security group called “Demo” that will allow basically the same things like the default group, but also 443 port. So in total icmp, TCP22, TCP80, TCP443.
# euca-create-group -d "Demo Security Group" DemoSG
GROUP   sg-49d47746     DemoSG  Demo Security Group
# euca-authorize -P icmp -t -1:-1 -s 0.0.0.0/0 DemoSG
GROUP   DemoSG
PERMISSION      DemoSG  ALLOWS  icmp    -1      -1      FROM    CIDR    0.0.0.0/0
# euca-authorize -P tcp -p 22 -s 0.0.0.0/0 DemoSG
GROUP   DemoSG
PERMISSION      DemoSG  ALLOWS  tcp     22      22      FROM    CIDR    0.0.0.0/0
# euca-authorize -P tcp -p 80 -s 0.0.0.0/0 DemoSG
GROUP   DemoSG
PERMISSION      DemoSG  ALLOWS  tcp     80      80      FROM    CIDR    0.0.0.0/0
# euca-authorize -P tcp -p 443 -s 0.0.0.0/0 DemoSG
GROUP   DemoSG
PERMISSION      DemoSG  ALLOWS  tcp     443     443     FROM    CIDR    0.0.0.0/0
if we now look again on all the security groups, we will see both the default and the new one (you can also double-check via webGUI)
# euca-describe-groups
GROUP   sg-49d47746     121804880595    DemoSG  Demo Security Group
PERMISSION      121804880595    DemoSG  ALLOWS  icmp    -1      -1      FROM    CIDR    0.0.0.0/0       ingress
PERMISSION      121804880595    DemoSG  ALLOWS  tcp     443     443     FROM    CIDR    0.0.0.0/0       ingress
PERMISSION      121804880595    DemoSG  ALLOWS  tcp     22      22      FROM    CIDR    0.0.0.0/0       ingress
PERMISSION      121804880595    DemoSG  ALLOWS  tcp     80      80      FROM    CIDR    0.0.0.0/0       ingress
GROUP   sg-dca36633     121804880595    default default group
PERMISSION      121804880595    default ALLOWS  tcp     22      22      FROM    CIDR    0.0.0.0/0       ingress
PERMISSION      121804880595    default ALLOWS  tcp     80      80      FROM    CIDR    0.0.0.0/0       ingress
PERMISSION      121804880595    default ALLOWS  icmp    -1      -1      FROM    CIDR    0.0.0.0/0       ingress
Step 6: Create a load-balancer
=====================================================================================
–OPTIONAL, BUT RECOMMENDED SECTION START–
Sometimes in the future, you will probably need to troubleshoot the load-balancer and for that you need access with SSH to the load-balancer instance. Now the problem is that by default Eucalyptus doesn’t give SSH keys to the load-balancer instances, so we need to do some steps to tell Eucalyptus to give these SSH keys where needed. So first generate a key with euca-create-keypair:
# euca-create-keypair euca-admin-lb > euca-admin-lb.priv
# chmod 0600 euca-admin-lb.priv
The the cloud property ‘loadbalancing.loadbalancer_vm_keyname’ governs the keypair assignments, so we modify it like this:
euca-modify-property -p loadbalancing.loadbalancer_vm_keyname=euca-admin-lb
— OPTIONAL, BUT RECOMMENDED SECTION END–
=====================================================================================
To create a load-balancer, we will use the eulb-create-lb command, the parameters are very simple at this point as we will only use the HTTP for load-balancing with default settings (more information about the settings can be found in the –help of the command, or on eucalyptus.com documentations)
# eulb-create-lb -z default -l "lb-port=80, protocol=HTTP, instance-port=80, instance-protocol=HTTP" DemoLB
DNS_NAME        DemoLB-121804880595.lb.localhost
You can also again check the load-balancer with eulb-describe-lbs
# eulb-describe-lbs
LOAD_BALANCER   DemoLB  DemoLB-121804880595.lb.localhost        2015-01-28T18:19:50.819Z
Every load-balancer needs a health-checking mechanism, this we can add using this command:
# eulb-configure-healthcheck --healthy-threshold 2 --unhealthy-threshold 2 --interval 15 --timeout 30 --target http:80/index.html DemoLB
HEALTH_CHECK    HTTP:80/index.html      15      30      2       2
The above command will create a load-balancer check that is checking an URL of /index.html every 15 seconds, failure of a test is after timeout of 30 seconds and two consecutive failures means server down and two consequent successful tests mean the server is back up.
Step 7: Server configuration scripts after booting (in auto-scaling)
If we want to do auto-scaling demo, the empty servers booting has to have some way to prepare the server after boot for real work. Because we are working here with HTTP servers, we need a small script, that will install apache2 server and configure a basic index.html webpage.
This is a script that we will use as part of a “launch-configuration” to do example configuration of a server instance after start:
#!/bin/bash
#
# This small script will prepare a virtual image in eucalyptus to perform
# as a small web server

# PART I.
# GET its own local identification

local_ipv4=$(curl -qs http://169.254.169.254/latest/meta-data/local-ipv4)
public_ipv4=$(curl -qs http://169.254.169.254/latest/meta-data/public-ipv4)
hostname=instance-${local_ipv4//./-}.networkgeekstuff.com
hostname $hostname

# PART II.
# Setup hosts
cat << EOF >> /etc/hosts
$local_ipv4   $hostname ${hostname%%.*}
EOF

# PART III.
# install apache
yum install -y httpd mod_ssl

# PART IV.
# configure apache to display a test page that will show our test message
cat << EOF >> /var/www/html/index.html
<!DOCTYPE html>
<html>
<head>
<title>Welcome networkgeekstuff.com eucalyptus demo system instance</title>
</head>
<body>
<h1>Welcome networkgeekstuff.com eucalyptus demo system instance</h1>

<p> You are visiting demo system configured by script from networkgeekstuff.com Eucalyptus tutorial </p>
<p> System ID is : $(hostname) </p>
</body>
</html>
EOF

# PART V.
# configure apache to start on boot
chkconfig httpd on
service httpd start
Tak this script and save it as a file /root/demo-lanuch-configuration-script.sh
Now lets take this script and make it part of a DemoLC launch configuration in eucalyptus with euscale-create-launch-config , we will use our Fedora20 image ID of emi-0676ae2c.
# euscale-create-launch-config DemoLC --image-id emi-0676ae2c --instance-type m1.small \
           --monitoring-enabled --key my-first-keypair --group=DemoSG \
           --user-data-file=/root/demo-lanuch-configuration-script.sh
Now have a look on the launch-configuration with euscale-describe-launch-configs, where our DemoLC is visible:
# euscale-describe-launch-configs
LAUNCH-CONFIG   DemoLC  emi-0676ae2c    m1.small
LAUNCH-CONFIG   lc-euca-internal-elb-121804880595-DemoLB-81abd4bf       emi-dc054c35    m1.small              loadbalancer-vm-121804880595-DemoLB
LAUNCH-CONFIG   M1-SMALL-FEDORA emi-0676ae2c    m1.small
Step 8: Creating the auto-scaling group
=====================================================================================
— OPTIONAL START: VERIFY YOU HAVE ENOUGH RESOURCES FOR MULTIPLE INSTANCES —
Before we go further I want to present to you something that was a problem for me when I was first attempting to create this auto-scaling system. My problem was that despite that I have enough RAM in my eucalyptus host (~8GB), I was not able to start more than 2 instances because of resource quotas and the auto-scaling was simply quietly failing in the background. Therefore you should first manually check if you can create at least 3 instances manually in the dashboard/webGUI (whe one running on 8888 port).
You can either start creating new instances via the webGUI interface and wait until you hit this error:

The problem that I had was that I had enough RAM, definitely enough to have several t1.small instances (256MB RAM each) running, but something was blocking me, what I found out was that each eucalyptus node (ergo server registered in the control system as place capable of hosting instances) has a quota limits that can be viewed with euca-describe-availability-zones verbose command. This is what I got when I had my problems:
# euca-describe-availability-zones verbose
AVAILABILITYZONE        default 192.168.125.3 arn:euca:eucalyptus:default:cluster:default-cc-1/
AVAILABILITYZONE        |- vm types     free / max   cpu   ram  disk
AVAILABILITYZONE        |- m1.small     0000 / 0001   1    256     5
AVAILABILITYZONE        |- t1.micro     0000 / 0001   1    256     5
AVAILABILITYZONE        |- m1.medium    0000 / 0001   1    512    10
AVAILABILITYZONE        |- c1.medium    0000 / 0000   2    512    10
AVAILABILITYZONE        |- m1.large     0000 / 0000   2    512    10
<<omitted>>
Notice the free and max columns, this is the maximum amount of instances your eucalyptus node will allow you to launch! And 1 instance maximum is definitely not enough for an auto-scaling tutorial we are running here. So here is how to extend this limit, but note that your are responsible for managing your own RAM limits when you do this.
EDIT file /etc/eucalyptus/aucalyptus.conf and look for a parameter “MAX_CORES=0“. And increase the value, afterwards restart the eucalytus process with # service eucalyptus-cloud restart or # service eucalyptus-nc restart reboot.
I for example changed MAX_CORES=4 and as such I get the following availabilities in the cloud:
# euca-describe-availability-zones verbose
AVAILABILITYZONE        default 192.168.125.3 arn:euca:eucalyptus:default:cluster:default-cc-1/
AVAILABILITYZONE        |- vm types     free / max   cpu   ram  disk
AVAILABILITYZONE        |- m1.small     0004 / 0004   1    256     5
AVAILABILITYZONE        |- t1.micro     0004 / 0004   1    256     5
AVAILABILITYZONE        |- m1.medium    0002 / 0002   1    512    10
AVAILABILITYZONE        |- c1.medium    0002 / 0002   2    512    10
AVAILABILITYZONE        |- m1.large     0002 / 0002   2    512    10
AVAILABILITYZONE        |- m1.xlarge    0002 / 0002   2   1024    10
AVAILABILITYZONE        |- c1.xlarge    0002 / 0002   2   2048    10
AVAILABILITYZONE        |- m2.xlarge    0002 / 0002   2   2048    10
AVAILABILITYZONE        |- m3.xlarge    0001 / 0001   4   2048    15
AVAILABILITYZONE        |- m2.2xlarge   0000 / 0000   2   4096    30
— OPTIONAL END: VERIFY YOU HAVE ENOUGH RESOURCES FOR MULTIPLE INSTANCES —
=====================================================================================
Now we are going to prepare a auto-scaling group that will be driving starting and shutdowns of server as needed, the command used is euscale-create-auto-scaling-group and we will reference both the load-balancer DemoLB and the launch-configuration DemoLC we created in previous steps.
# euscale-create-auto-scaling-group DemoASG --launch-configuration DemoLC \
             --availability-zones default --load-balancers DemoLB \
             --min-size 1 --max-size 3 --desired-capacity 1
You can again then verify the auto-scaling groups existence with euscale-describe-auto-scaling-groups command as below:
# euscale-describe-auto-scaling-groups
AUTO-SCALING-GROUP      DemoASG DemoLC  default DemoLB  1       3       1       Default
AUTO-SCALING-GROUP      asg-euca-internal-elb-121804880595-DemoLB       lc-euca-internal-elb-121804880595-DemoLB-81abd4bf      default         1       1       1       Default
INSTANCE        i-b764ff79      default InService       Healthy lc-euca-internal-elb-121804880595-DemoLB-81abd4bf
Step 9: Creating scaling-policy for both increase and decrease of instance counts
With the following command euscale-put-scaling-policy we will define a policy for changing scaling capacity based, as name suggest we will in the second step make this policy behavior based on CPU alarms.
# euscale-put-scaling-policy DemoHighCPUPolicy --auto-scaling-group DemoASG --adjustment=1 --type ChangeInCapacity
arn:aws:autoscaling::121804880595:scalingPolicy:4952e021-f20d-4180-a971-8de31dcbe610:autoScalingGroupName/DemoASG:policyName/DemoHighCPUPolicy
Now the second part is to create and alarm and monitor the CPU usage, for that we will use the euwatch-put-metric-alarm command, and at the end in the –alarm-action we will use the auto-scale policy ID from the previous command.
# euwatch-put-metric-alarm DemoAddNodesAlarm --metric-name CPUutilization \
--unit Percent --namespace "AWS/EC2" --statistic Average --period 120 --threshold 50 \
--comparison-operator GreaterThanOrEqualToThreshold --dimensions "AutoScalingGroupName=DemoASG" --evaluation-periods 2 \
--alarm-action arn:aws:autoscaling::121804880595:scalingPolicy:4952e021-f20d-4180-a971-8de31dcbe610:autoScalingGroupName/DemoASG:policyName/DemoHighCPUPolicy
NOW WE REPEAT THESE STEP WITH DIFFERENT PARAMETERS TO CREATE SCALE-DOWN POLICY
The differences are:
DemoDelNodesAlarm (changed name)
— adjustment = -1 (to have a decrease in number of instances)
— threshold 10 (to check when CPU utilization on instance is below 10%)
–comparison-operator LessThanOrEqualToThreshold (to check below the 10% CPU threshold)
# euscale-put-scaling-policy DemoLowCPUPolicy --auto-scaling-group DemoASG --adjustment=-1 --type ChangeInCapacity
arn:aws:autoscaling::121804880595:scalingPolicy:784c3b5a-17ef-4cbe-9743-4d55623c8faa:autoScalingGroupName/DemoASG:policyName/DemoLowCPUPolicy
# euwatch-put-metric-alarm DemoDelNodesAlarm --metric-name CPUutilization \
--unit Percent --namespace "AWS/EC2" --statistic Average --period 120 --threshold 10 \
--comparison-operator LessThanOrEqualToThreshold --dimensions "AutoScalingGroupName=DemoASG" --evaluation-periods 2 \
--alarm-action arn:aws:autoscaling::121804880595:scalingPolicy:784c3b5a-17ef-4cbe-9743-4d55623c8faa:autoScalingGroupName/DemoASG:policyName/DemoLowCPUPolicy
Step 10: Creating a termination policy
One thing that we omitted in the previous scale-down policy is to say which instance should be terminated from the group of instances running. At this moment we will simply choose one of the pre-set options that is called OldestLaunchConfiguration. This method will during scale-down policy shutdown that instance, that has the oldest version of configuration script from Step 7 (ergo it is expected that you will update these scripts over time).
# euscale-update-auto-scaling-group DemoASG --termination-policies "OldestLaunchConfiguration"
REMARK: This method actually has one additional use-case, imagine that you are doing an application update (for example new version of webpage rolled out to the instances), for something like this you can modify the server configuration script from Step 7 and then just increasing the load will launch a new auto-scaled instance with new webpage and after a while, when the system will be scaling-done the instance cluster, it will shutdown specifically those servers that are running with the oldest version of the server configuration script. This way you can technically do a rolling updates across all your instances as a “trick”.
Step 11: Verification that auto-scaling is running the first instance
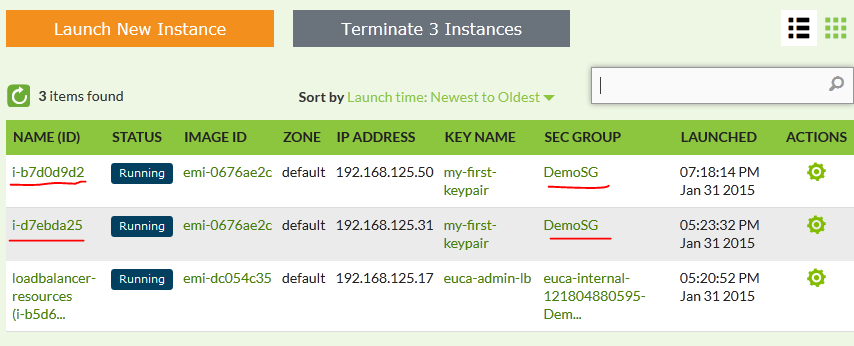
Ok, so everything is actually configured, now the auto-scaling group should have already created the initial instance. On this point I will show the webGUI view on the running instances, but I really recommend you to re-run all the commands from Step 4 to give yourself the full view on how the auto-scaling and instance status looks like from the console commands perspective.
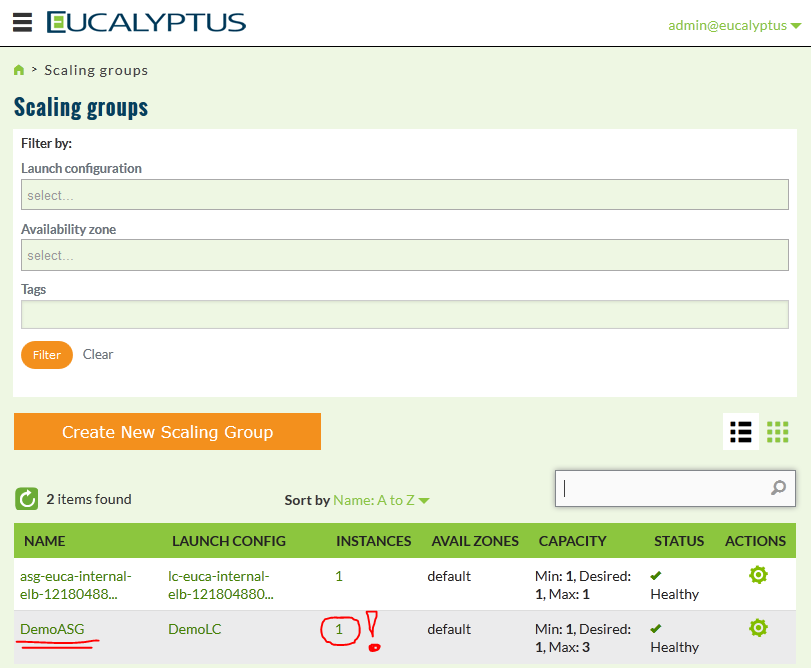
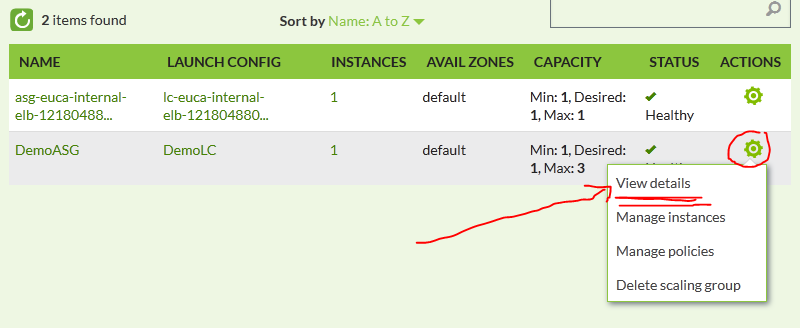
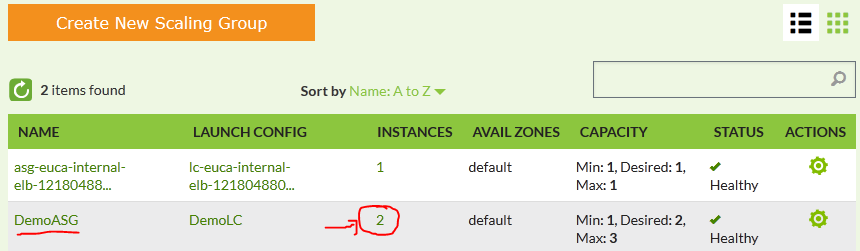
If you go to webGUI, then immediatelly enter the “SCALING-GROUPS” view and you will see two groups exist, one is internal system for load-balancer resouces, which is a result of your DemoLB, but you do not have to care about this, the second however is your DemoASG and you should see the number of instances on 1! This is the view:
Next we will check the details, select the gear icon and select View details…
In this view, select “Instances” tab and you should see your auto-scaled instance ID i-db9ead12:
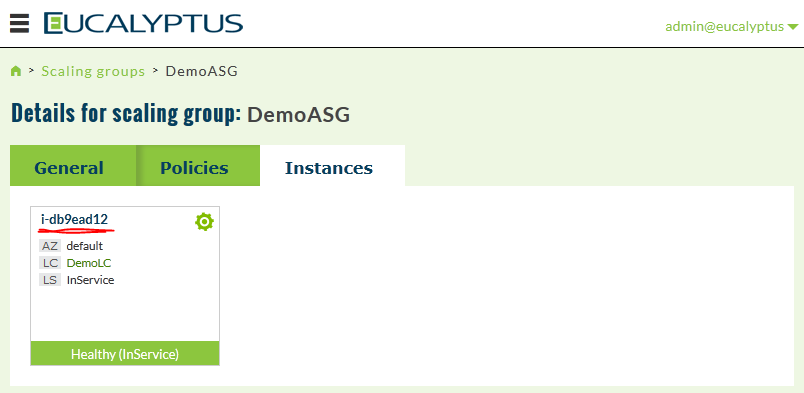
Now that we have our ID, lets go check the instance details in the main view “Instances” view (go back to dashboard and select Running instances there):
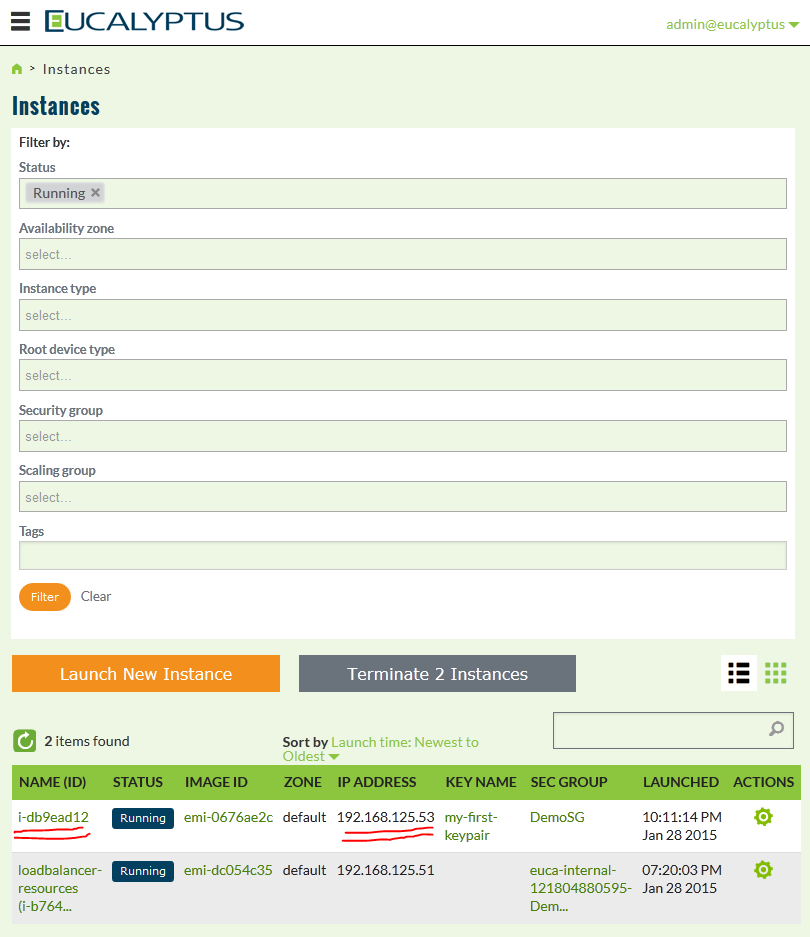
Ok, now we have an IP address, lets go connect to it! If you followed my steps from the beginning, you should have the my-first-keypair.pem file in the /root directory. So you can use it to connect to the fedora image like this:
# ssh -i ./my-first-keypair.pem fedora@192.168.125.53
Last login: Wed Jan 28 22:14:20 2015 from 192.168.125.53
[fedora@instance-192-168-125-74 ~]$
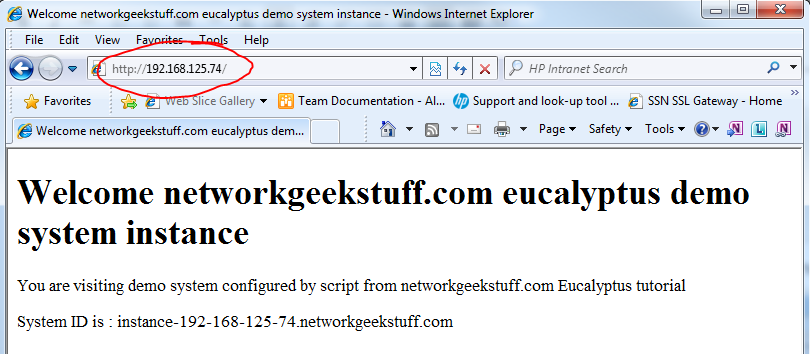
Immediatelly please notice that the hostname of the target system is “instance-192-168-125-74” what means that our configuration script has worked!!! Maybe it will take some time to finish the whole configuration (like apache2 installation), but lets check if the HTTP service is running already with the netstat command.
[fedora@instance-192-168-125-74 ~]$ sudo netstat -tl
Active Internet connections (only servers)
Proto Recv-Q Send-Q Local Address           Foreign Address         State
tcp        0      0 0.0.0.0:ssh             0.0.0.0:*               LISTEN
tcp6       0      0 [::]:http               [::]:*                  LISTEN
tcp6       0      0 [::]:ssh                [::]:*                  LISTEN
tcp6       0      0 [::]:https              [::]:*                  LISTEN
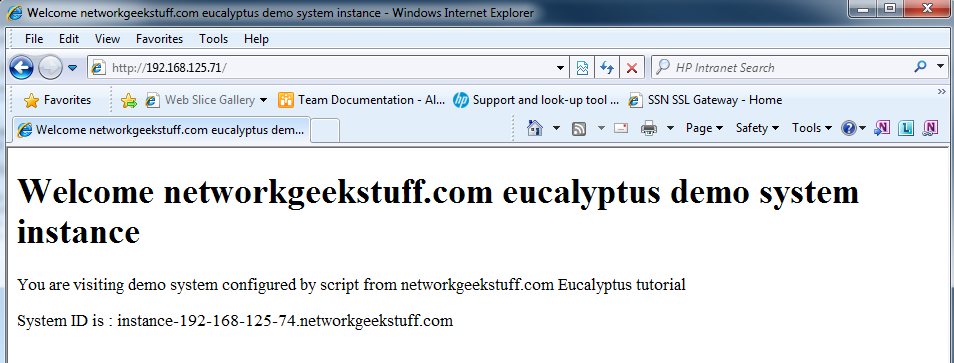
As you can see, HTTP is running, so lets point our browser to it (using either the internal 192.168.125.53 OR the external 192.168.125.74 IP) and check what we will find:

Now also you should check the access via the load-balancer, if everything works, you should also via the load-balancer, first check the IP of the load-balancer via the webGUI, go to Running instances again and select details of the load-balancer instance running.
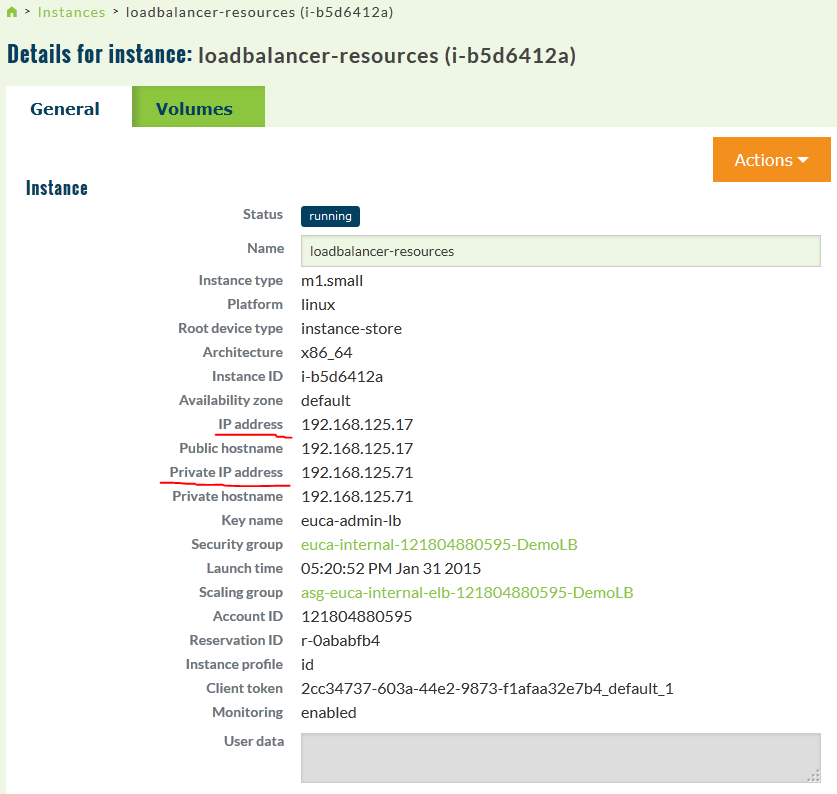
So to test access, point your browser also to the public IP of the load-balancer that is the 192.168.125.71 and you should see access to one of the running instances, in this case only the one 192.168.125.74:
BONUS Step if not working: Troubleshooting load-balancer if needed.
When I have tried accessing the test webpage via Load-Balancer for the first time, it was not working, after double-checking everything I concluded that something must be wrong with the Eucalyptus Load-Balancers used in the auto-scaling. But how to troubleshoot this ? Well the point is that from the eucalyptus system, you can only check how the load-balancer considers the server HTTP system alive or not with the eulb-describe-instance-health command. This was specifically my problem, the server (despite running HTTP and test page) was considered “OutOfService”.
# eulb-describe-instance-health DemoLB
INSTANCE        i-7ddcfe12      OutOfService
Ok, so we need to check the load-balancer operation, and for that we need to enter it. First list out the instances and look for the load-balancer, in the webGUI you can find the loadbalancer in the running instances, and select detailed view:
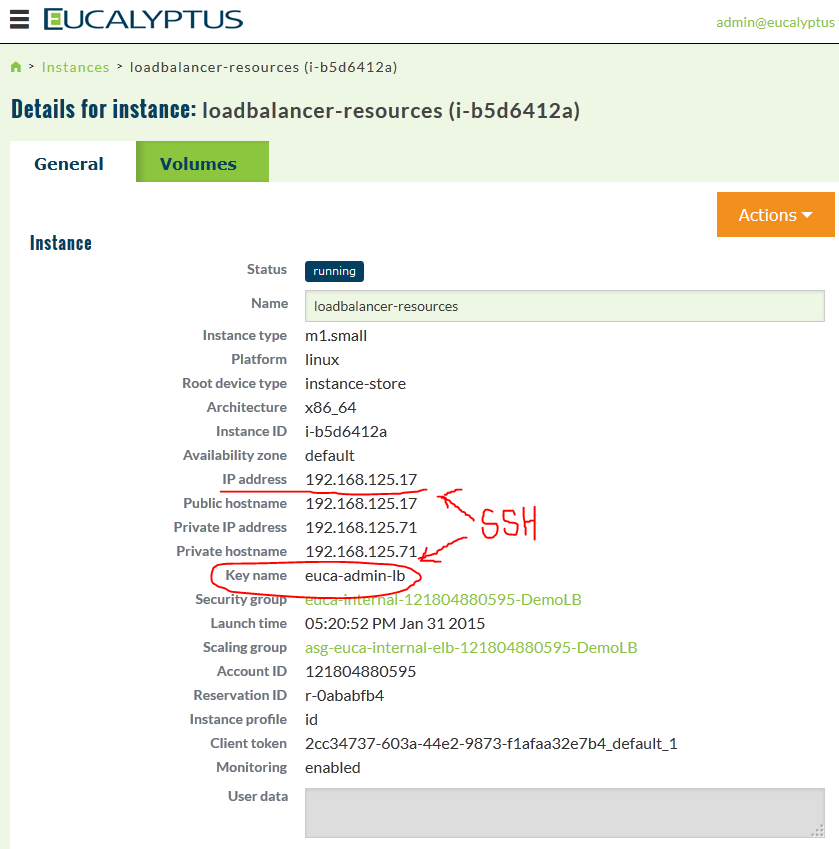
Notice the Instance ID of i-b5d6412a in the GUI, we can find this also in the console instances view:
# euca-describe-instances
RESERVATION     r-4d06d56c      121804880595    euca-internal-121804880595-DemoLB
INSTANCE        i-b5d6412a      emi-dc054c35    192.168.125.92  192.168.125.92  running     euca-admin-lb         m1.small        2015-01-29T08:02:55.934Z        default                         monitoring-enabled      192.168.125.92       192.168.125.92                  instance-store                                  hvm             cde4677e-a6c6-4eee-8f8f-a2a95e54a9ad_default_1  sg-0c984bf7                     arn:aws:iam::121804880595:instance-profile/internal/loadbalancer/loadbalancer-vm-121804880595-DemoLB x86_64
TAG     instance        i-d4cea9f5      Name    loadbalancer-resources
TAG     instance        i-d4cea9f5      aws:autoscaling:groupName       asg-euca-internal-elb-121804880595-DemoLB
TAG     instance        i-d4cea9f5      euca:node       192.168.125.3
Right behind the “running” word is the key pair that the load-balancer instance is using, which is of course the euca-admin-lb that the created Step 6 optional section. If you didn’t done this, you probably see “0” instead of key and this means that there is no SSH keypair deployed in the load-balancer and you cannot connect there now! However if you have done the optional part of Step 6, you can now connect to the loadbalancer with SSH like this:
# ssh -i euca-admin-lb.priv root@192.168.125.17
Once inside the load-balancer, the main cause for me was the NTP not synchronized.
Here are the LOGs : /var/log/load-balancer-servo/servo.log , my error that pointed me to NTP was:
servo [ERROR]:failed to report the cloudwatch metrics: [Errno -2] Name or service not known
Step 12: Verify the auto-scaling work with CPU stress tests
Now we have the auto-scaling configured, we have policy to increase and to decrease the number of instances based on CPU load, so lets test it. Right now our group has a minimum running instances of 1, lets try to push it to 2 with loading the CPU a little bit up.
To have a tool to push CPU usage up, install “stress” to the
# yum install -y stress
Now, have a look on the auto-scaling group in the webGUI, there is a default cooldown period in seconds between scaling events, therefore we must product a CPU usage above 50% cpu for more than 300 seconds in order to have a trigger. And for that we use the stress tool like this (running from inside the instance):
# stress -c 4 -t 600
This will generate a CPU load inside the instance that should trigger a scaling event.
top - 18:19:08 up 53 min,  2 users,  load average: 101.24, 85.11, 45.10
Tasks: 174 total, 102 running,  72 sleeping,   0 stopped,   0 zombie
%Cpu(s):  0.0 us,  0.0 sy,  0.0 ni,  0.0 id,  0.0 wa, 98.0 hi,  0.0 si, 95.0 st
KiB Mem:    245364 total,   240940 used,     4424 free,     7808 buffers
KiB Swap:        0 total,        0 used,        0 free,   124428 cached

  PID USER      PR  NI    VIRT    RES    SHR S %CPU %MEM     TIME+ COMMAND
  866 root      20   0    7268     92      0 R  23.6  0.0   0:00.75 stress
  867 root      20   0    7268     92      0 R  23.6  0.0   0:00.75 stress
  868 root      20   0    7268     92      0 R  23.6  0.0   0:00.75 stress
  869 root      20   0    7268     92      0 R  23.6  0.0   0:00.75 stress
Alternative, if stress is not generating enough CPU load is to use superPi or for 64bit only linux then this version of y-cruncher pi
Watching the triggers and alarms status:
# euwatch-describe-alarms
DemoAddNodesAlarm       OK       arn:aws:autoscaling::121804880595:scalingPolicy:087c4635-6bed-4578-af94-1a167479a4ae:autoScalingGroupName/DemoASG:policyName/DemoHighCPUPolicy      AWS/EC2 CPUutilization  120     Average 2       GreaterThanOrEqualToThreshold   20.0
DemoDelNodesAlarm       OK       arn:aws:autoscaling::121804880595:scalingPolicy:fa7de436-5548-4791-9c18-6ef73fb4b375:autoScalingGroupName/DemoASG:policyName/DemoLowCPUPolicy       AWS/EC2 CPUutilization  120     Average 2       LessThanOrEqualToThreshold      10.0
Specifically if you want history of the data that the alarms use as “input” you can go directly for the metric for CPUutilization like this
# euwatch-get-stats -n AWS/EC2 -s Average --period 120 --dimensions "AutoScalingGroupName=DemoASG" CPUUtilization
2015-01-31 16:50:00             0.7666666666666666                              Percent
2015-01-31 16:52:00             0.7350993377483444                              Percent
2015-01-31 16:54:00             0.7248322147651006                              Percent
2015-01-31 16:58:00             2.2333333333333334                              Percent
2015-01-31 17:00:00             6.119205298013245                               Percent
2015-01-31 17:04:00             21.381270903010034                              Percent
2015-01-31 17:08:00             0.8400000000000001                              Percent
2015-01-31 17:10:00             4.523178807947019                               Percent
2015-01-31 17:12:00             43.50666666666667                               Percent
2015-01-31 17:14:00             41.463087248322154                              Percent
2015-01-31 17:18:00             33.01324503311258                               Percent
2015-01-31 17:20:00             36.28                           Percent
2015-01-31 17:22:00             4.3892617449664435                              Percent
2015-01-31 17:24:00             8.920529801324504                               Percent
2015-01-31 17:28:00             11.355704697986576                              Percent
2015-01-31 17:30:00             3.4172185430463577                              Percent
2015-01-31 17:32:00             3.0134228187919465                              Percent
2015-01-31 17:34:00             33.81456953642384                               Percent
2015-01-31 17:38:00             8.080536912751677                               Percent
2015-01-31 17:40:00             23.2317880794702                                Percent
Worst case scenario if you have problem triggering the alarms, you can do it manually like this by setting the alarm state to “ALARM”:
euwatch-set-alarm-state --state-value ALARM --state-reason Testing DemoAddNodesAlarm
If successful, you will see two INSTANCES,one old and one new that was launched under the auto-scaling group:
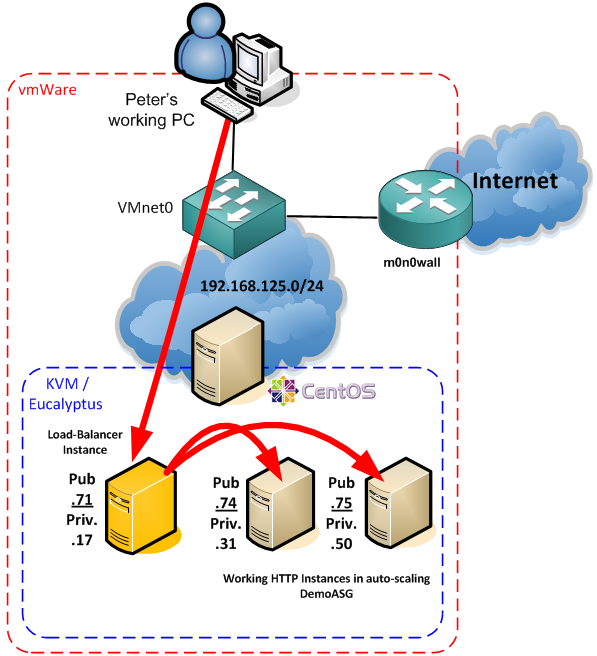
In summary
Now after all is finished, and the auto-scaling is working, you technically have something like shown in the diagram below. To test/verify, I encourage you to use all of the commands that I presented during the tutorial, the euca*, eulb*, euwatch* to verify the functionality. I understand that there are probably many other questions here, specifically about the load-balancer internal functions, but this calls actually for actually start learning Eucalyptus for production deployment and that is right now beyond the target of this quick introduction article. But feel free to check the external links below for more information on eucalyptus (especially the administrator guide).
External resources:
Eucalyptus Documentation – https://www.eucalyptus.com/docs/eucalyptus/4.1.0/index.html
Eucalyptus Administrator Guide – https://www.eucalyptus.com/docs/eucalyptus/4.1.0/admin-guide/index.html
To meet other people and get community support, go for IRC to #freenode.com and go for #eucalyptus channel
when i am install backport 3.12.1 every thing goes right but when i type make it’s always shows me /————–
| Your kernel headers are incomplete/not installed.
| Please install kernel headers, including a .config
| file or use the KLIB/KLIB_BUILD make variables to
| set the kernel to build against, e.g.
| make KLIB=/lib/modules/3.1.7/
| to compile/install for the installed kernel 3.1.7
| (that isn’t currently running.)
\–
make[1]: *** [modules] Error 1
make: *** [default] Error 2
it is very minor error 🙂
you have not installed kernel headers so i just type root@choco:/usr/src/backports-3.12-1# apt-get install -y linux-headers-$(uname -r)
Reading package lists… Done
Building dependency tree
Reading state information… Done
E: Unable to locate package linux-headers-3.14-kali1-686-pae
E: Couldn’t find any package by regex ‘linux-headers-3.14-kali1-686-pae’
and shows me this msg show above and i hae checked my reposetory
## Regular repositories
root@choco:/etc/apt# cat sources.list
deb http://http.kali.org/ /kali main contrib non-free
deb http://http.kali.org/ /wheezy main contrib non-free
deb http://http.kali.org/kali kali-dev main contrib non-free
deb http://http.kali.org/kali kali-dev main/debian-installer
deb-src http://http.kali.org/kali kali-dev main contrib non-free
deb http://http.kali.org/kali kali main contrib non-free
deb http://http.kali.org/kali kali main/debian-installer
deb-src http://http.kali.org/kali kali main contrib non-free
deb http://security.kali.org/kali-security kali/updates main contrib non-free
deb-sr
actually am doing these thing because my wireless card stuck on fixed channel -1 that’s why i am trying to install backpoert
my first step to install backpoert are
cd /usr/src/
sudo wget https://www.kernel.org/pub/linux/kernel/projects/backports/stable/v3.12/backports-3.12-1.tar.bz2
tar xvf backports-3.12-1.tar.bz2
cd backports-3.12-1
sudo apt-get install patch
sudo wget http://patches.aircrack-ng.org/mac80211.compat08082009.wl_frag+ack_v1.patch
sudo patch -p1 < mac80211.compat08082009.wl_frag+ack_v1.patch
sudo apt-get install libncurses5-dev
make defconfig-ath9k \\ after entering this command shows me msg install kernel header
please sir help me i have seen many of article but can't find the way
i think you can help me
I have a feeling you are simply missink the kernel-devel packages. But I see you are using Kali which is a distribution I am now familiar with in detail (other than the wifi hacking tutorials here). But since it is based on ububntu, maybe simply “apt-get install linux-headers” ?