


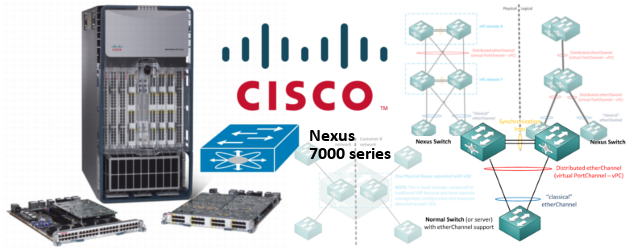
Nexus 7k – Getting Started Examples – Part1 (basics, VDC and vPC)
So I finally had a project with Cisco Nexus switches to finally get hands on experience on these boxes. I am no longer a fanboy of Cisco, so just practically, this article is a summary of my notes and example configurations that I have put together as a documentation for myself and now I will kind of share them with you. First of all, when I started writing this article it was November 2013 and Nexus 9000 were just released, note that this articles is based on Nexus 7000 series and not the new 9000 series. Sorry, not chance to get to 9000 yet, maybe later.
Let’s get started. Similarly as with my previous IOS XR Getting Started Guide (part 1 and part 2), I will go over the very quick overview and then show basically a snapshots of configuring some elemental configurations. There is actually one advantage over the IOS XR in that the NX-IOS has and that is that it is more similar to the classical IOS we all know.
Contents
Basic commands to verify hardware, software and license
So the basic show version is of course available, here is an example.
nexus7000# show version
Cisco Nexus Operating System (NX-OS) Software
TAC support: http://www.cisco.com/tac
Documents: http://www.cisco.com/en/US/products/ps9372/tsd_products_support_serie
s_home.html
Copyright (c) 2002-2012, Cisco Systems, Inc. All rights reserved.
The copyrights to certain works contained in this software are
owned by other third parties and used and distributed under
license. Certain components of this software are licensed under
the GNU General Public License (GPL) version 2.0 or the GNU
Lesser General Public License (LGPL) Version 2.1. A copy of each
such license is available at
http://www.opensource.org/licenses/gpl-2.0.php and
http://www.opensource.org/licenses/lgpl-2.1.php

Software
  BIOS:      version 2.8.0
  kickstart: version 6.1(2)
  system:    version 6.1(2)
  BIOS compile time:       06/09/12
  kickstart image file is: bootflash:///n7000-s2-kickstart.6.1.2.bin
  kickstart compile time:  12/25/2020 12:00:00 [10/26/2012 04:38:27]
  system image file is:    bootflash:///n7000-s2-dk9.6.1.2.bin
  system compile time:     9/7/2012 13:00:00 [10/26/2012 05:44:25]

Hardware
  cisco Nexus7000 C7004 (4 Slot) Chassis ("Supervisor module-2")
  Intel(R) Xeon(R) CPU         with 32745272 kB of memory.
  Processor Board ID JAQH632ANGS

  Device name: nexu7000
  bootflash:    2007040 kB
  slot0:              0 kB (expansion flash)

Kernel uptime is 0 day(s), 18 hour(s), 19 minute(s), 15 second(s)

Last reset at 24374 usecs after  Mon Jul 29 20:16:46 2013

  Reason: Reset Requested by CLI command reload
  System version: 6.1(2)
  Service:

plugin
  Core Plugin, Ethernet Plugin
Then we can check the modules installed with show module.
nexus7000# show module

Mod  Ports  Module-Type                         Model              Status
---  -----  ----------------------------------- ------------------ ----------
1    0      Supervisor module-2                 N7K-SUP2E          active *
3    48     10/100/1000 Mbps Ethernet XL Module N7K-M148GT-11L     ok
4    48     1/10 Gbps Ethernet Module           N7K-F248XP-25E     ok

Mod  Sw              Hw
---  --------------  ------
1    6.1(2)          1.0
3    6.1(2)          1.2
4    6.1(2)          1.0

Mod  MAC-Address(es)                         Serial-Num
---  --------------------------------------  ----------
1    84-88-ac-58-02-c3 to 84-88-ac-58-02-e6  EEF4492KKCS
3    00-99-f6-c1-55-ff to 00-ff-f6-83-86-32  JHFCU555RRA
4    84-78-0f-0f-66-ff to 84-78-56-0f-66-39  JQU1714AKOI

Mod  Online Diag Status
---  ------------------
1    Pass
3    Pass
4    Pass

* this terminal session
What is more important on Nexus in comparison to what I consider the usual is the more strict license rules. To check what licenses are currently loaded to your Nexus, check the show license usage.
nexus7000# show license usage
Feature                      Ins  Lic   Status Expiry Date Comments
                                 Count
--------------------------------------------------------------------------------
MPLS_PKG                      Yes   -   Unused 14 Dec 2014 -
STORAGE-ENT                   No    -   Unused             -
VDC_LICENSES                  Yes   4   In use 14 Dec 2014 -
ENTERPRISE_PKG                No    -   Unused             -
FCOE-N7K-F132XP               No    0   Unused             -
FCOE-N7K-F248XP               No    0   Unused             -
ENHANCED_LAYER2_PKG           Yes   -   In use 14 Dec 2014 -
SCALABLE_SERVICES_PKG         No    -   Unused             -
TRANSPORT_SERVICES_PKG        Yes   -   Unused 14 Dec 2014 -
LAN_ADVANCED_SERVICES_PKG     Yes   -   In use 14 Dec 2014 -
LAN_ENTERPRISE_SERVICES_PKG   Yes   -   Unused 14 Dec 2014 -
--------------------------------------------------------------------------------
Configuration checkpoints and rollback
And this is something that I really love, you can create your something called checkpoints of the configuration so that you are very easily able to do recovery to older configurations very easily and quickly. In the following example I will create loopback 1 interface with IP 1.1.1.1, then save snapshot0 with checkpoint snapshot0 and then reconfigure interface loopback 1 with IP 2.2.2.2. Once done, you can see how nicely you can recover back to the original configuration with IP 1.1.1.1.
nexus7000# conf t
Enter configuration commands, one per line.  End with CNTL/Z.
nexus7000(config)# interface loopback 1
nexus7000(config-if)# ip address 1.1.1.1/32
nexus7000(config-if)# no shutdown
nexus7000(config-if)# exit
nexus7000(config)# exit
nexus7000# checkpoint snapshot0
Done
nexus7000# conf t
Enter configuration commands, one per line.  End with CNTL/Z.
nexus7000(config)# interface loopback 1
nexus7000(config-if)# ip address 2.2.2.2/32
nexus7000(config-if)# exit
nexus7000(config)# exit
nexus7000# show running-config interface loopback 1

!Command: show running-config interface loopback1
!Time: Tue Jul 30 15:06:05 2013
version 6.1(2)

interface loopback1
  ip address 2.2.2.2/32

nexus7000# rollback ?
  running-config  Rollback running configuration

nexus7000# rollback running-config ?
  checkpoint  Rollback running configuration to checkpoint
  file        Rollback running configuration to configuration file

nexus7000# rollback running-config checkpoint ?
  baseline
  snapshot0
  snapshot1

nexus7000# rollback running-config checkpoint snapshot0 ?
  <CR>
  atomic                 Stop rollback and revert to original configuration (default)
  best-effort            Skip errors and proceed with rollback
  stop-at-first-failure  Stop rollback at the first error
  verbose                Show the execution log

nexus7000# rollback running-config checkpoint snapshot0 best-effort verbose
Collecting Running-Config
#Generating Rollback Patch
Executing Rollback Patch
========================================================
`conf t`
`interface loopback1`
`ip address 1.1.1.1/32`
========================================================

Rollback completed successfully.

nexus7000#
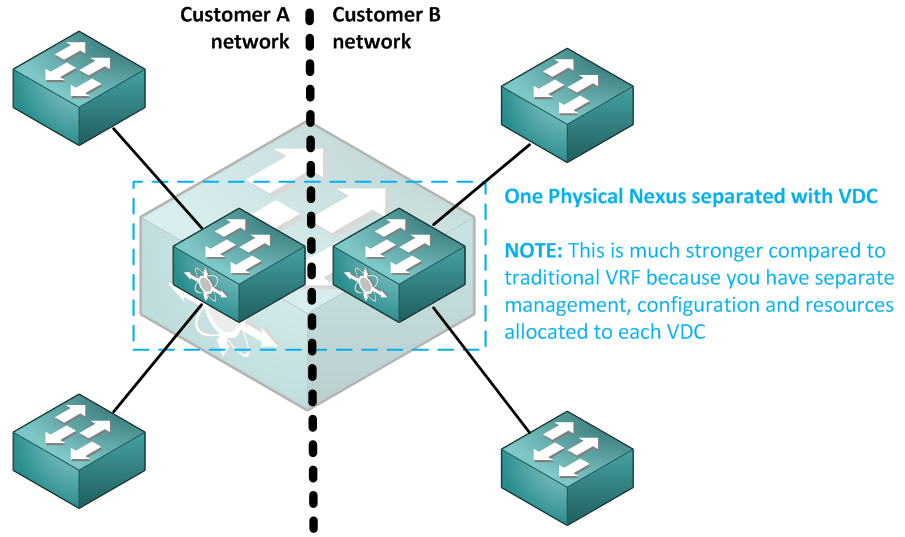
Nexus Virtual Device Context (VDC)
So lets start with the first technology, the VDC is something like VRF on steroids, you can separate the nexus system into several small individual systems with their own resources, dedicated interfaces and independent configuration files. By default you can have 8 VDC contexts on a Nexus 7000, but right now I will just use a few to illustrate what this brings to us.
First command vdc tinyVdc in global configuration mode will created the VDC that I called tinyVfc.
nexus7000(config)# vdc tinyVdc

Note:  Creating VDC, one moment please ...

nexus7000(config-vdc)# do show vdc

vdc_id  vdc_name                          state               mac                 type        lc
------  --------                          -----               ----------          ---------   ------
1       nexus7000                         active              84:78:ac:59:66:41   Admin       None
2       tinyVdc                           active              84:78:ac:59:66:46   Ethernet    m1 f1 m1xl m2xl
Then you can allocate interfaces to the created VDC with allocate interface command.
nexus7000(config-vdc)# allocate interface ethernet 4/5 - 8

Moving ports will cause all config associated to them in source vdc to be removed.
Are you sure you want to move the  ports (y/n)?  [yes] y

ERROR: 1 or more interfaces are from a module of type not supported by this vdc
As you see, there is a limit with F2 modules, that are not by default allowed (as you can see on show vdc above) and then we can allocate the interfaces without error.
nexus7000(config-vdc)# limit-resource module-type f2

This will cause all ports of unallowed types to be removed from this vdc. Continue (y/n)? [yes] y

nexus7000(config-vdc)# allocate interface ethernet 4/5 - 8

Moving ports will cause all config associated to them in source vdc to be removed.
Are you sure you want to move the  ports (y/n)?  [yes] y
Just to check the port allocations, you can have a look on show vdc membership module command.
nexus7000(config-vdc)# do show vdc membership module

vdc_id: 0 vdc_name: Unallocated interfaces:
        Ethernet4/17          Ethernet4/18          Ethernet4/19
        Ethernet4/20          Ethernet4/25          Ethernet4/26
        Ethernet4/27          Ethernet4/28          Ethernet4/29
        Ethernet4/30          Ethernet4/31          Ethernet4/32
        Ethernet4/33          Ethernet4/34          Ethernet4/35
        Ethernet4/36          Ethernet4/37          Ethernet4/38
        Ethernet4/39          Ethernet4/40          Ethernet4/41
        Ethernet4/42          Ethernet4/43          Ethernet4/44
        Ethernet4/45          Ethernet4/46          Ethernet4/47
        Ethernet4/48

vdc_id: 6 vdc_name: tinyVdc interfaces:
        Ethernet4/5           Ethernet4/6           Ethernet4/7
        Ethernet4/8
Each VDC has a resource limits associated with it, you can check the defaults already appeared in the running-config in vdc section. To see only this section, use show running-config vdc all command.
nexus7000# show running-config vdc all

!Command: show running-config vdc
!Time: Mon Jul 29 11:50:54 2013

version 6.1(2)
no vdc combined-hostname
system admin-vdc
vdc nexus7000 id 1
  cpu-share 5
  limit-resource vlan minimum 16 maximum 4094
  limit-resource monitor-session minimum 0 maximum 2
  limit-resource monitor-session-erspan-dst minimum 0 maximum 23
  limit-resource vrf minimum 2 maximum 4096
  limit-resource port-channel minimum 0 maximum 768
  limit-resource u4route-mem minimum 96 maximum 96
  limit-resource u6route-mem minimum 24 maximum 24
  limit-resource m4route-mem minimum 58 maximum 58
  limit-resource m6route-mem minimum 8 maximum 8
  limit-resource monitor-session-inband-src minimum 0 maximum 1
vdc tinyVdc id 2
  limit-resource module-type f2
  allow feature-set fabricpath
  allow feature-set fex
  allow feature-set mpls
  cpu-share 5
  allocate interface Ethernet4/5-8
  boot-order 1
  limit-resource vlan minimum 16 maximum 4094
  limit-resource monitor-session minimum 0 maximum 2
  limit-resource monitor-session-erspan-dst minimum 0 maximum 23
  limit-resource vrf minimum 2 maximum 4096
  limit-resource port-channel minimum 0 maximum 768
  limit-resource u4route-mem minimum 8 maximum 8
  limit-resource u6route-mem minimum 4 maximum 4
  limit-resource m4route-mem minimum 8 maximum 8
  limit-resource m6route-mem minimum 5 maximum 5
  limit-resource monitor-session-inband-src minimum 0 maximum 1
Connect to new VDC and initial configuration
Connecting to the new VDC command line is also easy, just use switchto vdc tinyVdc command.
nexus7000# switchto vdc tinyVdc

         ---- System Admin Account Setup ----

Do you want to enforce secure password standard (yes/no) [y]: y

  Enter the password for "admin":
  Confirm the password for "admin":

         ---- Basic System Configuration Dialog VDC: 6 ----

This setup utility will guide you through the basic configuration of
the system. Setup configures only enough connectivity for management
of the system.

Please register Cisco Nexus7000 Family devices promptly with your
supplier. Failure to register may affect response times for initial
service calls. Nexus7000 devices must be registered to receive
entitled support services.

Press Enter at anytime to skip a dialog. Use ctrl-c at anytime
to skip the remaining dialogs.

Would you like to enter the basic configuration dialog (yes/no): yes

  Create another login account (yes/no) [n]: n
  Configure read-only SNMP community string (yes/no) [n]: n
  Configure read-write SNMP community string (yes/no) [n]: n
  Enter the switch name : yinyVdc

  Continue with Out-of-band (mgmt0) management configuration? (yes/no) [y]: y
    Mgmt0 IPv4 address : 4.4.4.4
    Mgmt0 IPv4 netmask : 255.255.255.0
  Configure the default gateway? (yes/no) [y]: y
    IPv4 address of the default gateway : 4.4.4.1
  Configure advanced IP options? (yes/no) [n]: n
  Enable the telnet service? (yes/no) [n]: n
  Enable the ssh service? (yes/no) [y]: y
    Type of ssh key you would like to generate (dsa/rsa) [rsa]:
    Number of rsa key bits <1024-2048> [1024]:
  Configure default interface layer (L3/L2) [L3]: L3
  Configure default switchport interface state (shut/noshut) [shut]: shut

The following configuration will be applied:
  password strength-check
  switchname tinyVdc
vrf context management
ip route 0.0.0.0/0 4.4.4.1
exit
  no feature telnet
  ssh key rsa 1024 force
  feature ssh
  no system default switchport
  system default switchport shutdown
interface mgmt0
ip address 4.4.4.4 255.255.255.0
no shutdown

Would you like to edit the configuration? (yes/no) [n]: n
Use this configuration and save it? (yes/no) [y]: y

[########################################] 100%
Copy complete.

Cisco Nexus Operating System (NX-OS) Software
TAC support: http://www.cisco.com/tac
Copyright (c) 2002-2012, Cisco Systems, Inc. All rights reserved.
The copyrights to certain works contained in this software are
owned by other third parties and used and distributed under
license. Certain components of this software are licensed under
the GNU General Public License (GPL) version 2.0 or the GNU
Lesser General Public License (LGPL) Version 2.1. A copy of each
such license is available at
http://www.opensource.org/licenses/gpl-2.0.php and
http://www.opensource.org/licenses/lgpl-2.1.php

tinyVdc#
The last point in this quick guide is to check if the interfaces were allocated to the tinyVdc with the show interface brief.
tinyVdc# show interface brief

--------------------------------------------------------------------------------
Port   VRF          Status IP Address                              Speed    MTU
--------------------------------------------------------------------------------
mgmt0  --           up     4.4.4.4                                 1000     1500

--------------------------------------------------------------------------------
Ethernet      VLAN    Type Mode   Status  Reason                   Speed     Por
t
Interface                                                                    Ch
#
--------------------------------------------------------------------------------
Eth4/5        --      eth  routed down    Administratively down      auto(D) --
Eth4/6        --      eth  routed down    Administratively down      auto(D) --
Eth4/7        --      eth  routed down    Administratively down      auto(D) --
Eth4/8        --      eth  routed down    Administratively down      auto(D) --
Configuring virtual PortChannel (vPC)
With Nexus platform, Cisco came with a neat way of having redundancy with portChannel across two physical Nexus switches and this way you can completely avoid spanning tree on major uplinks between layers (access to distribution or distribution to core).
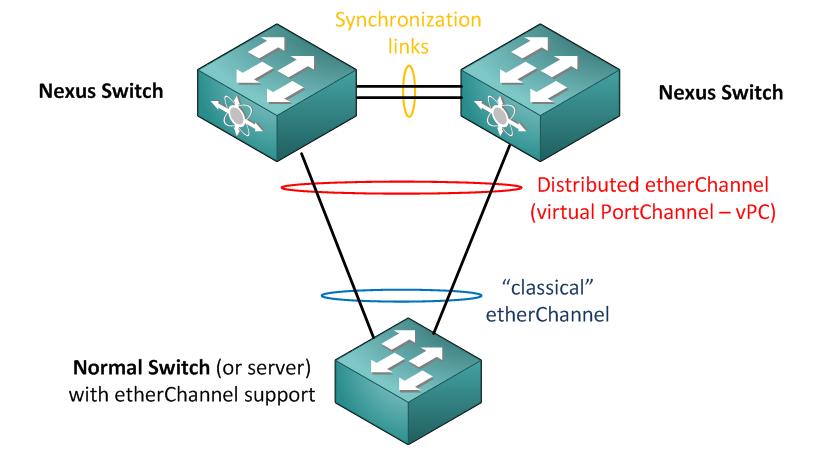
The best thing with this logical ether channels is that the Spanning tree has no chance to block any links. To ilustrate this, imagine the typical CORE – DISTRIBUTION – ACCESS layers with Spanning Tree enabled:
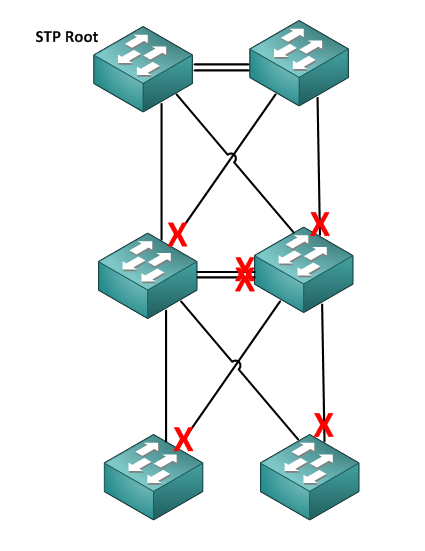
This is something you can very easily avoid with Nexus switches using vPC (and even more simply with HP Switches running IRF that are cheaper 😛 – I said that I am no longer Cisco fanboy).
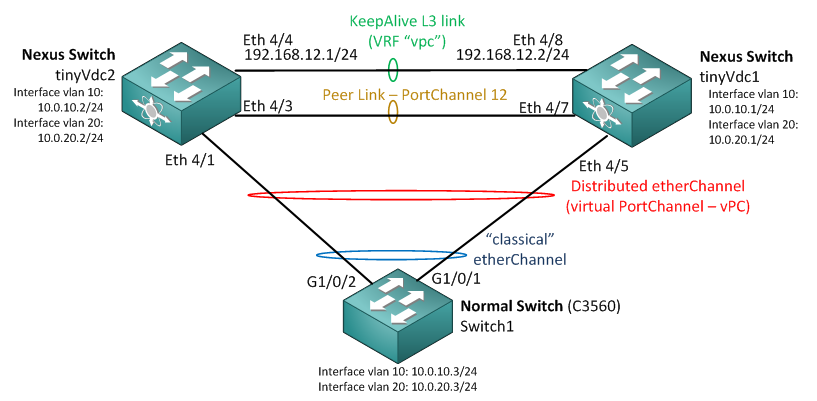
vPC example configuration
So lets create a quick vPC configuration example, this is how the LAB topology will look like.
Step 1 activate vpc feature
The first command we need to use is to enable the vpc feature with feature vpc command followed by creation of the vpc domain with vpc domain <#num> command.
tinyVdc1(config)# feature vpc
tinyVdc1(config)# vpc domain 12
Now that we simple enabled vpc and configured a domain, we can check the status of the domain with show vpc, but we will not see anything because nothing is really configured yet.
tinyVdc1(config-vpc-domain)# show vpc

Legend:
                (*) - local vPC is down, forwarding via vPC peer-link

vPC domain id                     : 12
Peer status                       : peer link not configured
vPC keep-alive status             : Disabled
Configuration consistency status  : failed
Per-vlan consistency status       : failed
Configuration inconsistency reason: vPC peer-link does not exist
Type-2 consistency status         : failed
Type-2 inconsistency reason       : vPC peer-link does not exist
vPC role                          : none established
Number of vPCs configured         : 0
Peer Gateway                      : Disabled
Dual-active excluded VLANs        : -
Graceful Consistency Check        : Disabled (due to peer configuration)
Auto-recovery status              : Disabled
Step 2 Create VRF “vpc” and create an L3 keepalive link between the two Nexus switches.
First, create the VRF called “vpc”, inside will be the keepalive link and a few other features later.
tinyVdc1(config)# vrf context vpc
tinyVdc1(config-vrf)# exit
Next, lets configure the synchronization lync between tinyVdc1 and tinyVdc2.
On tinyVdc1, the synchronization link is Eth4/8, this is how to configure it (repeat a mirror configuration on the neighbor).
tinyVdc1(config)# interface ethernet 4/8
tinyVdc1(config-if)# vrf member vpc
tinyVdc1(config-if)# ip address 192.168.12.2
tinyVdc1(config-if)# no shutdown
Also a good idea before moving forward is to test the connection to the neighbor
tinyVdc1(config-if)# ping 192.168.12.1 vrf vpc

PING 192.168.12.1 (192.168.12.1): 56 data bytes
36 bytes from 192.168.12.2: Destination Host Unreachable
Request 0 timed out
64 bytes from 192.168.12.1: icmp_seq=1 ttl=254 time=0.86 ms
64 bytes from 192.168.12.1: icmp_seq=2 ttl=254 time=0.743 ms
64 bytes from 192.168.12.1: icmp_seq=3 ttl=254 time=0.755 ms
64 bytes from 192.168.12.1: icmp_seq=4 ttl=254 time=0.907 ms

--- 192.168.12.1 ping statistics ---
5 packets transmitted, 4 packets received, 20.00% packet loss
round-trip min/avg/max = 0.743/0.816/0.907 ms
The last part of this step is to configure this as keepalive link for the vpc domain
tinyVdc1(config)# vpc domain 12
tinyVdc1(config-vpc-domain)# peer-keepalive destination 192.168.12.1 source 192.168.12.2 vrf vpc
Before moving forward, check the keepalive status with show vpc peer-keepalive command, if you already configured also your second Nexus switch, you should see a status as “Success” just like below.
tinyVdc1(config-vpc-domain)# show vpc peer-keepalive

vPC keep-alive status             : peer is alive
--Peer is alive for             : (107) seconds, (217) msec
--Send status                   : Success
--Last send at                  : 2013.07.30 09:43:36 724 ms
--Sent on interface             : Eth4/8
--Receive status                : Success
--Last receive at               : 2013.07.30 09:43:36 646 ms
--Received on interface         : Eth4/8
--Last update from peer         : (0) seconds, (817) msec

vPC Keep-alive parameters
--Destination                   : 192.168.12.1
--Keepalive interval            : 1000 msec
--Keepalive timeout             : 5 seconds
--Keepalive hold timeout        : 3 seconds
--Keepalive vrf                 : vpc
--Keepalive udp port            : 3200
--Keepalive tos                 : 192
Step 3 Configure a vPC Peer Link
For the real traffic, we have to create a vPC Peer Link, on our tinyVdc1, this will be the Eth4/7.
tinyVdc1(config)# interface 4/7
tinyVdc1(config-if)# switchport
tinyVdc1(config-if)# switchport mode trunk
tinyVdc1(config-if)# channel-group 12 mode on
Now we enter into port-channel 12 interface and configure it as vPC peer link
tinyVdc1(config)# interface po 12
tinyVdc1(config-if)# vpc peer-link

Please note that spanning tree port type is changed to "network" port type on vPC peer-link.
This will enable spanning tree Bridge Assurance on vPC peer-link provided the STP Bridge Assurance
(which is enabled by default) is not disabled.

tinyVdc1(config-if)# exit
To check Peer Link status, you can use vpc consistency-parameters global command. Right now we do not have our neighbor (peer) Nexus configured, so the output looks like this:
tinyVdc1(config)# show vpc consistency-parameters global

    Legend:
        Type 1 : vPC will be suspended in case of mismatch

Name                        Type  Local Value            Peer Value
-------------               ----  ---------------------- -----------------------
STP Mode                    1     Rapid-PVST             -
STP Disabled                1     None                   -
STP MST Region Name         1     ""                     -
STP MST Region Revision     1     0                      -
STP MST Region Instance to  1                            -
 VLAN Mapping
STP Loopguard               1     Disabled               -
STP Bridge Assurance        1     Enabled                -
STP Port Type, Edge         1     Normal, Disabled,      -
BPDUFilter, Edge BPDUGuard        Disabled
STP MST Simulate PVST       1     Enabled                -
Allowed VLANs               -     1                      -
Local suspended VLANs       -     1                      -
Do the mirror configuration of Peer Link on the neighbor Nexus switch and then check show vpc consistency-parameters global for peer information again. If you did everything correctly, this is how the output should look like:
tinyVdc1(config)# show vpc consistency-parameters global

    Legend:
        Type 1 : vPC will be suspended in case of mismatch

Name                        Type  Local Value            Peer Value
-------------               ----  ---------------------- -----------------------
STP Mode                    1     Rapid-PVST             Rapid-PVST
STP Disabled                1     None                   None
STP MST Region Name         1     ""                     ""
STP MST Region Revision     1     0                      0
STP MST Region Instance to  1
 VLAN Mapping
STP Loopguard               1     Disabled               Disabled
STP Bridge Assurance        1     Enabled                Enabled
STP Port Type, Edge         1     Normal, Disabled,      Normal, Disabled,
BPDUFilter, Edge BPDUGuard        Disabled               Disabled
STP MST Simulate PVST       1     Enabled                Enabled
Allowed VLANs               -     1                      1
Local suspended VLANs       -     -                      -
It is also a good idea to check the vpc domain if we have “peer adjacency formed ok” in show vpc:
tinyVdc1(config)# show vpc

Legend:
                (*) - local vPC is down, forwarding via vPC peer-link

vPC domain id                     : 12
Peer status                       : peer adjacency formed ok
vPC keep-alive status             : peer is alive
Configuration consistency status  : success
Per-vlan consistency status       : success
Type-2 inconsistency reason       : Consistency Check Not Performed
vPC role                          : secondary
Number of vPCs configured         : 0
Peer Gateway                      : Disabled
Dual-active excluded VLANs        : -
Graceful Consistency Check        : Enabled
Auto-recovery status              : Disabled
Step 4 Configure interface VLAN on all lab switches for VLAN 10 and VLAN 20
Now the easy (and known by all part), simply create on all three switches the interface VLANs as on the diagram below.
This is configuration on tinyVdc1 (you should know how to do tinyVdc2):
tinyVdc1(config)# vlan 10,20
tinyVdc1(config-vlan)# exit
tinyVdc1(config-vlan)# interface vlan 10
tinyVdc1(config-if)# ip address 10.0.10.1/24
tinyVdc1(config-if)# no shutdown
tinyVdc1(config-if)# interface vlan 20
tinyVdc1(config-if)# ip address 10.0.20.1/24
tinyVdc1(config-if)# no shutdown
This is a configuration for the bottom “classic” IOS switch called “Switch1”:
Switch1(config)# vlan 10,20
Switch1(config-vlan)# exit
Switch1(config)# interface vlan 10
Switch1(config-if)# ip address 10.0.10.3 255.255.255.0
Switch1(config)# no shutdown
Switch1(config-vlan)# interface vlan 20
Switch1(config-if)# ip address 10.0.20.3 255.255.255.0
Switch1(config)# no shutdown
Step 5 Configure vPC etherChannel on Nexus 7000 and classical etherChannel on IOS switch
This is the most interesting step because you will notice how simply it is now (and similar to the “normal” way of configuring it) on Nexus tinyVdc1:
tinyVdc1(config)# interface ethernet 4/5
tinyVdc1(config-if)# switchport
tinyVdc1(config-if)# switchport mode trunk
tinyVdc1(config-if)# channel-group 2
tinyVdc1(config-if)# exit
tinyVdc1(config-if)# interface port-channel 2
tinyVdc1(config-if)# vpc 2
Now for the Switch1:
Switch1(config)# interface GigabitEthernet1/0/1
Switch1(config-if)# channel-group 2
Switch1(config-if)# interface GigabitEthernet1/0/2
Switch1(config-if)# channel-group 2
Switch1(config-if)# interface Port-channel 2
Switch1(config-if)# switchport trunk encapsulation dot1q
Switch1(config-if)# switchport mode trunk
Step 6 Verification
First, lets check our vPC with show vpc, this will not only show us the peer-link and other core information, but will display all the port-channels that exist for that vPC domain.
tinyVdc1(config-if)# show vpc

Legend:
                (*) - local vPC is down, forwarding via vPC peer-link

vPC domain id                     : 12
Peer status                       : peer adjacency formed ok
vPC keep-alive status             : peer is alive
Configuration consistency status  : success
Per-vlan consistency status       : success
Type-2 consistency status         : success
vPC role                          : secondary
Number of vPCs configured         : 2
Peer Gateway                      : Disabled
Dual-active excluded VLANs        : -
Graceful Consistency Check        : Enabled
Auto-recovery status              : Disabled

vPC Peer-link status
---------------------------------------------------------------------
id   Port   Status Active vlans
--   ----   ------ --------------------------------------------------
1    Po12   up     1,10,20

vPC status
----------------------------------------------------------------------
id   Port   Status Consistency Reason                     Active vlans
--   ----   ------ ----------- ------                     ------------
2    Po2    up     success     success                    1,10,20
NOTE: In one vPC domain, you can have multiple ether-channel groups, this is not problem. Feel free to extend this lab and create another vPC ether-channel with another simple switch and assign it to the same vPC domain. It will simply show the new ether-channel in the list below.
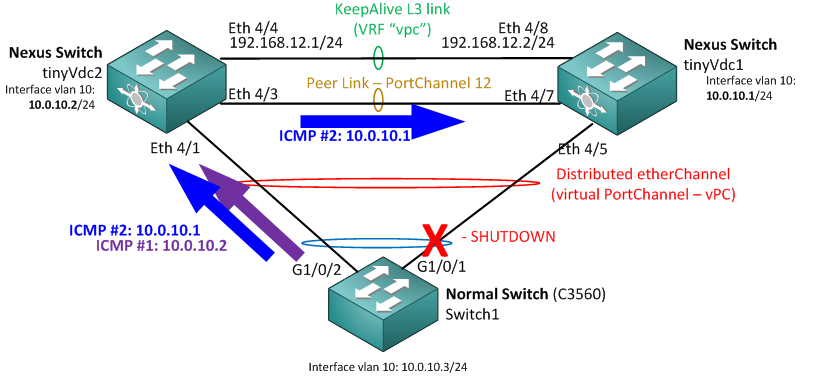
Second test that you can make is to actually shutdown the interfaces on the IOS Switch1 below and test ping to both Nexus switches in the vPC. I will leave the commands to you as the shutdown and ping is well known, but this is how the test might look like:
vPC Test Step 1: Shutdown one interface + PING both Nexus routers
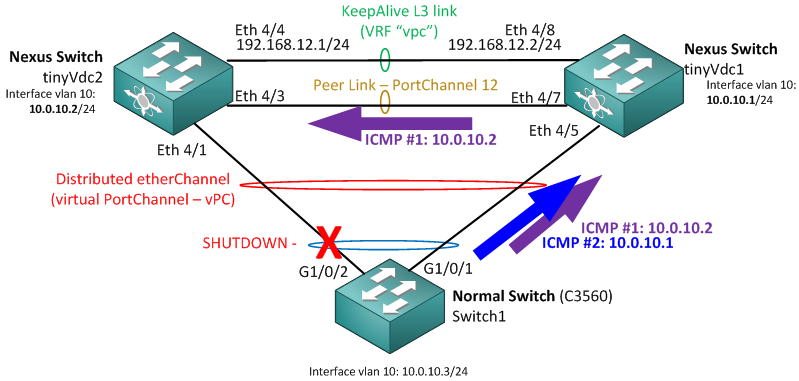
vPC Test Step 2: Shutdown the second interface + PING both Nexus routers
Summary
What can I say, Nexus product line is Cisco’s main switch for datacenter environment and features like vPC are essential for it. What however I really miss on Nexus is the virtualization technology like HP IRF (which is actually much more powerful then vPC). Something like the what is available on Catalyst 6500 called VSS that makes two physical devices to become one logical devices similarly like stacking on normal switches (actually even here is HP IRF more powerful as it doesn’t have a limit of only 2 devices and for the actual stacking HP use classical ethernet/optical 10Gbps SFP ports and not proprietary cables, this enables creating Geo-Clusters of virtual switches across two data-centers via DWDM).
In this article, I have shown the basic and essential L2 features that is needed when jumping from IOS switches like catalysts to Nexus for building L2 networks. If I will have time I plan to show a second article as “part 2” that would show another important group and that are FlexExtenders and hopefully a little FibreChannel if I get my hands on such equipment.
Very clear simple informative…Thanks a lot fr sharing 🙂
Thanks for info! Good explaination..
very clear and informative!
We have VSS & Nexus.
They can both have a role.
Need FCOE – cross off VSS
Don’t want HSRP/GLBP/VRRP – cross off Nexus
Want to manage a “single” box – cross off Nexus.
Want config failures to only impact one chassis – cross off VSS.
Need VDC .. cross off VSS
Well, and we in HP have IRF technology on all our A-Series swtiches, which makes them possible to combine from 2 to 4 (on some series up to 7) physical swtiches into one logical device (like VSS) over any 10Gbps connection (even geographically away from each other over DWDM if under 2ms)….
… so we get the main features of the Nexus+VSS+VDC for much lower price point compared to Cisco. Also configuration is more simple as things like distributed trunking doesn’t need any management or synchronization vlan configuration like on cisco.
Do not take me wrong, I do not want to sound like HP or anti-Cisco fanboy, but as I have bot Nexus and HP A-Series under my control in production environment, my experience is that I get much more for the money by not going with Cisco also on the datacenter level for L2/L3 forwarding where Cisco was dominant only 3-5 years ago.